
The Responsive Addons for Elementor (RAE) Login / Register widget allows you to create a simple login/registration form for your website where people can create accounts and enjoy any login-related features.
Content
General

- 1.Form Type: Choose which form you want to display on site load.
- 2.Hide all Forms from Logged-in Users: Checking this will hide both forms from logged-in users.
- 3.LOGIN Form General Settings:
- 1.Show Logout Message/Link: Checking this will display a message for logged-in users along with a logout link.
- 2.Show “Forgot Password?”: Displays “Forgot Password?” as a link on the form.
- 3.Forgot Password Text: Enter text to display in the form as the link. Default: “Forgot Password?”.
- 4.Forgot Password Redirects To: On click, redirect to default WordPress forgot password page or select custom URL.
- 5.Custom Forgot Password URL: Enter a custom URL to redirect to on click.
- 6.Show “Remember Me” Checkbox: Displays the checkbox for “Remember Me”.
- 7.Remember Me Text: Enter text to display for remember me checkbox.
- 8.Show “Register” Link: Display a link to the registration form.
- 9.Register Link Text: Enter Text to be displayed on the form.
- 10.Registration Link Action: “WordPress Registration Page” takes you to the default page in WordPress for registration. “Show Register Form” will link to the widget made registration form. To link to another form, select “Custom URL”.
- 11.Custom Register URL: Enter a custom URL to redirect the user.
- 12.Enable Google reCAPTCHA: Display Google reCAPTCHA v2 before login button.Note: Site key and Secret key must be entered from Responsive Addons for Elementor (RAE) Admin Settings for this to work.
- 4.REGISTER Form General Settings:
- 1.Show Login Link: Checking this will display a link for the login form on the registration form.
- 2.Login Link Text: Enter text to be displayed.
- 3.Login Link Action: “Default WordPress Page” takes you to the default page in WordPress for Login. “Show Login Form” will link to the widget made login form. To link to another form, select “Custom URL”.
- 4.Custom Login URL: Enter a custom URL to redirect the user.
- 5.Enable Google reCAPTCHA: Display Google reCAPTCHA v2 before login button.Note: Site key and Secret key must be entered from Responsive Addons for Elementor (RAE) Admin Settings for this to work.
Additional Form Content

- 1.Form Image: Choose an image to be displayed next to the form.
- 2.Image Size: Choose image size to “Contain” or “Cover” within its container.
- 3.Image Position (X & Y axis): Align the image along the X & Y axis.
- 4.Form Image Width (%): Adjust the image width.
- 5.Image Position: Display the image to the left or right of the form.
- 6.Logo: Choose an image to be displayed as a logo on the top of the form.
- 7.Logo Position: Display the logo next to the form heading text or on a line of its own.
- 8.Login Form Title: Enter title text for the login form.
- 9.Login Form Subtitle: Enter subtitle text for the login form.
- 10.Register Form Title: Enter title text for the register form.
- 11.Register Form Subtitle: Enter subtitle text for the register form.
Login Form Fields

- 1.Labels & Placeholders: Select “Custom” for entering your own labels & placeholders.
- 2.Show Label: Whether to display input labels or not.
- 3.Labels:
- 1.Username Label: Enter text for username/email input label.
- 2.Password Label: Enter text for password input label.
- 4.Placeholders:
- 1.Username Placeholder: Enter text for username/email input placeholder.
- 2.Password Placeholder: Enter text for password input placeholder.
- 5.Login Button > Button Text: Enter text to be displayed for the login button.
Login Form Options

- 1.Redirect After Login: Auto-redirect a user to the URL entered after a successful login.Note: Only URLs in context of the current domain are allowed.
Register Form Fields

- 1.Fields Repeater: Shows the total number of form fields. Drag and drop to change their position, duplicate or delete or add a field. Upon clicking on a field, it will open settings for it. You can select the content for the field from here. Each field has separate settings available.
- 1.Type: Choose the type of input field.
- 2.Label: Enter input field label.
- 3.Placeholder: Enter input field placeholder.
- 4.For Password Field:
- 1.Enforce Password Rules: Force a predefined password format to improve account security.
- 2.Password Visibility Icon: Toggling this will hide/show the “Show Password” button for the password field.
- 5.Show Label: Whether to display input labels or not.
- 6.Show Required Mark: Whether to display “ * ” after a required field.
- 7.Register Button > Button Text: Enter text to be displayed for the register button.
Register Form Options
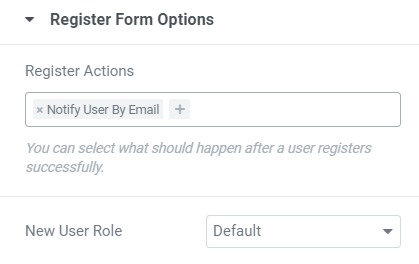
- 1.Register Actions: Auto perform certain actions after a successful registration. Actions include “Notify User By Email”, “Auto Login” & “Redirect”.
- 2.New User Role: Choose a role for when a user registers themselves on your website. Default takes the default WordPress role set in WordPress admin settings.
Register User Email Options

- 1.Email Template Type: Default uses WordPress default email template. Choose “Custom” to create your own template.
- 2.Email Subject: Enter the subject of the email.
- 3.Email Message: Enter the body text of your email. You can also use a select few shortcodes such as [password], [username], [email], [firstname],[lastname], [website], [loginurl], [password_reset_link] and [sitetitle] to render content dynamically.
- 4.Email Content Type: Choose content to be as HTML or plain text.
Register Admin Email Options

- 1.Email Template Type: Default uses WordPress default email template. Choose “Custom” to create your own template.
- 2.Email Subject: Enter the subject of the email.
- 3.Email Message: Enter the body text of your email. You can also use a select few shortcodes such as [username], [email], [firstname], [lastname], [website], [loginurl] and [sitetitle] to render content dynamically.
- 4.Email Content Type: Choose content to be as HTML or plain text.
Terms & Conditions

- 1.Show “Terms & Conditions” Checkbox: Toggles whether a checkbox for terms & conditions should be displayed on the form.
- 2.Acceptance Label: Displays the text next to the terms & conditions checkbox.
- 3.Content Source: Select the source of terms & conditions.
- 4.Terms & Conditions: If “Editor” is selected then this textbox will appear for you to type which will be displayed above the checkbox.
- 5.Terms & Conditions URL: Enter URL linking to the terms & conditions page.
Validation Messages

- 1.Error Messages:
- 1.Invalid Email: Error message for when an invalid email is used.
- 2.Email is missing: Error message for when email field is not submitted.
- 3.Already Used Email: Error message for when an email is already in use.
- 4.Invalid Username: Error message for when entered username is invalid or does not hold up to username standards.
- 5.Username is already in use: Error message for when an username already exists.
- 6.Invalid Password: Error message for when a wrong password is submitted.
- 7.Invalid Confirm Password: Error message for when password and confirm password does not match.
- 8.Already Logged In: Error message for when a logged in user tries to submit the form.
- 9.Terms & Conditions Error: Error message for when the terms & conditions are not accepted when submitting the form.
- 10.reCAPTCHA Failed: Error message for when the reCAPTCHA is not checked or fails.
- 11.Other Errors: Error message for when an unidentified error occurs.
- 2.Success Messages:
- 1.Successful Login: Success message for when a user logs in successfully.
- 2.Successful Registration: Success message for when a user registers successfully.
Style
General

- 1.Widget Container: Adjust the width, padding, border and background styles of the entire widget container.
- 2.Widget Container Box Shadow: Apply different box shadow properties.
- 3.Form Container: Adjust the width, padding, border and background styles of the entire form container.
- 4.Form Container Box Shadow: Apply different box shadow properties.
Login / Register Form Additional Styles


- 1.Form Image: Adjust the height, margin, padding and border styles of the form image.
- 2.Form Image Shadow: Apply different box shadow properties to the form image container.
- 3.Form Logo: Adjust the height, width, margin, padding and border styles of the form header logo.
- 4.Form Logo Shadow: Apply different box shadow properties to the form header logo.
- 5.Title: Change the margin, padding, color, background color and border styles for the header title.
- 6.Title Typography: Apply typography styles to the header title.
- 7.Subtitle: Change the margin, padding, color, background color and border styles for the header subtitle.
- 8.Subtitle Typography: Apply typography styles to the header subtitle.
Form Labels

- Adjust margin, padding, typography, color and background color for all labels of both forms.
- Password Visibility Style: Change the padding, icon size, eye open and close color for the show password button.
- Enforce Password: Change colors for valid or invalid conditions when enforcing password rules.
Form Input Fields

- Adjust the margin, padding, typography and text alignment for the form input fields.
- Colors & Border: Change the text color and border radius of the input fields. Allows to change the placeholder color and background color when an input field is focused or not.
- Terms & Conditions: Change the checked condition color for the terms & conditions checkbox.
Login / Register Button


Allows adjusting the margin and padding of the buttons along with adding borders and customizing the color and background color for when the button is hovered or not. Also, allows you to change the button height and width as you need.
Login / Register Form reCAPTCHA


Adjust the margin for reCAPTCHA. Also, allows you to change the theme between light and dark along with the size of the box being normal or compact.
Login / Register Link


Adjust the margin, padding and typography for the links of both forms. Additionally, you can display the link on its own line if needed by changing the display to “Block”. Beautify the link by changing its border properties and applying different colors and background colors for normal or in hover state. Furthermore, you can also adjust the link height and width.


