
↓ Skip to Main Content
Cyberchimps Logo

Main Navigation

  • Products
    • Responsive Theme
    • Responsive Plus Plugin
    • Responsive Addons for Elementor
    • Responsive Blocks Plugin
  • Starter Templates
    • Free Templates
    • Premium Templates
  • For Agencies
  • Pricing
  • Login
Get Started
Cyberchimps Logo

Off Canvas Menu

  • Products
    • Responsive Theme
    • Responsive Plus Plugin
    • Responsive Addons for Elementor
    • Responsive Blocks Plugin
  • Starter Templates
    • Free Templates
    • Premium Templates
  • For Agencies
  • Pricing
  • Login

Theme Installation & Updates

7
  • How to Delete a WordPress Theme
  • Precautions to take while working with a child theme
  • How to Create Your Account on Cyberchimps Responsive
  • FIX: Uploaded-file-exceeds-the-upload_max_filesize
  • Getting Error โ€“ The theme is missing the style.css stylesheet?
  • How to Install Responsive Theme
  • How to Download & Install Responsive Starter Template Plugin?

Responsive Theme Walkthrough

23
  • Blog/Archive Settings
  • Single Post Settings
  • Page Settings
  • Global Settings – Colors and Backgrounds
  • Global Settings – Form Fields
  • Global Settings – Button
  • How to Load Google Fonts Locally
  • How to Add Sidebar in Responsive Theme
  • Header and Footer Scripts in theme customizer
  • Global Typography Settings in Responsive Theme
  • Show Last Updated or Published Dates on Your Blog Posts
  • Create a Header Using Responsive Theme’s Header Builder
  • Create a Footer Using Responsive Themeโ€™s Footer Builder
  • Responsive Theme Typography Presets
  • How To Create A Sticky Header Using Cyberchimps Responsive Theme
  • How To Change The Copyright Footer Text In WordPress
  • How To Change Breadcrumbs Icon in Responsive Theme
  • How to adjust the width of sidebars from the customizer
  • Resize Logo From Theme Customizer
  • How to Add Breadcrumbs Using Responsive Theme?
  • Responsive Theme Settings
  • How to Add Related Posts Using Responsive Theme
  • Responsive Theme Widgets

FAQ

8
  • How To Enable Debug Log In WordPress
  • Download A .zip File Without Unzipping In Safari
  • How To Create An Admin User For Support In WordPress
  • Upgrading to 4.0.0 +
  • Upgrading to 4.1
  • Facing issues in importing Yoga Instructor Pro?
  • Yoast Seo Breadcrumb support in the theme
  • Updating to 4.2.0 results in the blank front end

Pre Sales / Billing FAQ

2
  • Billing FAQ
  • Pre Sales FAQ

Header Builder

12
  • How To Create Mobile Header With Responsive Theme’s Header Builder
  • How to Activate Live Search
  • Secondary Menu
  • HTML
  • Contact Info
  • Header Widgets
  • Header Social
  • Cart
  • Header Button
  • Search
  • Site Title and Logo
  • Primary Menu

Footer Builder

5
  • Footer Widgetsย 
  • Social
  • Scroll To Top
  • Copyright
  • Footer Menu
View Categories
  • Home
  • Docs
  • Responsive Theme
  • Responsive Theme Walkthrough
  • Single Post Settings

Single Post Settings

After installing Responsive Theme, from the WordPress dashboard navigate to Appearance > Customize > Blog/Archive > Single Post.

Letโ€™s see the different post design options you get with Responsive Theme:

Main Content Width – You can select the width of the content here for a single blog post.

Post Elements – Here you can set the order of Title, Meta, Featured Image and Content in which they appear. You need to drag the elements to change their order. Also you can toggle click on the eye icon in front of each element to show / hide that element on the page.
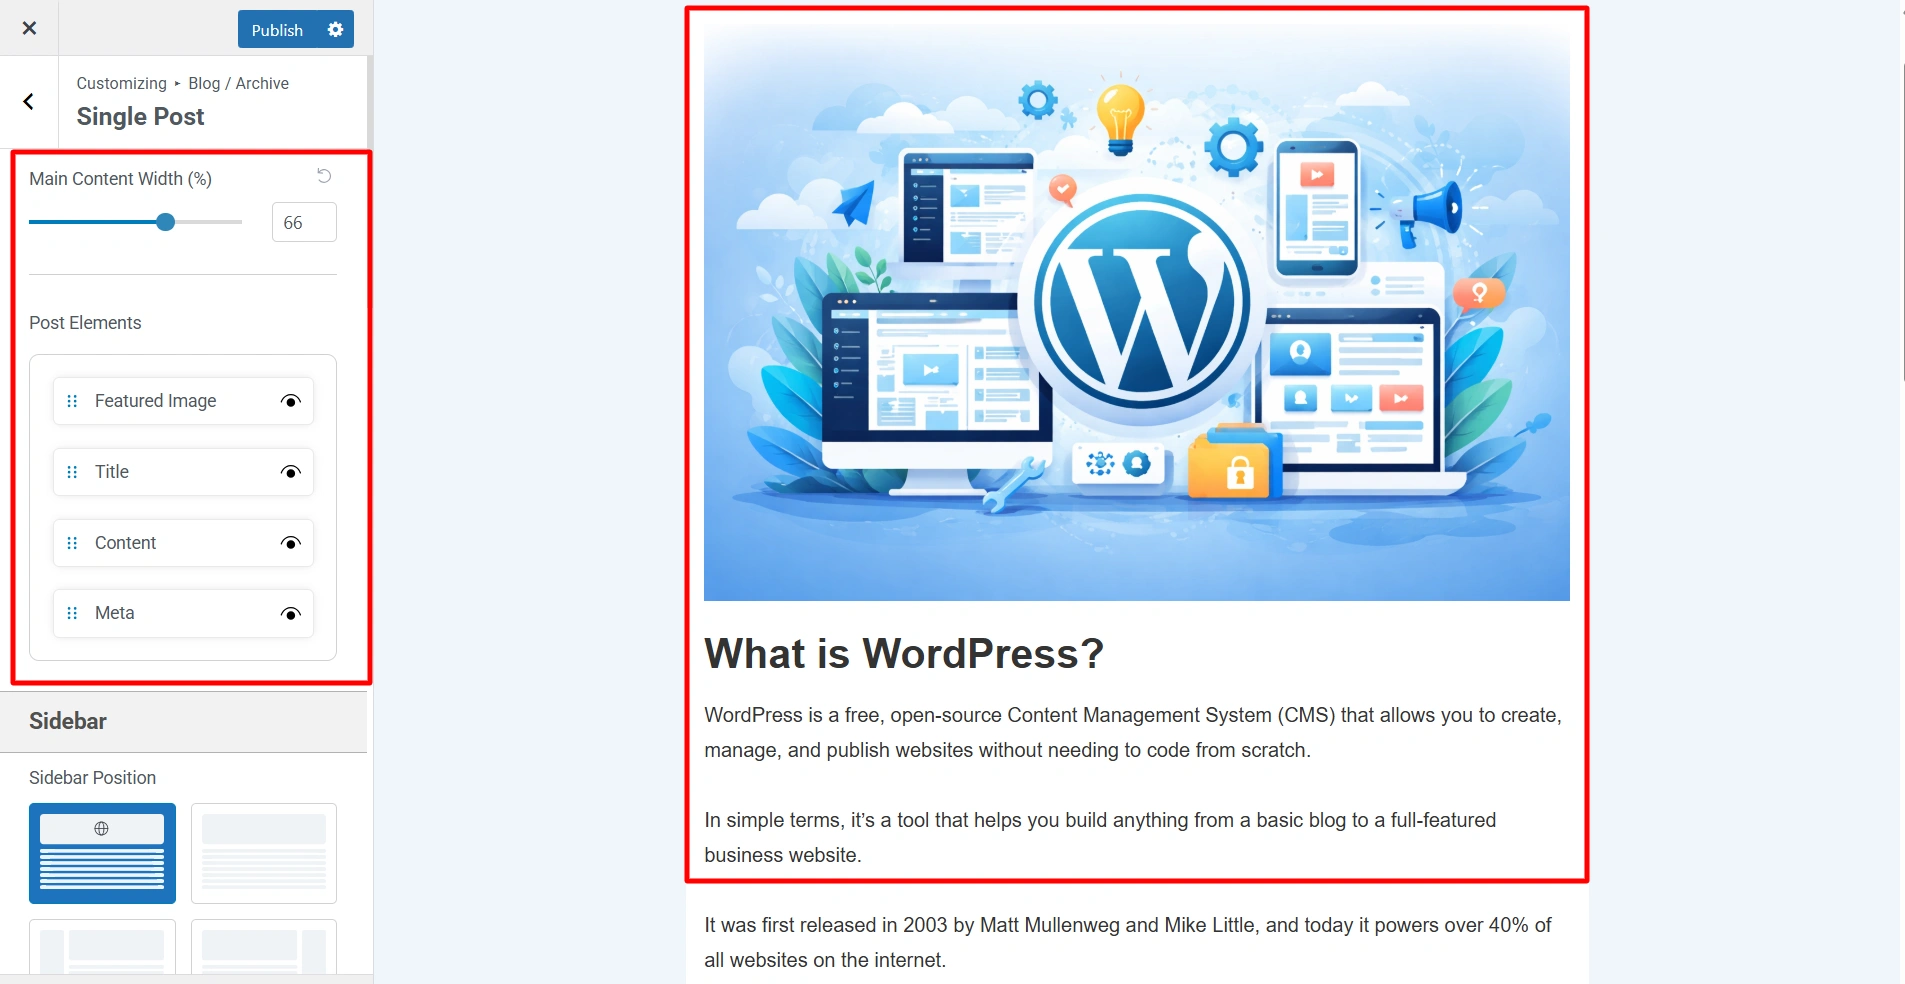
Post Elements in Single post settings

Sidebar – You can select a layout for single post pages from following options

  • Right Sidebar – Sidebar will appear on the right side. This is the most traditional way to show sidebar content.
  • Left Sidebar – Sidebar will appear on the left side and the main content will be on the right side.
  • No Sidebar – Sidebar will not be present and the content will span across the entire container width.
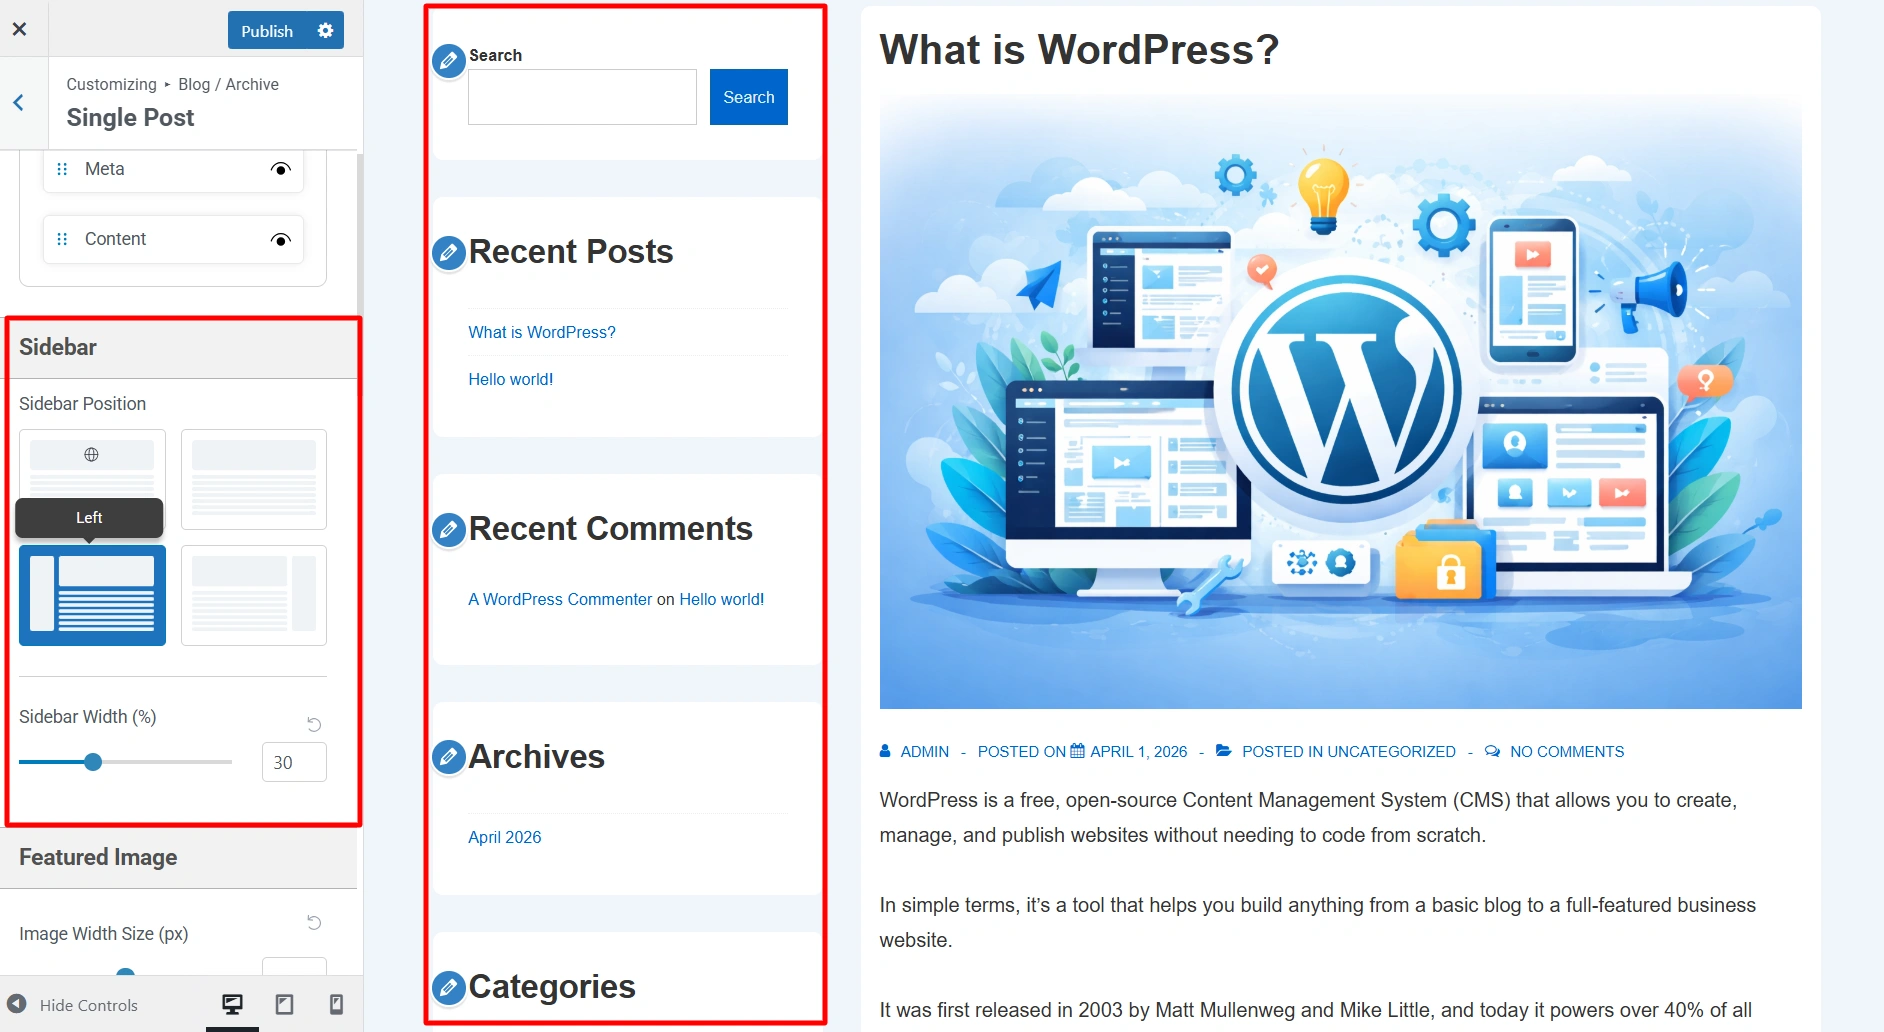
Sidebar options in Single Post settings

Featured Image

  • Image Width Size (px) – Update the Featured image width size by slider. Default value will be used when the slider is in the middle. Dragging the slider to left or right will decrease or increase the image width respectively. You can click the reset button next to the input field to get the default value.
  • Image Style – Here you can choose if you want to display the featured image of the blog as default or stretched.
  • Image Alignment – Here you can choose if you want to display the image at left, right or center.
  • Title Alignment – You can choose if you want to display the page title at left, right or center.
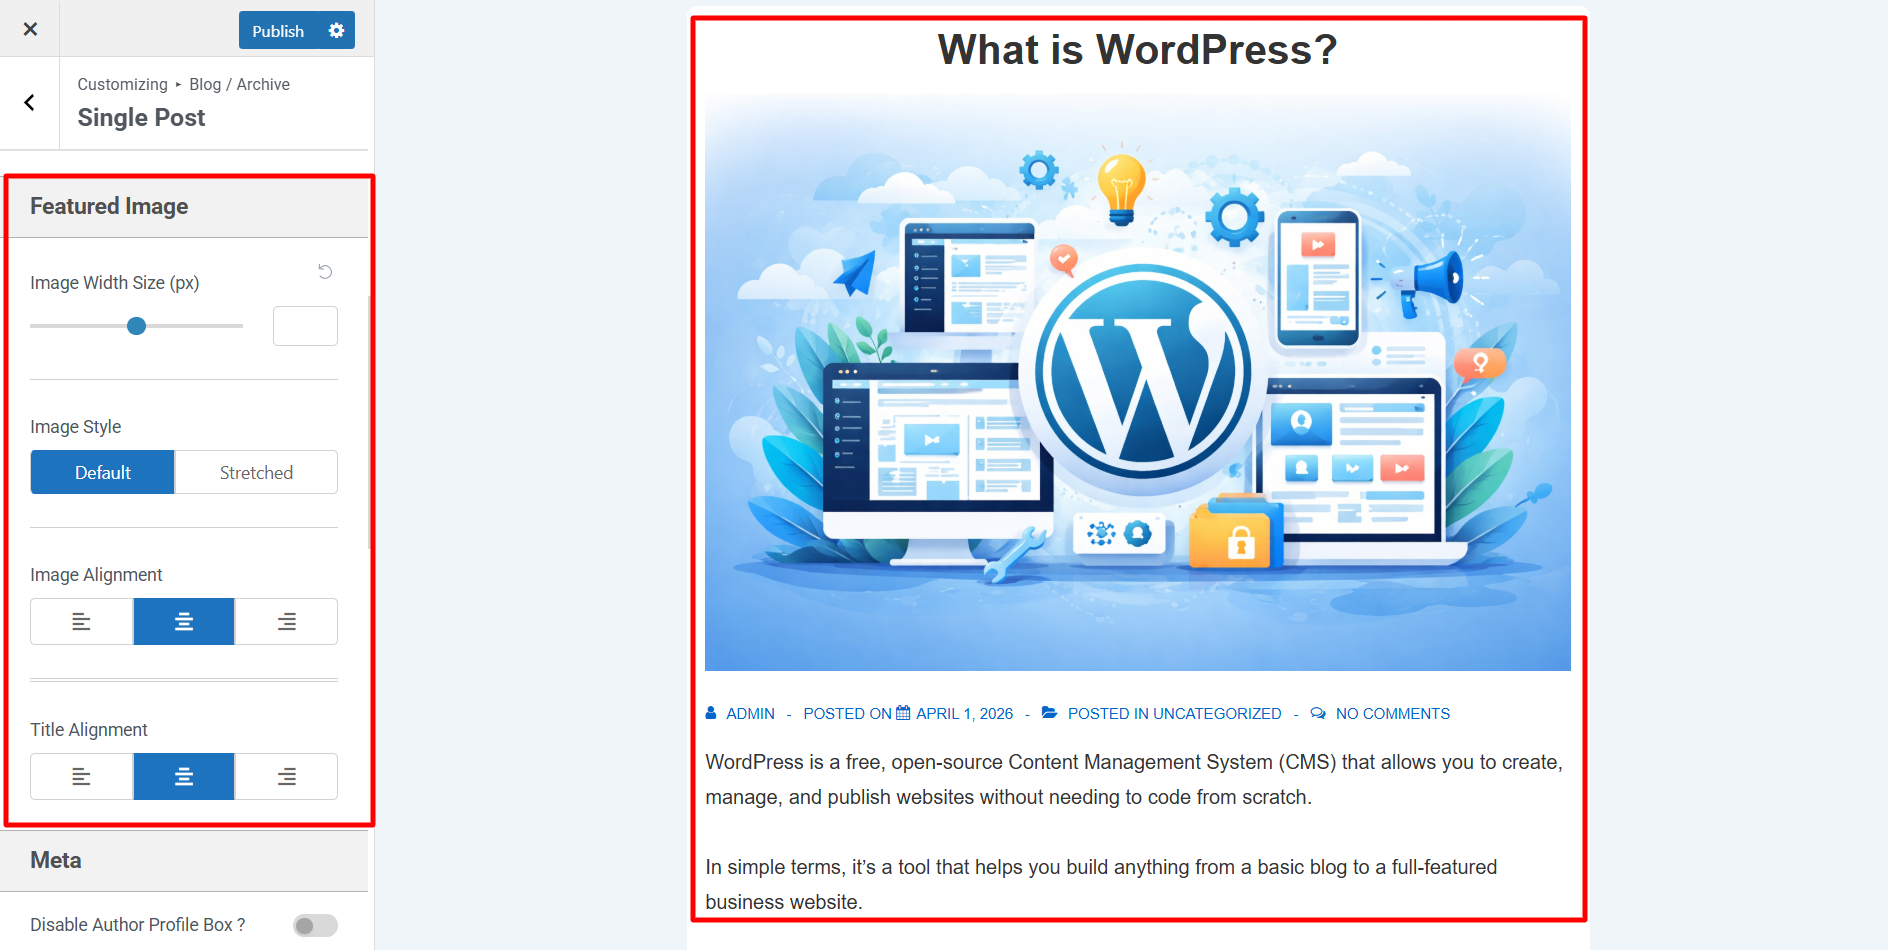
Featured image options in Single Post Settings

Meta

  • Disable Author Profile Box – Enable or disable the author’s biographical info after posts. Author biographical info can be added/updated from the user update page.
  • Meta Elements – If you have kept Meta elements visible in the above Post Elements options then you can decide the order and visibility of individual Post Meta including Author, Date Published, Categories, Comments, Tags, Last Updated.
  • Meta Separator – Here you can edit the separator that will be present in between different meta elements
  • Meta Alignment – Here you can choose if you want to display the meta of the blog page at left, right, or center.
  • Post Content Alignment – Here you can choose if you want to display the blog page content at left, right or center.
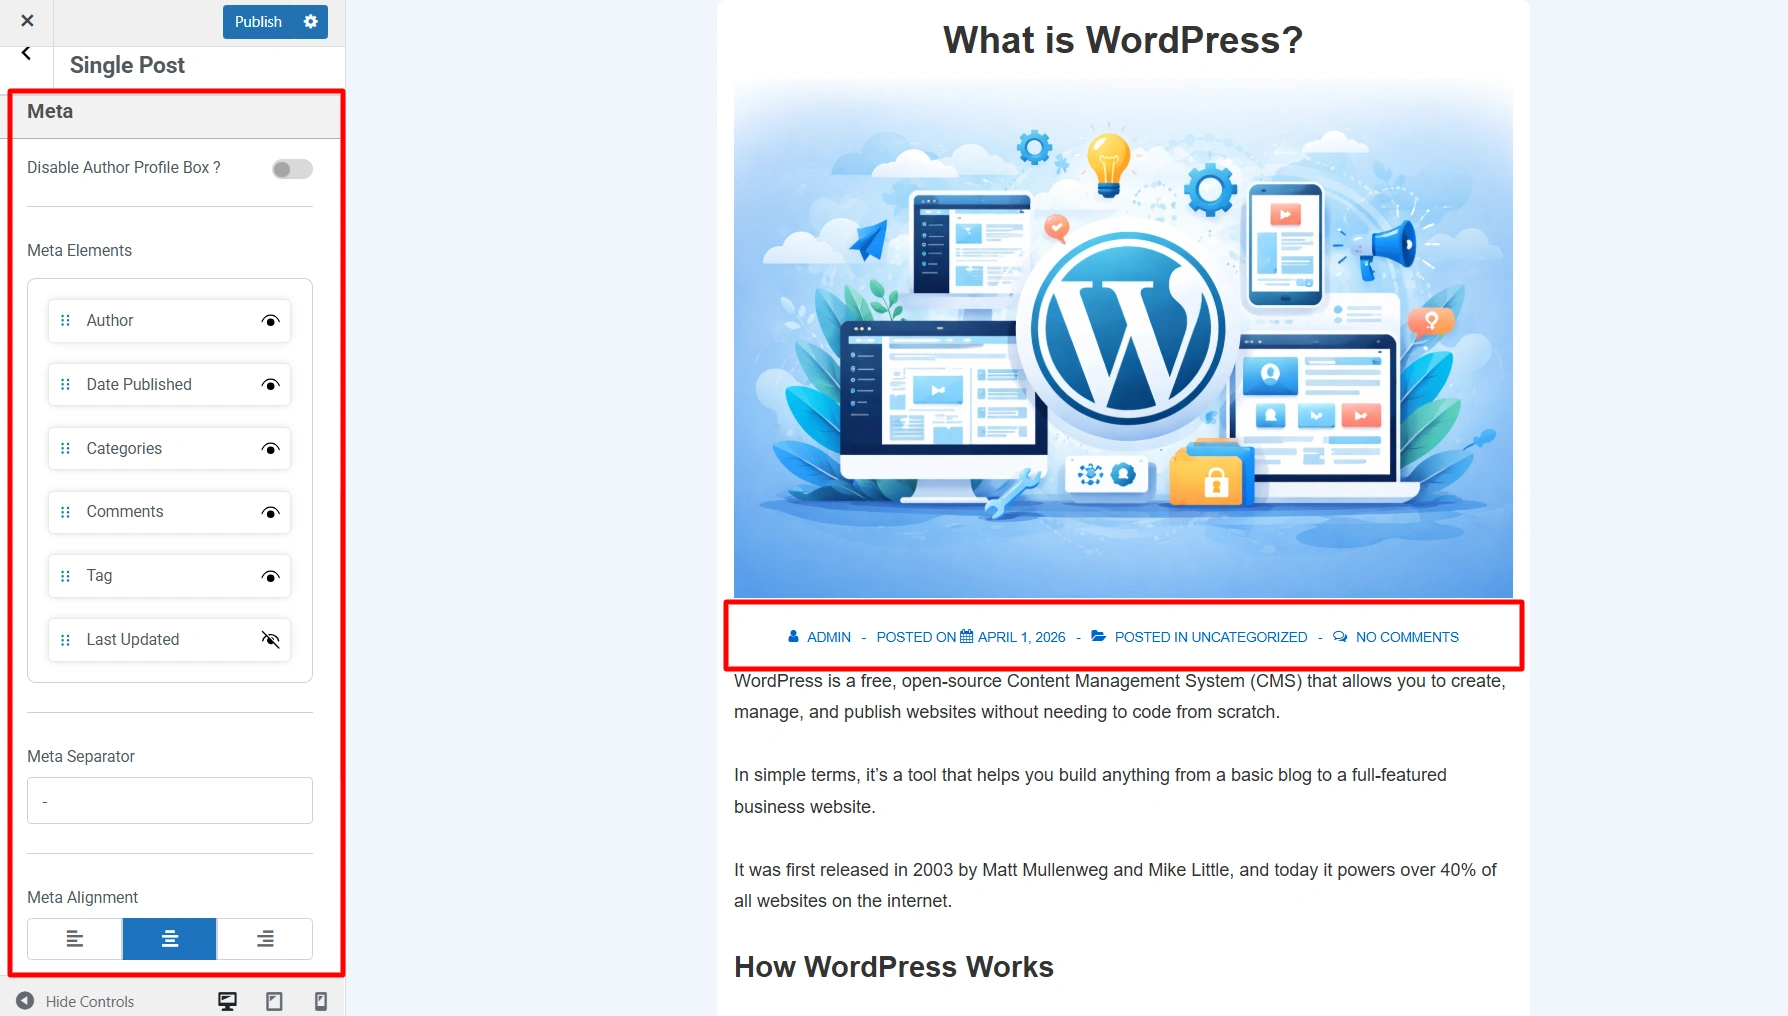
Meta elements in Single Post settings

Related Posts

  • Enable Related Posts – Toggle it on to display related posts at the end of each blog post.
  • Spacing – It lets you set the spacing around and within the related posts section. You get two options to do so:
    • Outside Container (px)
    • Inside Container (px)

This option allows you to add sidebar across your entire website.
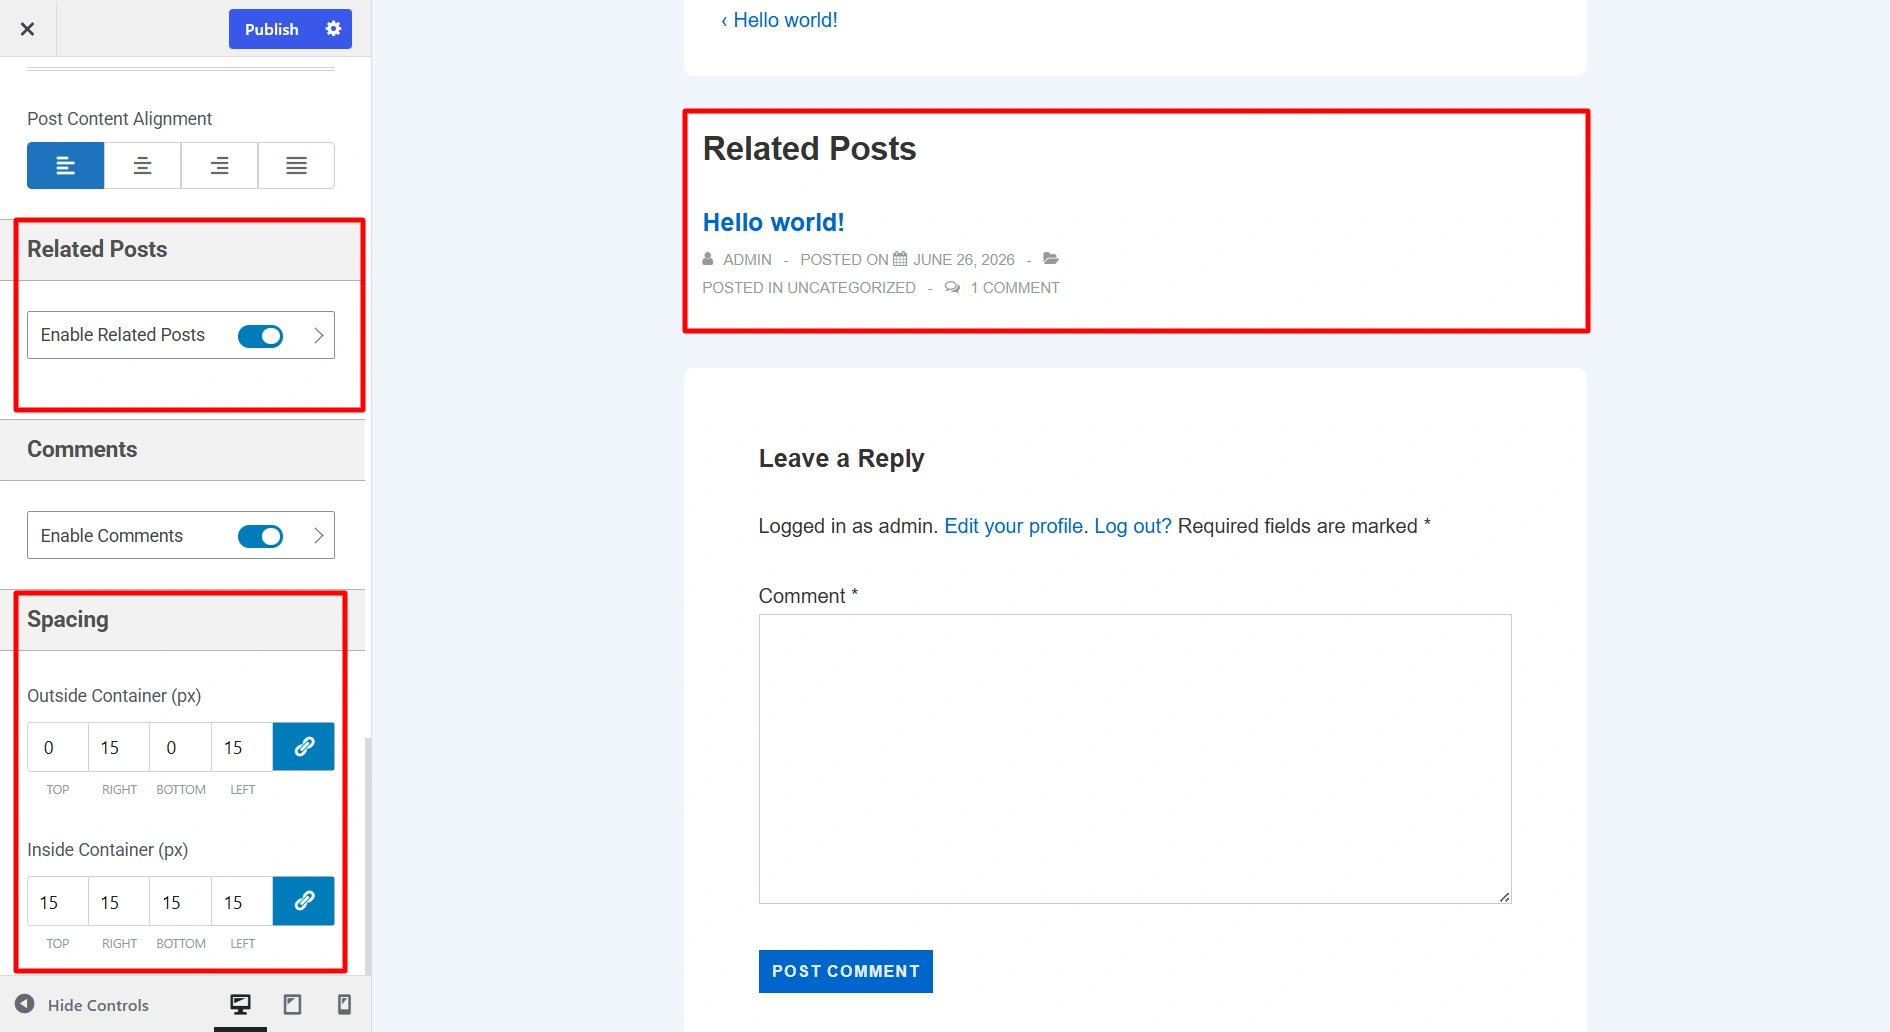
Related posts options

Comments

  • Enable Comments – Toggle it on to display comments at the end of each blog post. You also get the option to add the comment section above or below your post.
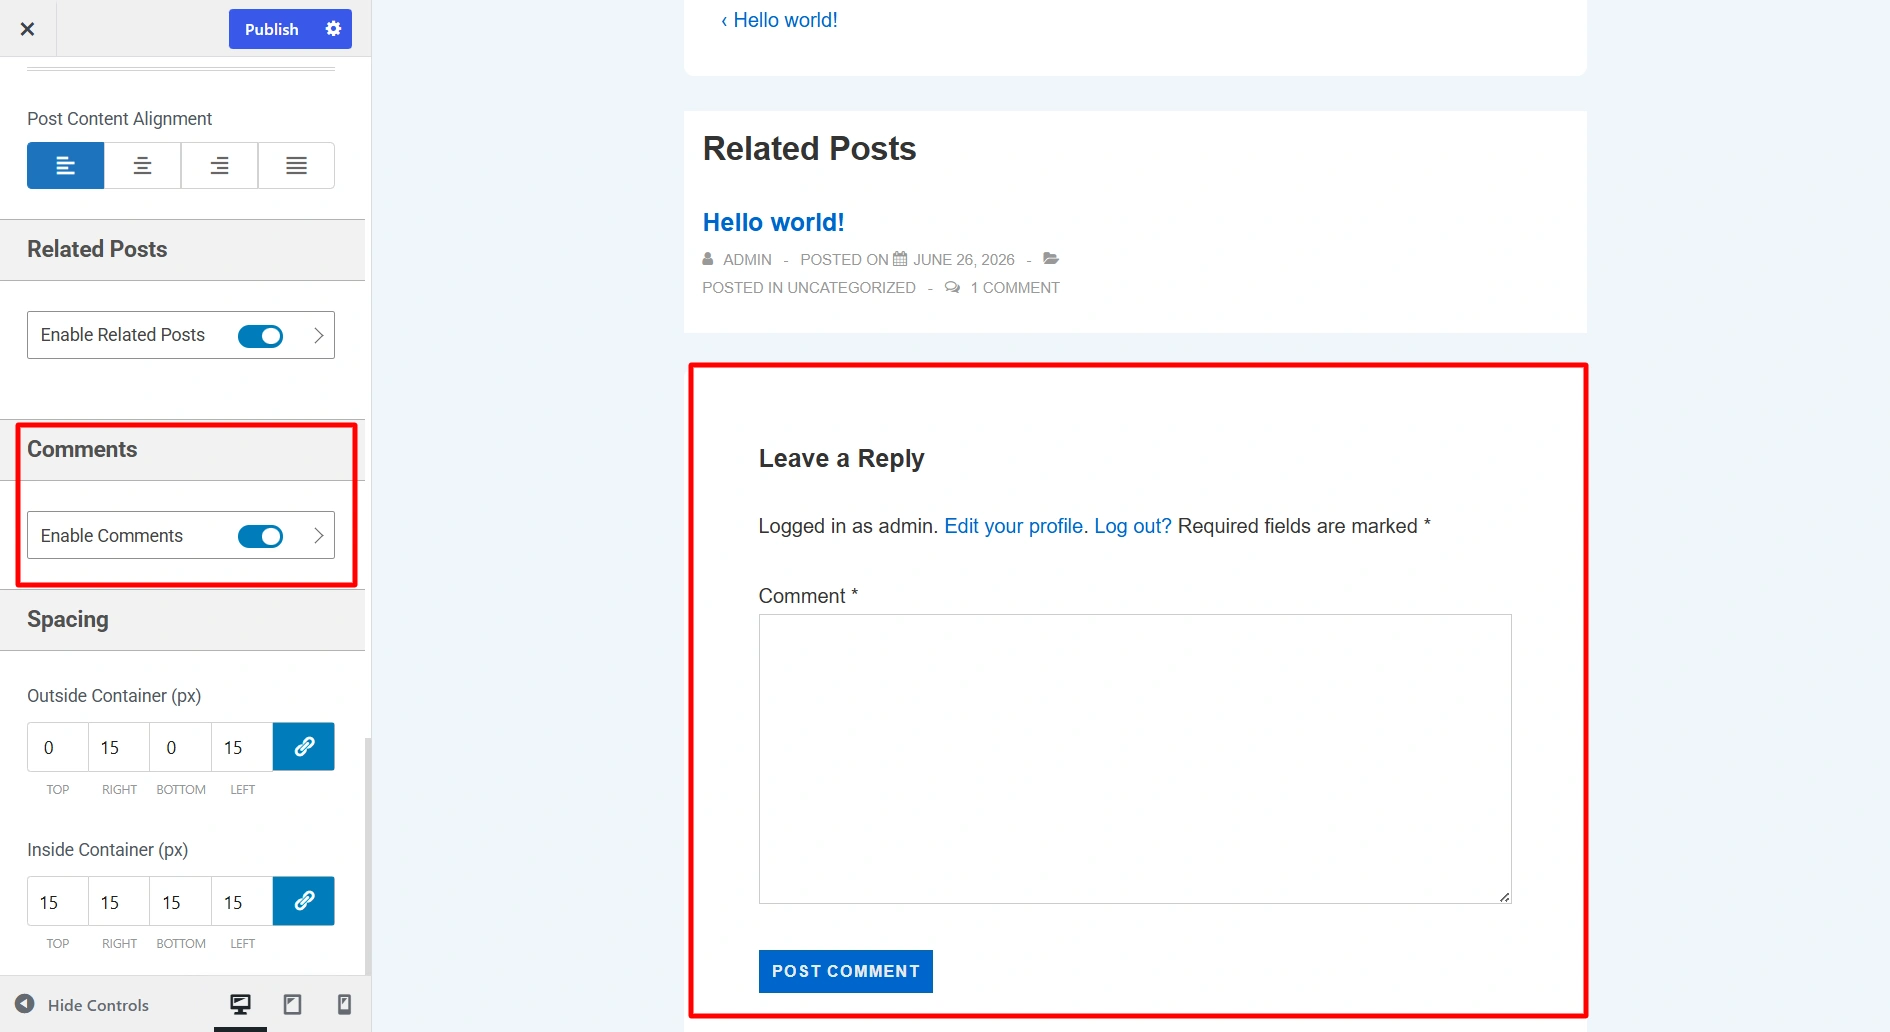
Comments box in Single post

By using these design options you can customize the single posts on your website as per your brand requirements. Happy Designing!

Updated on June 26, 2026

What are your Feelings

  • Happy
  • Normal
  • Sad

Share This Article :

  • Facebook
  • X
  • LinkedIn
  • Pinterest
Blog/Archive SettingsPage Settings

Our Products

Responsive Paid Plan

Responsive Plus

Responsive Addons for Elementor

Starter Templates

Responsive Blocks

WP Legal Pages

GDPR Cookie Consent

Powered by Responsive WordPress theme

Our Products

Responsive Paid Plan

Responsive Plus

Responsive Addons for Elementor

Starter Templates

Responsive Blocks

WP Legal Pages

GDPR Cookie Consent

Powered by Responsive WordPress theme

Resources

Starter Templates

Responsive Platform

Learn Elementor

Testimonials

Compare Astra/Kadence

TrustPilot

CCPA

Video Tutorials

Resources

Starter Templates

Responsive Platform

Learn Elementor

Testimonials

Compare Astra/Kadence

TrustPilot

CCPA

Video Tutorials

Theme Features

Responsive Features

WooCommerce

Header Footer Builder

Site Builder

Child Theme Generator

Download Free Theme

DFY Website Setup

Theme Features

Responsive Features

WooCommerce

Header Footer Builder

Site Builder

Child Theme Generator

Download Free Theme

DFY Website Setup

Company

About

Pricing

Blog

Brand Assets

Affiliate Program

Contact Us

Terms of Service

GDPR Privacy Policy

GDPR Cookie Policy

Website Design Service

Company

About

Pricing

Blog

Brand Assets

Affiliate Program

Contact Us

Terms of Service

GDPR Privacy Policy

GDPR Cookie Policy

Website Design Service

Support

Login

Whatโ€™s New

Documentation

Request Support

Video Tutorials

Refund Policy

Service

Discount Coupon

Bug Bounty Program

Support

Login

Whatโ€™s New

Documentation

Request Support

Video Tutorials

Refund Policy

Service

Discount Coupon

Bug Bounty Program

Copyright © 2010-2026 CyberChimpsย ย 

Copyright © 2010-2026 CyberChimpsย ย 

Top
Top