
Summary
The article explains how to build a WordPress website. It defines the steps from choosing hosting and a domain to installing WordPress and selecting a theme.
It also highlights setup tips, customization, essential settings, and beginner-friendly guidance. Helping readers create a functional WordPress site from scratch.
Are you looking to build a WordPress website?
You may be an entrepreneur, a small business owner, a blogger, or even someone who wants to start a new venture. The most important thing for each is a great website.
A website greatly increases the chances of people trusting your business. Now, is it possible to build a website without any coding? Absolutely!
Building a website may seem daunting at first, but fear not! Follow this article entirely, and you’ll soon discover that creating a website is as easy as slicing a cake.
Now, without further ado, let’s dive into how to create a website. Read on!
- Which Platform is Ideal for Creating a Website?
- How to Create a WordPress Website?
- Step 1: Get Domain Name and Hosting Service
- Step 2: Install WordPress
- Step 3: Install Responsive Theme
- Step 4: Install the Responsive Addons Plugin
- Step 5: Import a Template Using Responsive Addons
- Step 6: Create a New Page
- Step 7: Create a New Post
- Step 8: Set Blog Page As Posts Page
- Step 9: Organise Pages in Header /Footer
- Step 10: Customize Using Elementor Plugin to Creatively Build a WordPress Website
- FAQs
- Conclusion
Cyberchimps Responsive is the Best WordPress Theme – Get it for free!
Which Platform is Ideal for Creating a Website?
Most people choose a platform depending on the needs and requirements of their website.
As there are multiple website-building platforms, it can be overwhelming to choose the right one. To make things easier for you, we advise using WordPress.
What is WordPress?
WordPress is a platform for creating a website.
In technical terms, WordPress is an open-source content management system licensed under the General Public License Version 2.0 (GPL v2).
The user-friendly interface makes it easy for people with no technical skills to build and manage their websites.
WordPress is a full-fledged website builder with plenty of features that let you build any website.
And the best part is it’s FREE!
How to Create a WordPress Website?
There are three crucial things you need to create a website. First, a good domain name and an excellent website hosting provider. Second, you need to install WordPress.And lastly, themes and plugins to build a WordPress website.
Now that we have our basics right, let’s look at how to create a WordPress site in detail:
WordPress is a fantastic platform for making a website. We’ll go through a step-by-step procedure and learn how to create a beautiful website with WordPress.
Now, without further ado, let’s dive into the content.
Step 1: Get Domain Name and Hosting Service

To start the website development process, the first step is to buy a domain name and a hosting service.
So, if you’re new to these terms, a domain name refers to a unique address used to access a website. For example, cyberchimps.com is a domain name that allows you to access the CyberChimps website.
Each domain name is associated with an Internet Protocol(IP) address. IP addresses are unique numerical codes that computers use to locate and communicate with web servers.
On the contrary, a hosting service provider is a company that provides you with several services to make your website available on the World Wide Web (WWW).
A hosting provider’s most important service is storing your website data on the servers. So, when someone types your domain name in a web browser, your browser interacts with the hosting server, which in turn sends the required information back to the browser.
This is an ongoing process; Google gets around 3.5 billion searches daily. Your domain name should reflect your brand and must be easy to remember. Some of the best places to buy domain names are Namecheap or GoDaddy.
If you’re a beginner in WordPress, we recommend you use the free web hosting services.
You can choose from multiple web hosting providers for your WordPress website. But for the best results and quick support, we recommend using the Kinsta or Bluehost provider.
For tutorial purposes, we’re using the Kinsta service provider.
Why Kinsta is a Reliable Hosting Provider?
Kinsta offers various features and services that are relevant to your business:
- High-performance infrastructure using Google Cloud Platform
- Developer-friendly features like SSH access, WP-CLI support, Git integration, and more
- Automatic scaling based on traffic spikes or lulls
- 24/7 support from a team of experts
After choosing a domain name and a good hosting platform, the next step is to install WordPress.
Step 2: Install WordPress
The easiest way to install WordPress is by visiting your hosting account and creating a new site.
In this step, you can provide the domain name you’ve purchased, and you’ll also find an option to install WordPress.
Step 3: Install Responsive Theme
📢 My Real World Test Results:
- Load time on shared hosting: 0.78 seconds
- GTmetrix Performance score: 100%
- Total theme size: Under 80KB
- Mobile PageSpeed score: 99/100
- Save design time with 100+ Premium-grade Starter templates
Once you’ve installed WordPress, the next few steps are crucial as they define the performance of your WordPress website.
So, to start with, we need to install a WordPress theme.
A WordPress theme helps you to set up a website quickly and provides plenty of customization options.
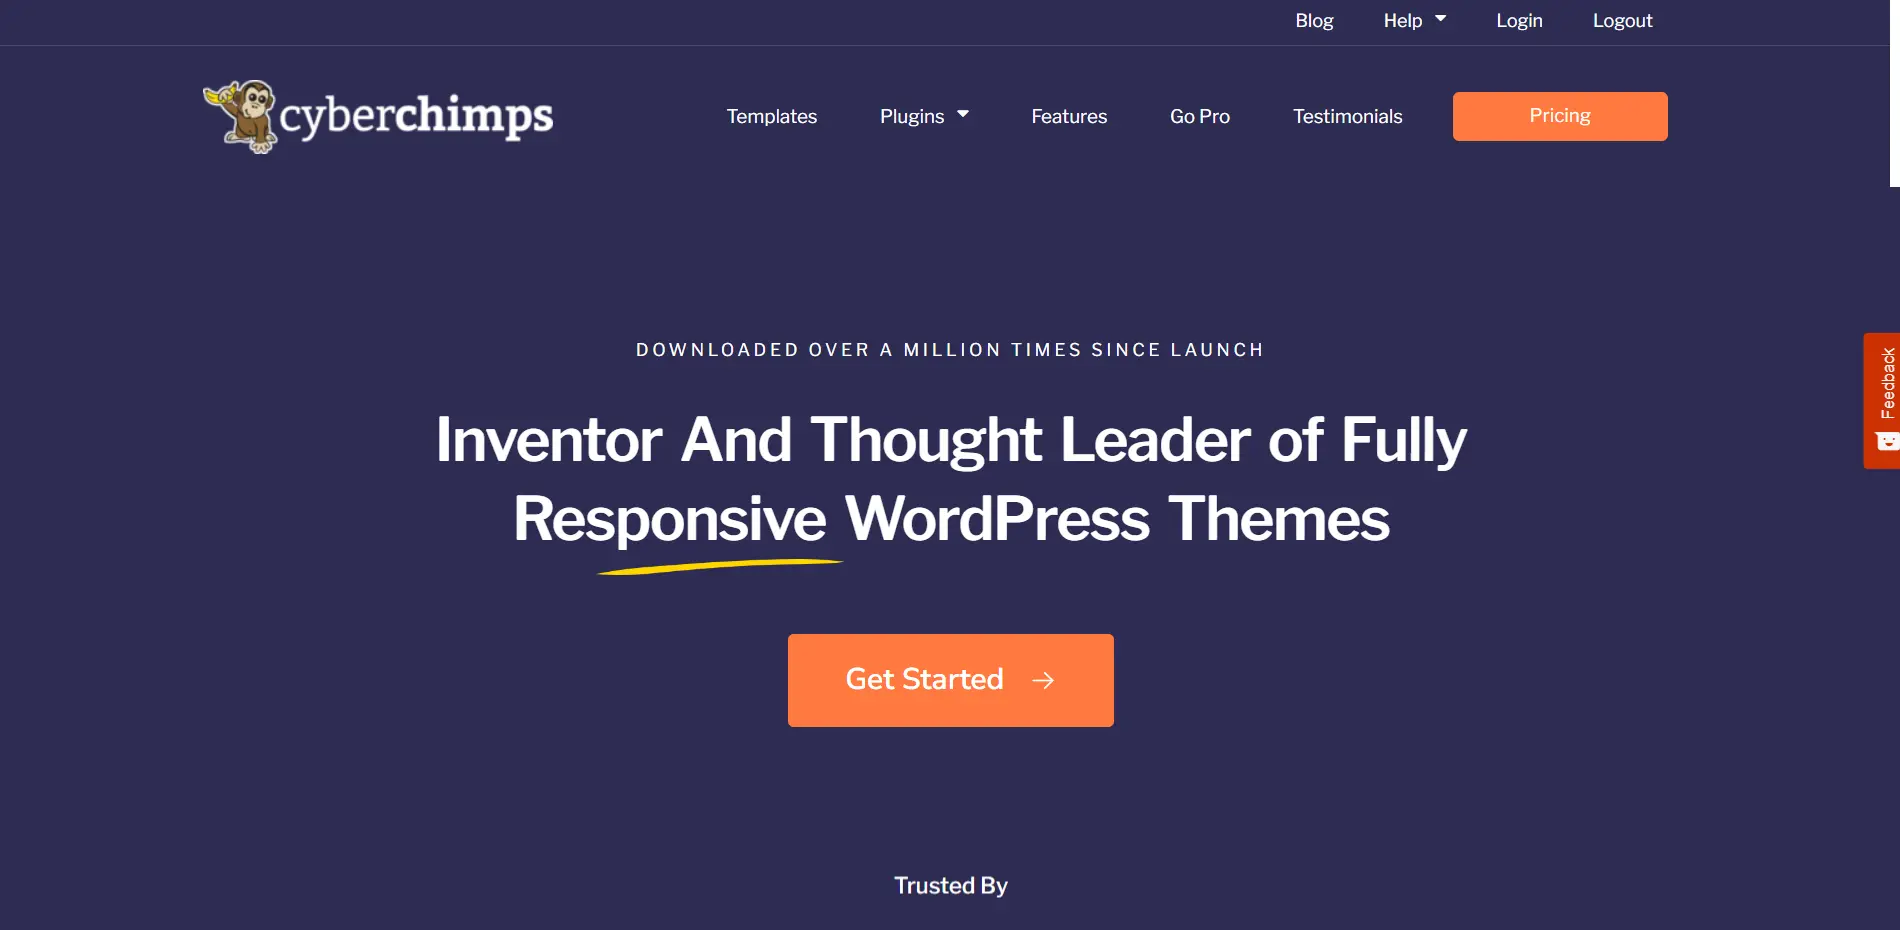
We recommend using the Responsive theme.
Why Responsive Theme?
There are plenty of reasons why the Responsive theme is the best. Here are some insights into the Responsive theme:
Responsive theme is one of the most popular free WordPress themes. It’s fast, translation-ready, search engine optimized, and helps to build a WordPress website quickly.
As the name suggests, the theme is responsive, meaning it’s optimized for viewing on all devices, including smartphones, tablets, and desktop computers.
Coming with a unique set of features and customization options, the Responsive theme has the edge over other themes in several aspects.
Responsive Theme’s distinctive features are:
- 250+ Readymade Starter Templates: The responsive Starter Templates plugin offers a library of premium Elementor and block templates to launch your website quickly. Just select your favorite website template, click import, and launch your website.
- SEO Optimized: When it comes to SEO WordPress themes, Responsive is the most popular theme, making it the top of our list.
- Responsive Addons Elementor (RAE): RAE has 80+ advanced, incredible Elementor widgets to create a unique website.
- Integration with Popular Plugins: Responsive works with all the popular plugins like Mailchimp, WPLP Compliance Platform, WooCommerce, Yoast, WP Forms, Contact Form 7, and many more!
How to Install the Responsive Theme?
To install the Responsive theme, all you need to do is follow these simple steps.
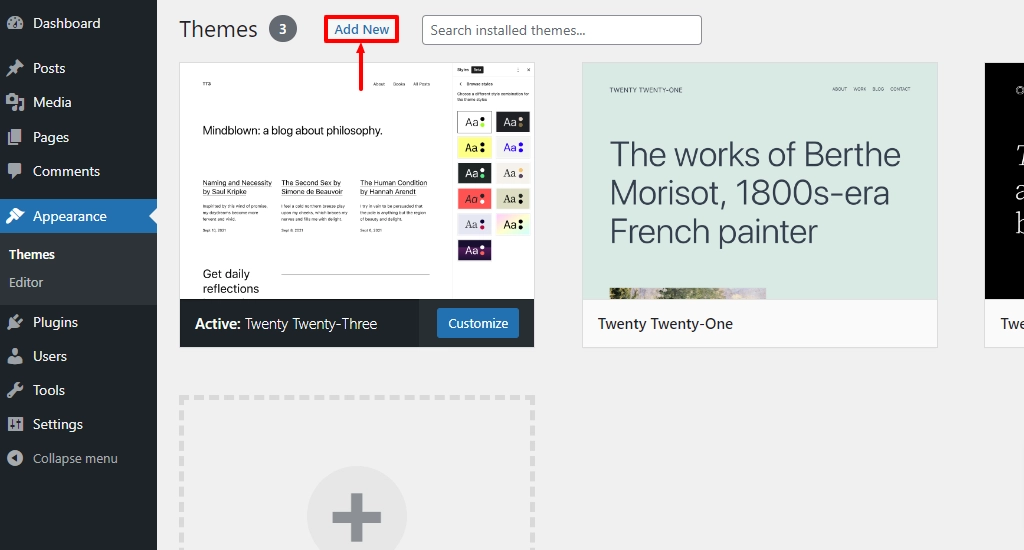
Head over to your WordPress dashboard. From the dashboard, hover over the Appearance menu and click on the Themes button.

Click on the Add new button.
Search for Responsive in the search bar above.
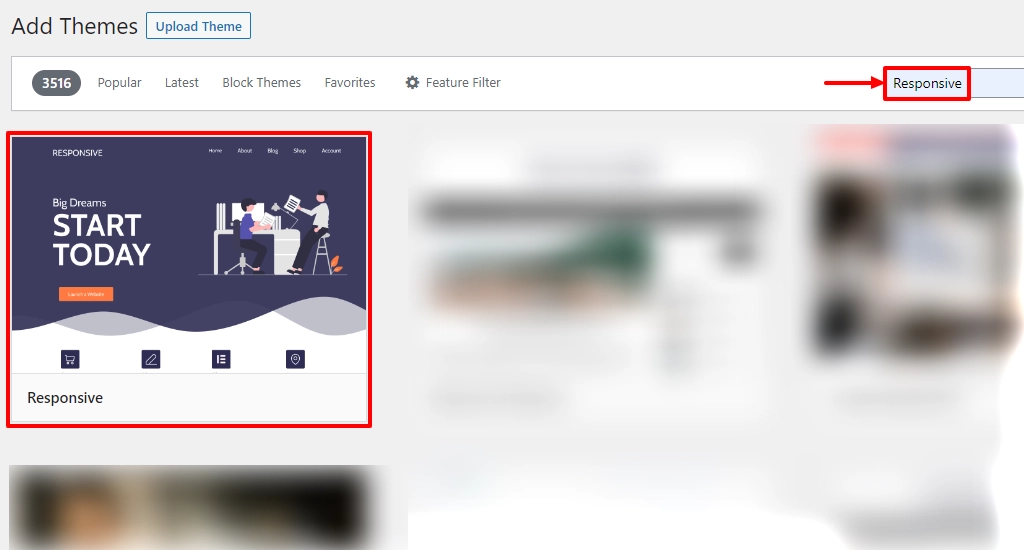
Next, hover over the Responsive theme and click on the Install button.
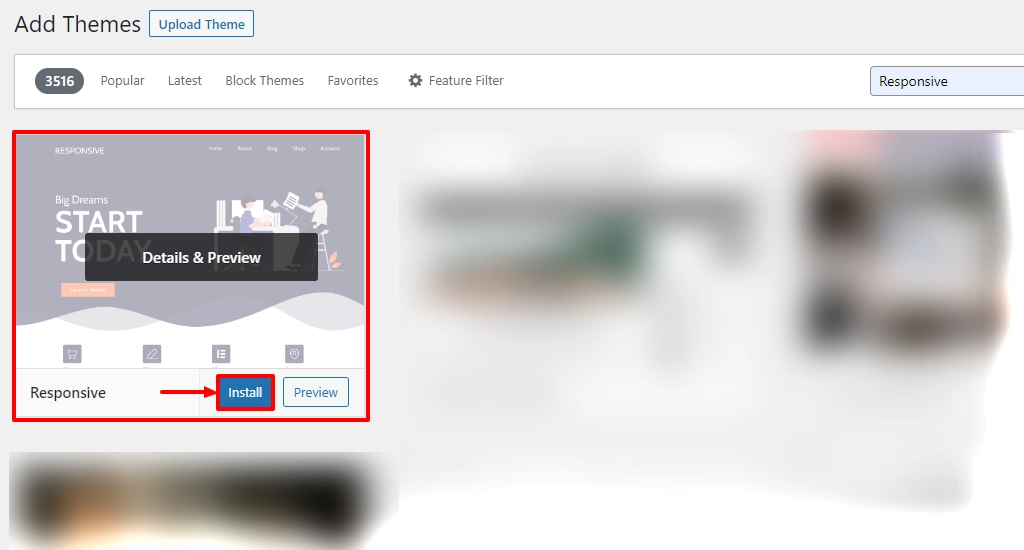
Once the theme is installed, click on the Activate button.
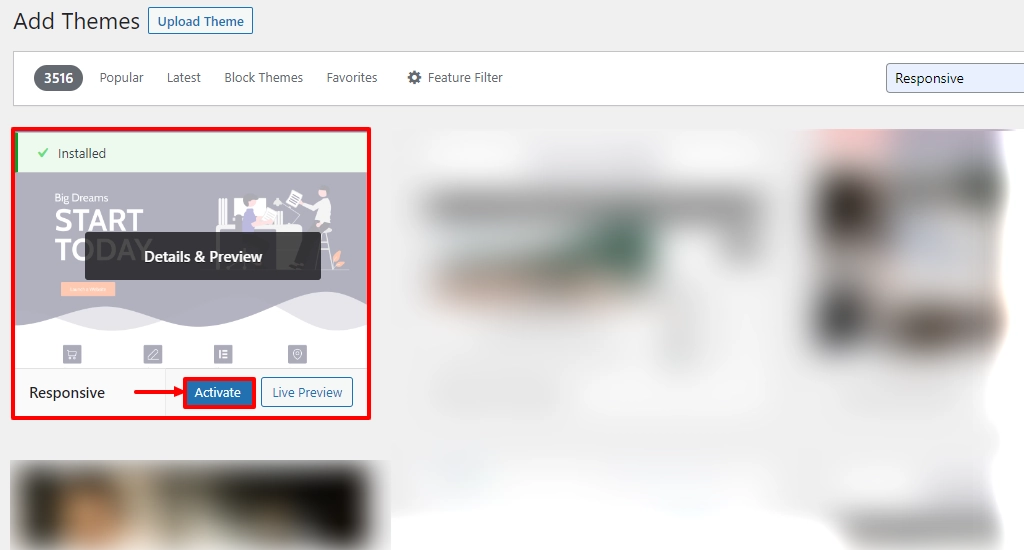
Well, that’s it. You’ve successfully installed the Responsive theme.
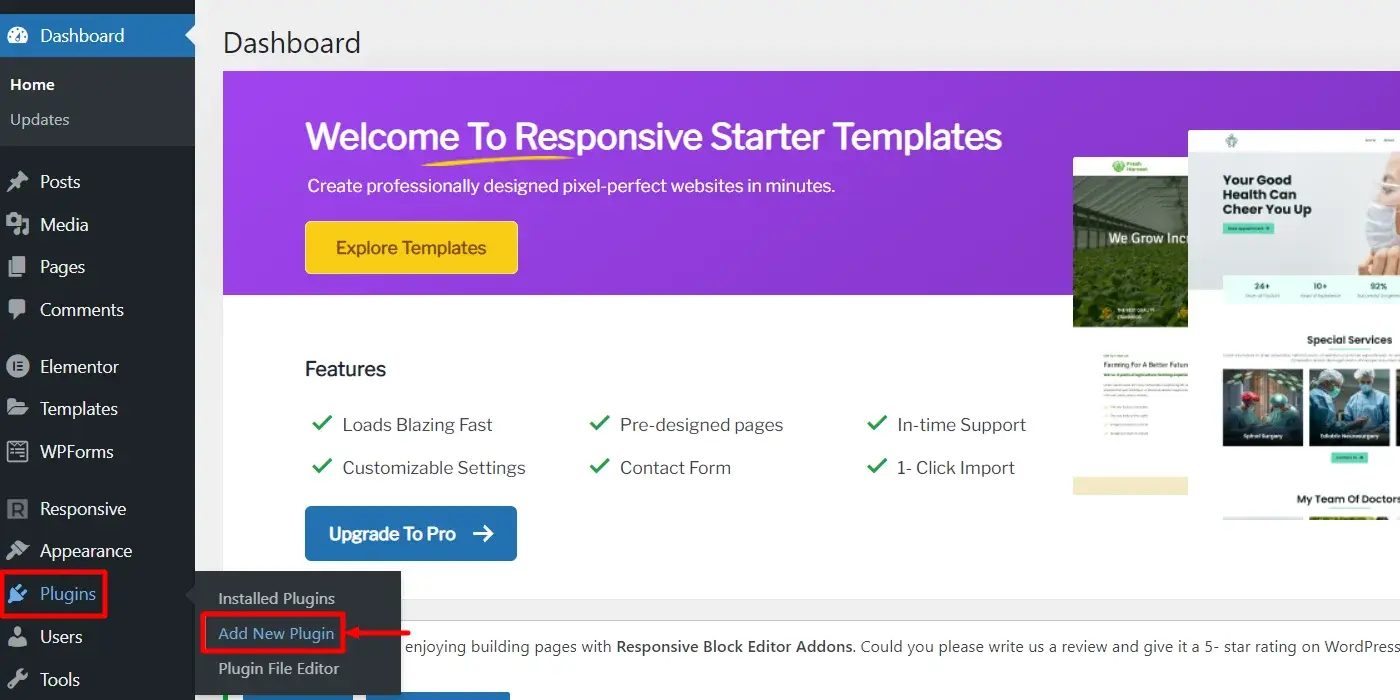
Step 4: Install the Responsive Addons Plugin
Responsive Addons is an essential plugin for WordPress that allows you to use 250+ pre-made templates for your website.
With these templates, it’s straightforward to create any website.
Let’s see how to install the Responsive Addons plugin.
1. From your WordPress dashboard, navigate to Plugins > Add New Plugin
2. Search for responsive addons in the search bar.

3. Click on Install Now to install the plugin.
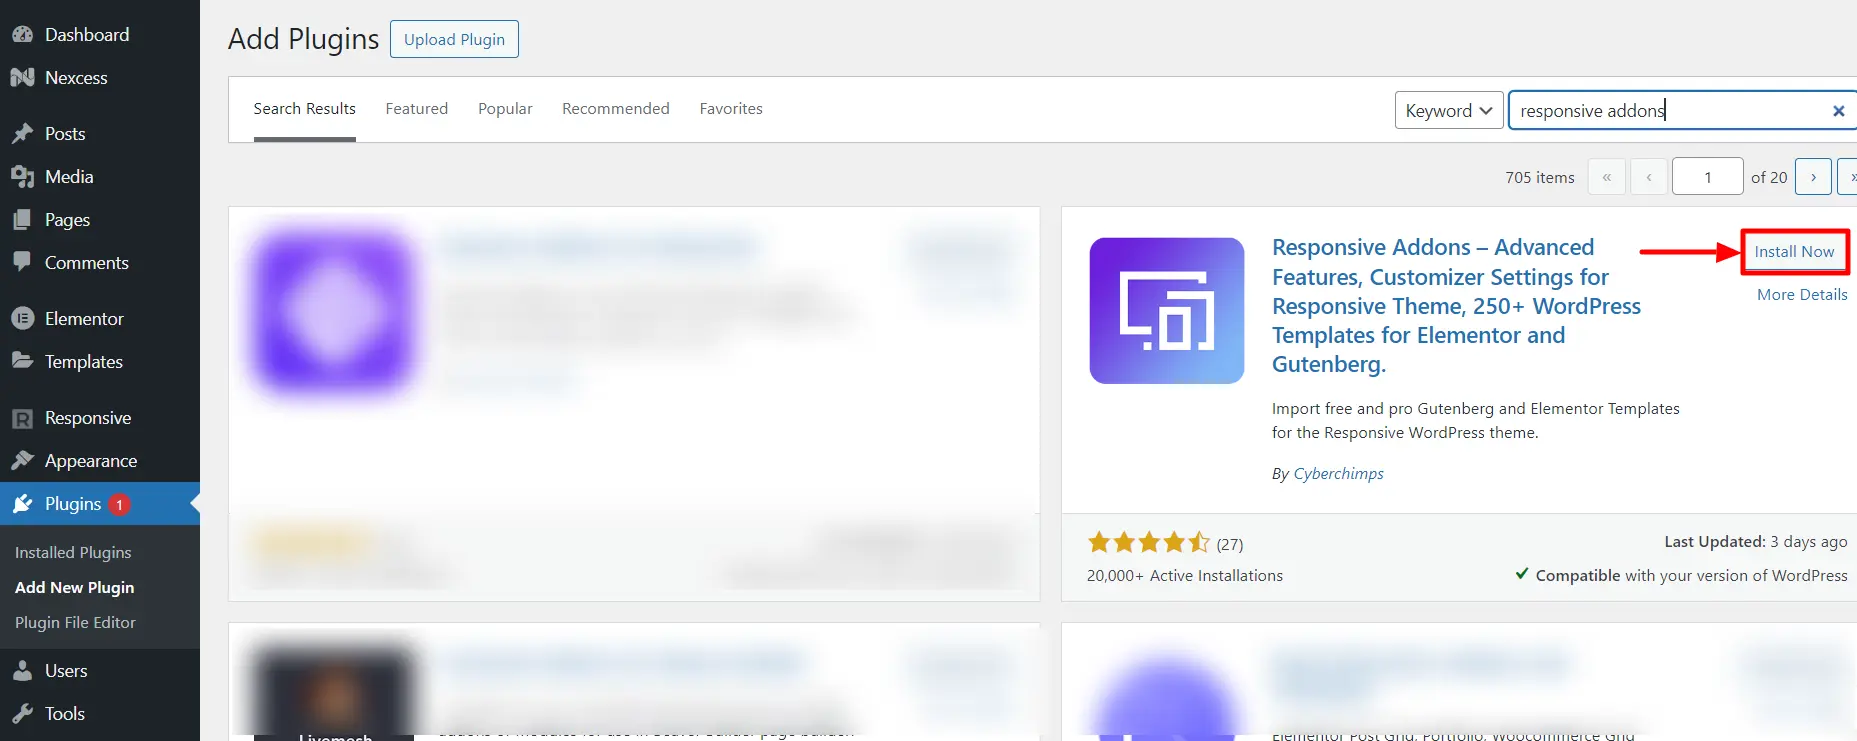
4. Next, click on the Activate button to activate the plugin.
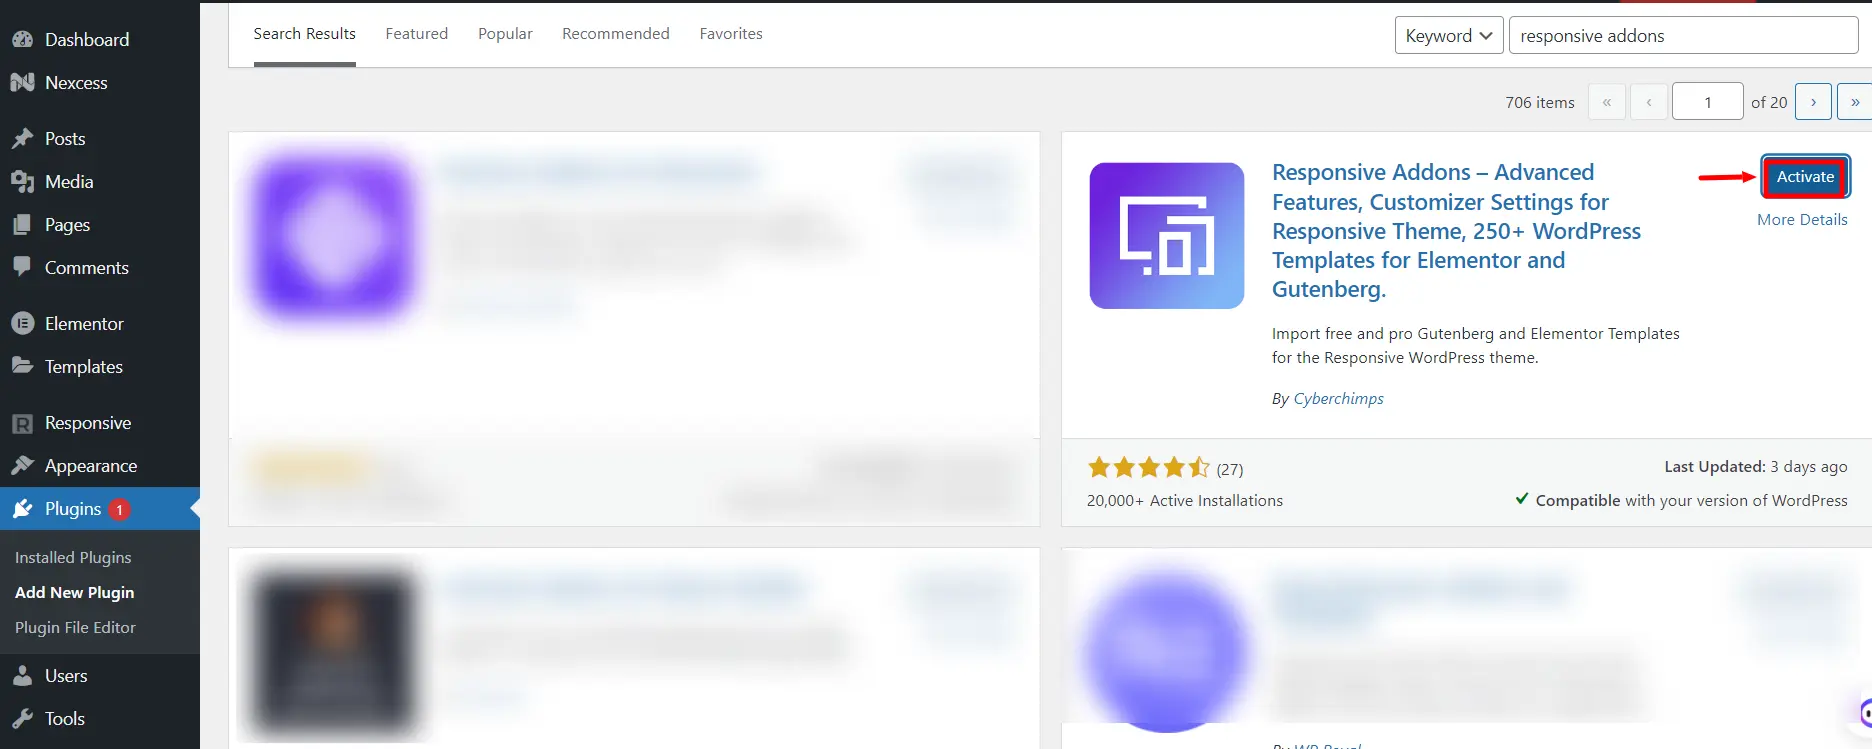
This is how you can easily install the Responsive Addons plugin.
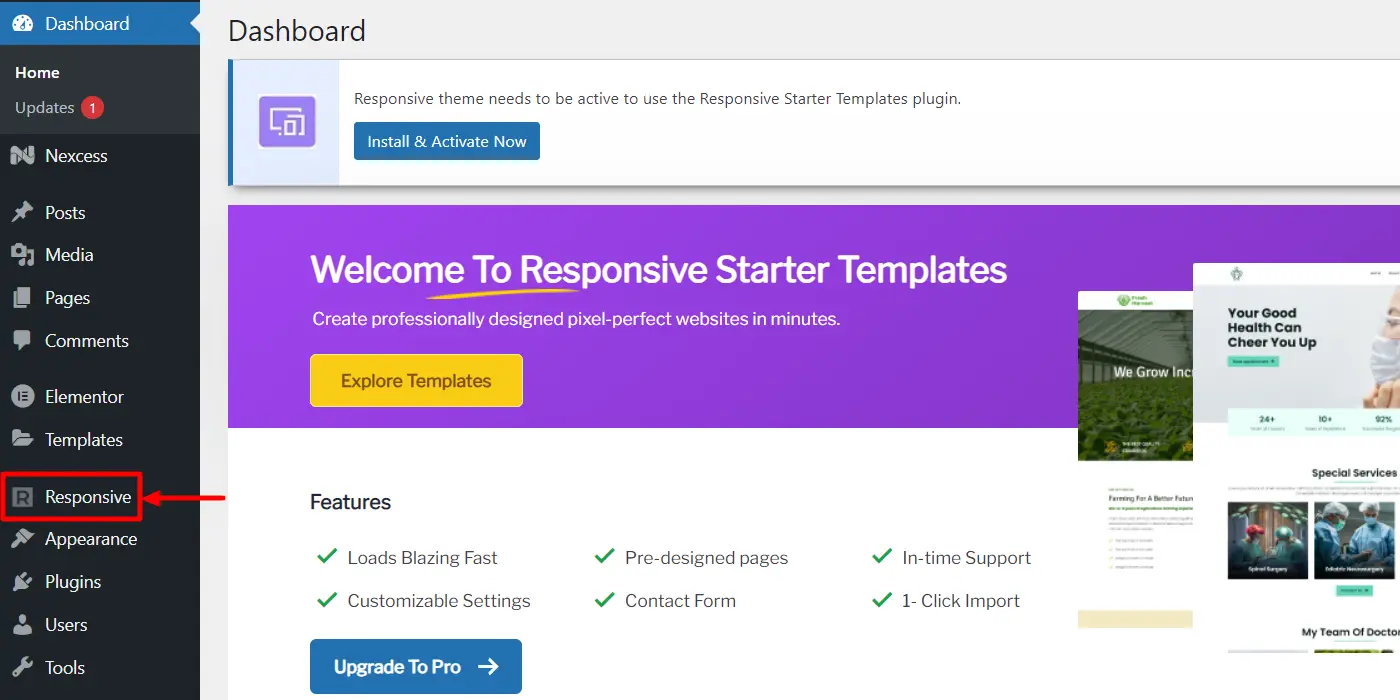
Step 5: Import a Template Using Responsive Addons
If you’re reading this, then you’ve completed 70 % of the website-building process. In this step, we’ll see how to use a pre-made template to create a WordPress website.
From your WordPress admin dashboard, navigate to the Responsive tab.
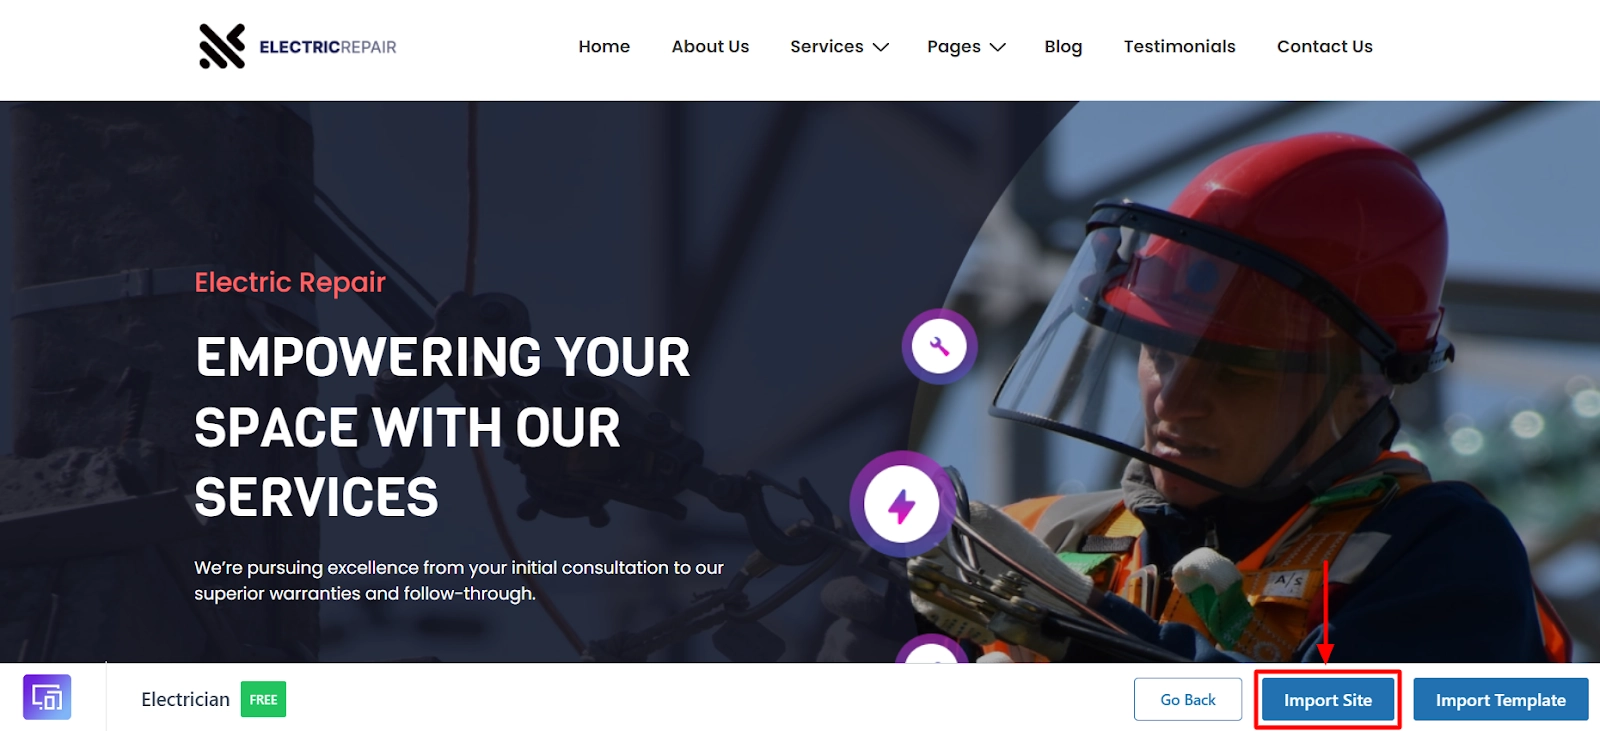
Next, to import a template, click on the template you wish to import

Once selected, click on the Import Site button.
For this article, we will use the Electrician website template.
Next, you will be asked to connect your website to the Cyberchimps Responsive account.
[Refer to this document to learn how to connect your account.]

Step 4: Upon successfully connecting your website, this will take you to the following page, click on Subscribe and Start Importing.

Step 3: Next, click the Visit Website button to check the imported site.

That’s it! You now have a website ready.

Also, when you download a template made in Elementor, the plugin automatically gets installed on your WordPress. Elementor is an essential plugin that lets you easily customize your WordPress website.

With Elementor, you can simply drag and drop the required elements into the main panel, which directly reflects on your website.
In the following sections, let’s learn more about WordPress customizations.
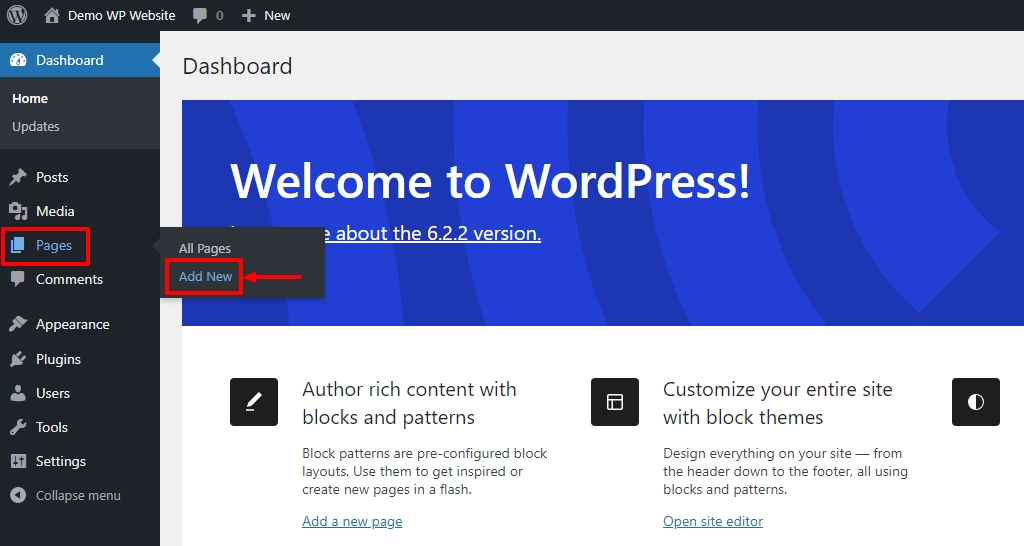
Step 6: Create a New Page
A website page contains content, helpful information, products, and more. If you wish to change the default pages to a new one, you must create a new page in WordPress.
To create a new page, follow these steps.
From the WordPress dashboard, hover over Pages and click on the Add New menu.
Once you have provided the title, click on the Publish button. Here, I’m adding a blog page.

Step 7: Create a New Post
Posts are blog entries that contain content, images, videos, SEO elements, and so on.
This section is essential to add a blog page to your website. Feel free to skip this section if you’re not going to write a blog.
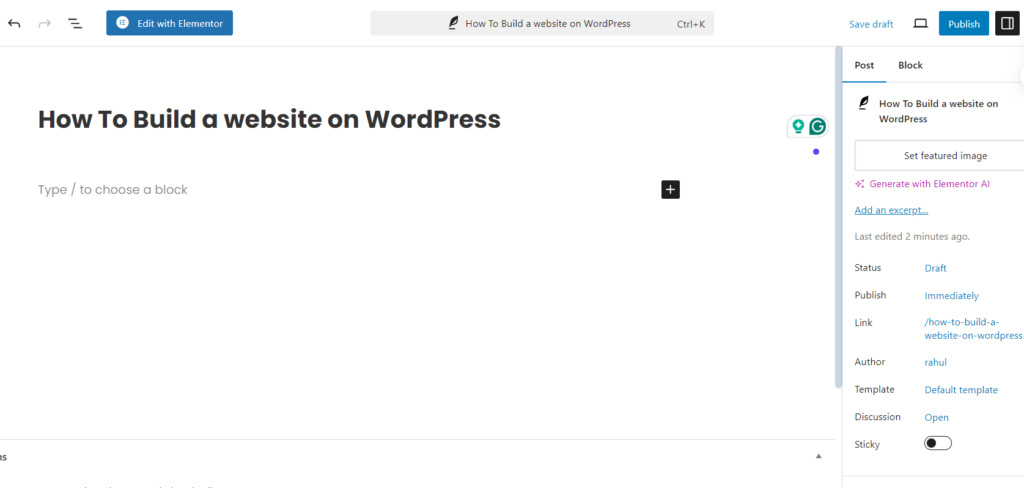
So, to create a new post, hover over Posts and click on the Add New menu.
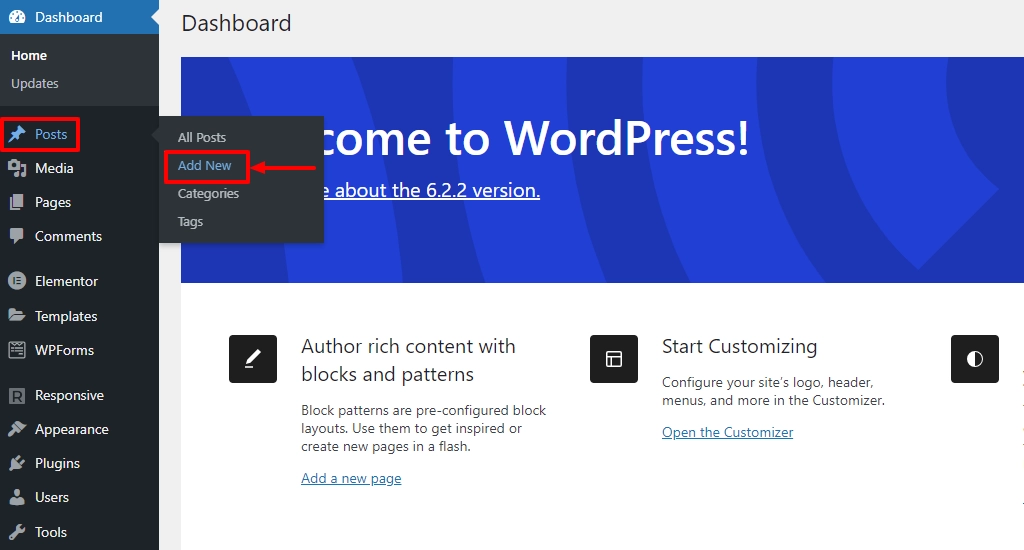
We recommend using the Block Editor to create blogs and using Elementor to create pages.
Once you have provided the title, click on the Publish button. Here we’re adding a demo blog post.
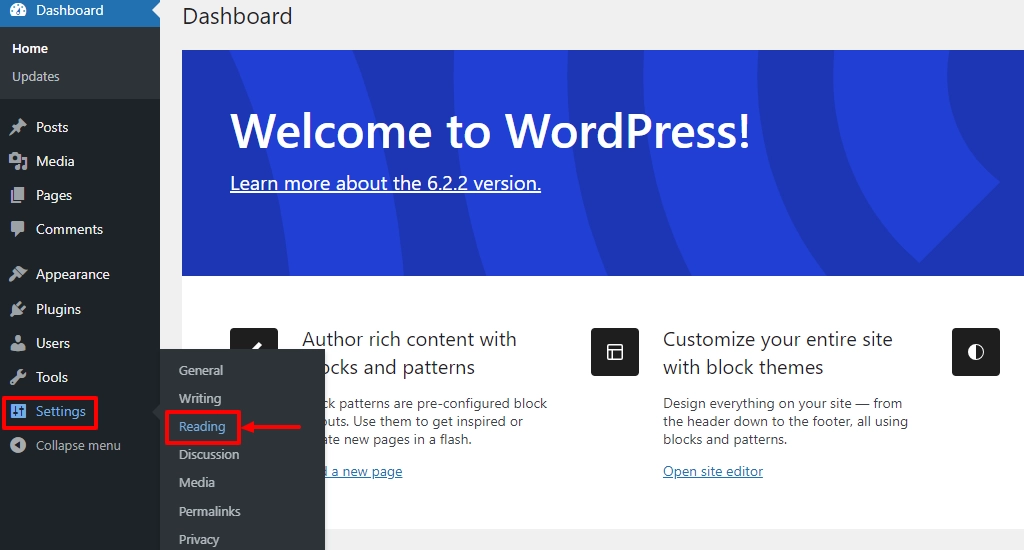
Step 8: Set Blog Page As Posts Page
Setting up your blog page as a default for the posts is crucial.
Hover the mouse over the Settings and click on the Reading menu.
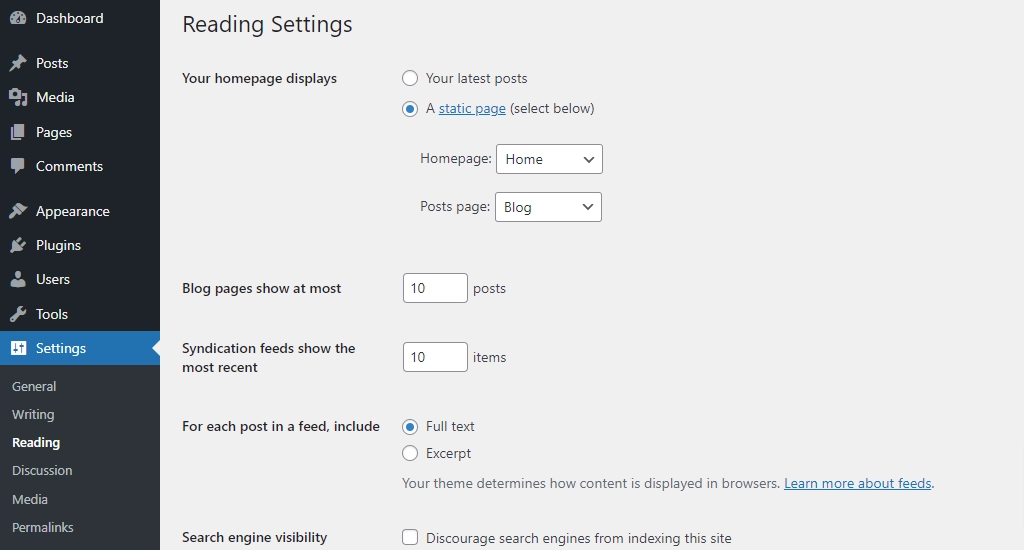
Now set the Homepage as Home and the Posts page as Blog. You can also set how many posts you want to show on the blog page.
Step 9: Organise Pages in Header /Footer
Assuming you’ve added a new page to your WordPress site. This page will not appear in your header or footer unless you set them to display.
Follow these steps to add or remove pages from your website’s header/footer.
Head over to the WordPress dashboard. Hover on Appearance and click on the Menus button.
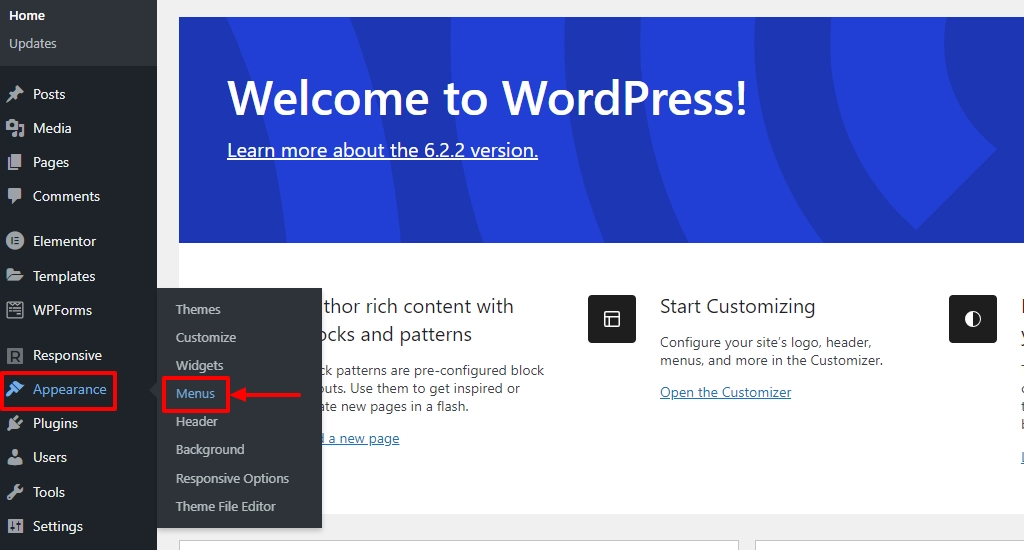
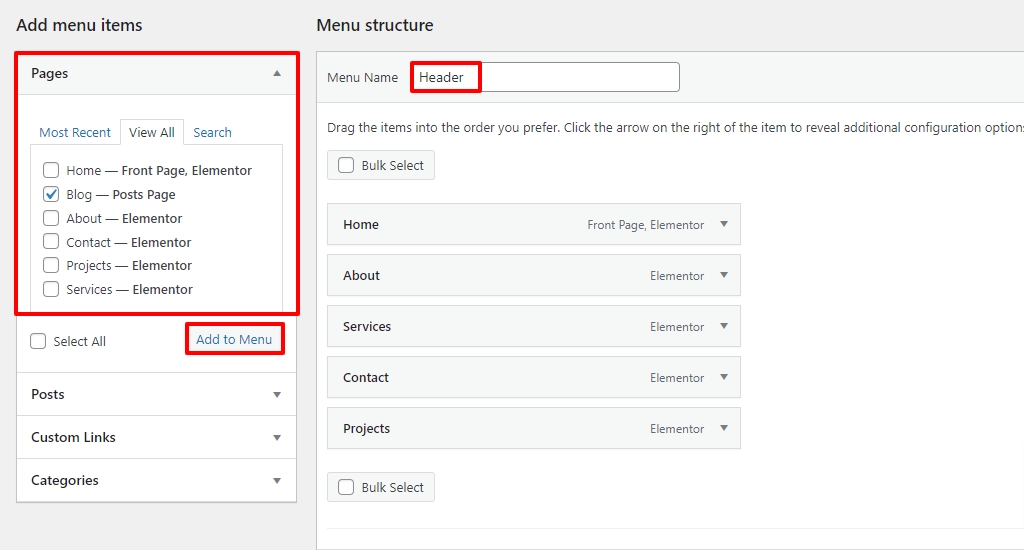
Provide a suitable Menu Name and select View All to view all the pages. Next, tick the required pages, and click on the Add to Menu button. You can also select whether the menu must be displayed in the header or footer.
To delete a page from the menu, select the dropdown icon next to the page and click on the Remove button.
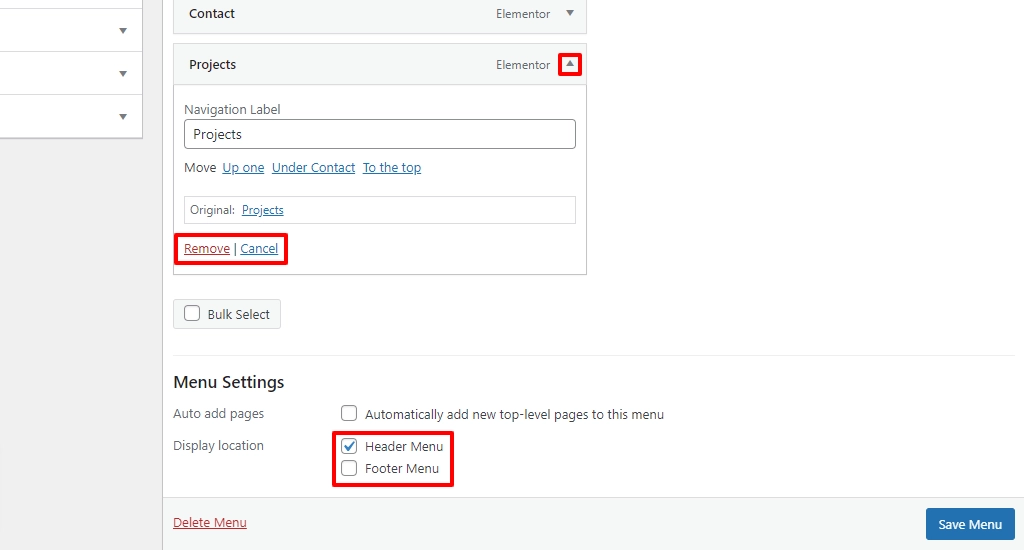
Once you’ve made the changes, don’t forget to click on the save changes button. To view the changes, click on the Visit Site from the dashboard.

Now you can see that the pages have been changed in the front end of the website.

Step 10: Customize Using Elementor Plugin to Creatively Build a WordPress Website
Customizing your website is the last step. Most of us will have a design in mind before creating a website. In this section, you put in your design thoughts to create a unique website.
We’ll look at some basic customization settings to help you start with your customization.
Select a page you want to edit, and click on the Edit with Elementor button.

This will open the customization widget panel that helps you edit any page section. You can also search for a particular widget from the provided search bar.

To use a widget, just drag and drop the widget from the panel to the main area.
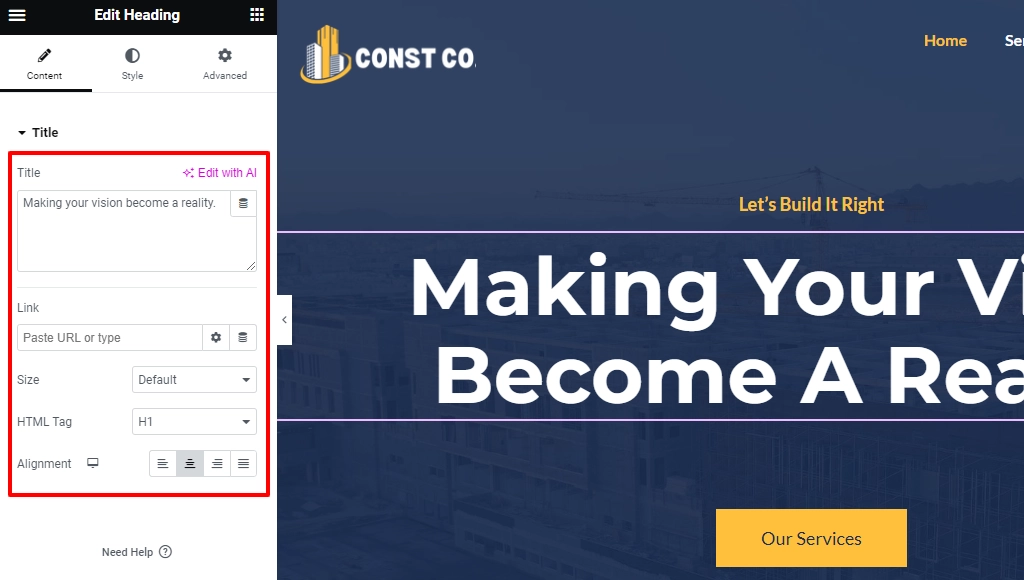
Click on any page section, and the respective customization options will appear on the left. For example, to edit a title, just click on any part of the title, and the settings appear as shown. Here you can change the text, provide heading tags, and more.
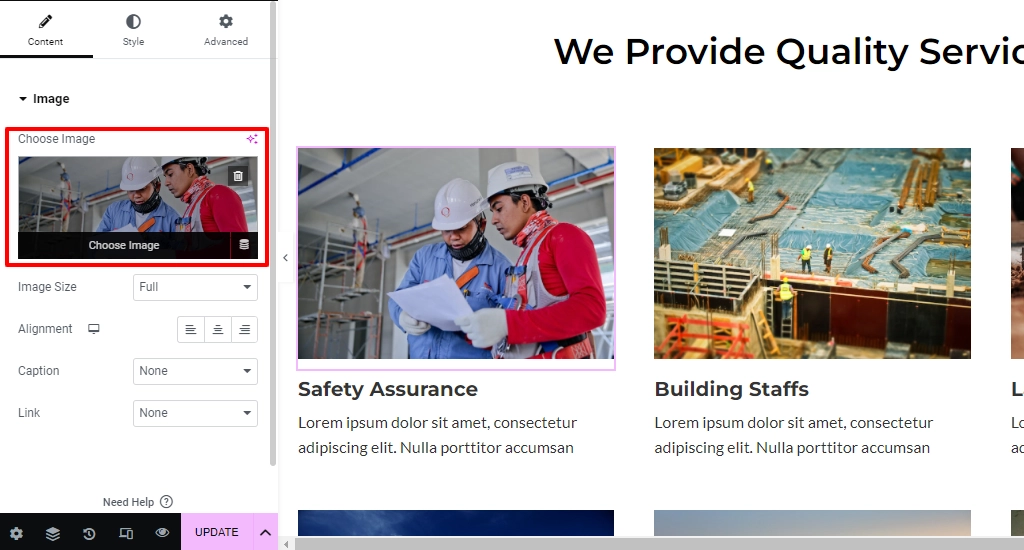
Similarly, click on an image in the template, and you can easily change it according to your style.
To change the image, select the image from the main area.
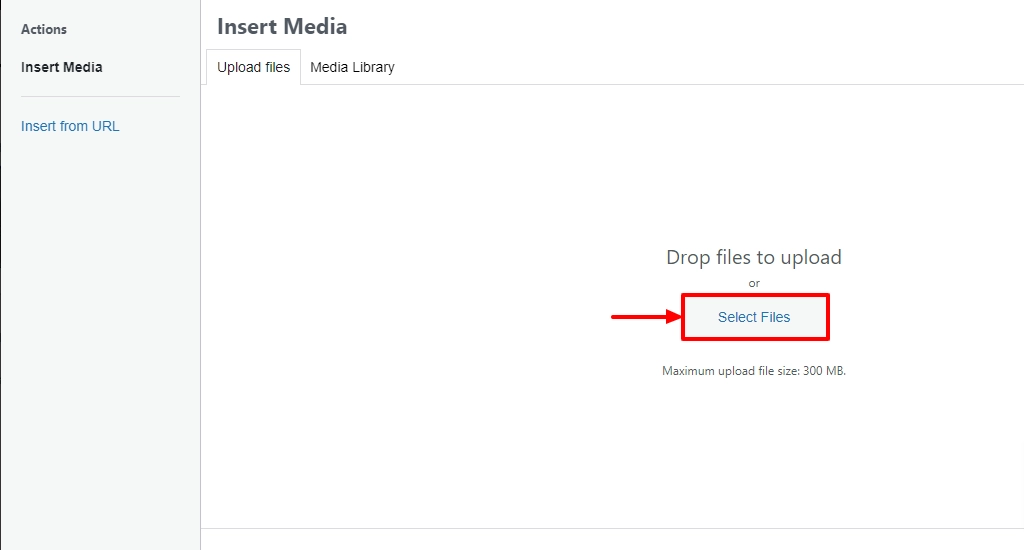
From the panel, again, click on the image.
This will lead to Insert media. Here, click on Select Files and upload the desired image.
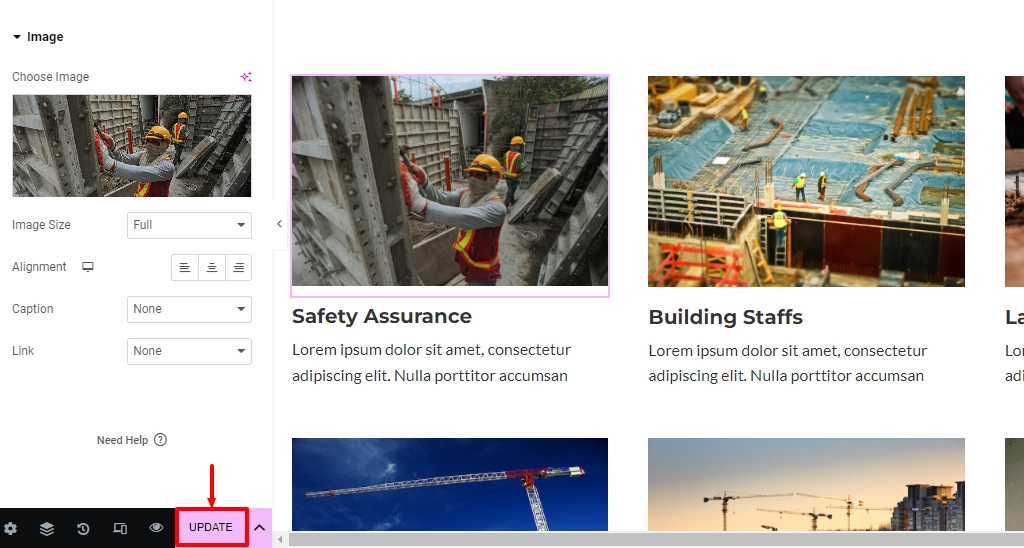
Change various sections and different pages according to your style. Once you have made all the changes, click on the Update button.
Now, check your website by going to the dashboard and clicking Visit Site. Refresh the page once so the updated version appears.
That’s it; you’ve successfully created your WordPress Website.
FAQs
Yes, you can start for free using WordPress. You get a free site with a basic address and limited features. To look professional, you will need paid hosting and a domain later.
ChatGPT cannot build a website for you. But it can guide you step by step and help with content ideas and settings.
No coding is needed. You can build a full website using themes like Responsive and page builders with simple clicks.
You can use WordPress without hosting only on WordPress.com. If you want full control, you will definitely need hosting.
WordPress is used to create blog websites, business websites, online stores, portfolios, and more. It works for both beginners and professionals.
Conclusion
A WordPress website for your business is an ideal solution to increase traffic and revenue. A website also creates a sense of trust among the users about your brand.
WordPress is the best platform to create a website as it’s flexible and easily customizable. Another critical point is that it comes with multiple plugins that help bring various new features.
Also, a WordPress-compatible theme, like the Responsive, enhances the blog functionality and makes your website SEO friendly.
If you’ve liked reading this article, don’t forget to look at our other similar articles:
- What is WooCommerce? Beginner’s Guide
- How to Build a WooCommerce Website with Elementor
- Elementor Review: Is It Still Relevant?
Thinking already of building a WordPress website? Grab the Responsive theme and Elementor to build the best website!


2 Comments on “How to Build a WordPress Website – Ultimate Beginner’s Guide”
I very delighted to find this internet site on bing, just what I was searching for as well saved to fav
I think this is one of the most vital information for me. And i am glad reading your article. But want to remark on some general things, The site style is great, the articles is really nice : D. Good job, cheers