You’ve made the right decision by choosing to start a blog. Blogging lets you share your gifts and passion with the world in a fun and a rewarding way. But we get it. Getting started with a blog seems daunting at first, particularly if you are not a techie. But what if we tell you that you can set up a blog even without having to know any programming knowledge?
You heard that right!
In this blog post, we will look at how to start your blog on WordPress from scratch. We cover everything you need to know to make a WordPress blog, right from buying a domain name to writing your first blog post.
So, let’s dive in!
WordPress.com or WordPress.org?
It’s a common question that gets asked frequently by budding bloggers. The difference between WordPress.com and WordPress.org is that if you host your website on WordPress.com, it does no longer remain your content. What I mean by that is, if in case your content accidentally goes against their policies, your blog is at the risk of getting suspended. It has happened before.
Whereas when you set up your blog on WordPress.org, you own your blog, you set up your policies, and it pretty much becomes your owned property. Therefore, I would recommend you to go with WordPress.org.
Step 1: Laying the Foundations
Before you start building your blog on WordPress, you should know the history of WordPress, and you should need to have the following 2 things:
- A domain name
- A web hosting plan
Let’s look at how you can go about buying both:
A Domain Name
A domain name is the online equivalent of the physical address. It’s how your visitors will find you. For example, www.cyberchimps.com is the domain name of CyberChimps.
On a piece of paper, brainstorm and come up with a lot of ideas to decide on a domain name. The domain name should be easy to remember, spell and should not be a homonym as it helps to avoid any confusion. Try using a business name generator if you need more ideas.
Also, go for .com as the domain extension, as .com extensions are easy to remember.
Use a service like Instant Domain Search to verify the availability of your domain name. If the domain name of your choice isn’t available, go back to your brainstorming list and try out other names.
A Web Hosting Plan
A web hosting plan allows you to store the website files in its server so that the website visitors can access your website. There are plenty of web hosts to choose from, but we will stick to Bluehost for this article.
Click on the Get Started Now button when you land on the homepage of Bluehost:

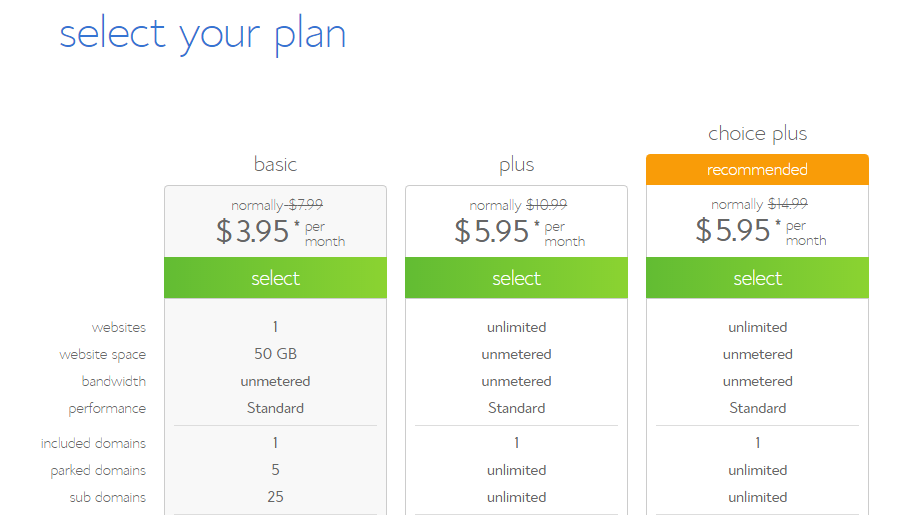
Upon clicking, you would be taken to their pricing page where you will see 3 different pricing options. If you’re just starting out, we would recommend you to go for the basic plan. You can always upgrade if the need arises.
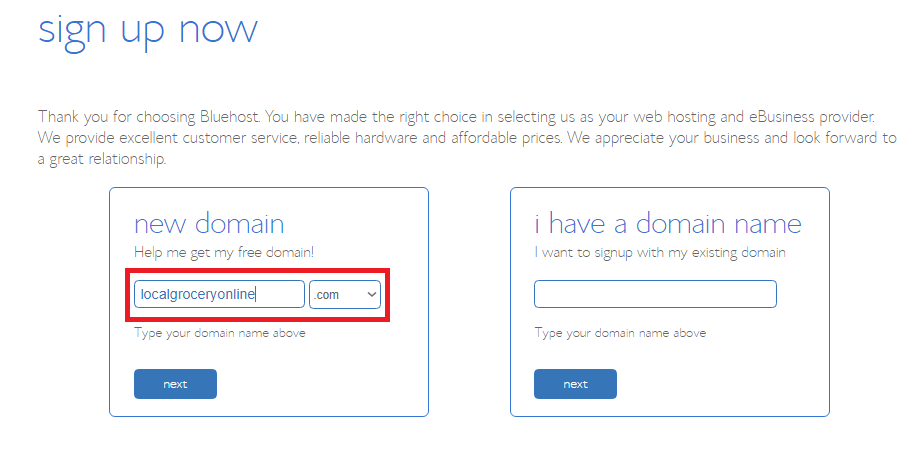
After selecting the plan, you need to enter the domain name that you have shortlisted.
On the payment page, you’ll see the summary of your purchases and will be shown a few add-ons under the package extras section. Out of those select only Domain Privacy Protection as it keeps your account details private.
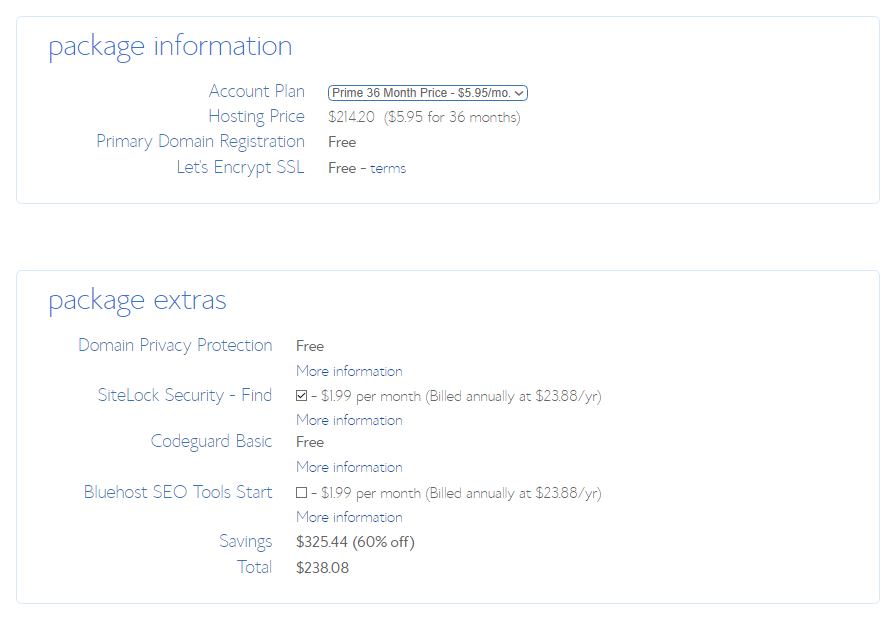
After completing the payment, you’ll receive a confirmation/registration mail. Now, you are all set to install WordPress.
Step 2: Installing WordPress
Installing WordPress on Bluehost is a simple task. Bluehost and other major web hosts offer a feature called 1-Click Installation that allows you to install WordPress with a single click. Here is how you can install WordPress on Bluehost
- Log into your web hosting service provider (In this case Bluehost)
- Go to the control panel
- Under the Website section, click on Install WordPress
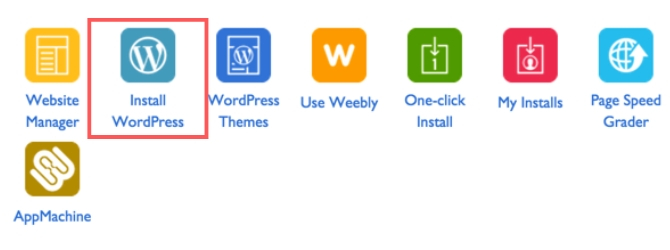
- Choose the domain where you would like to install WordPress
- Enter the site name (Not the domain name), admin username and password, and click on Install Now
Tip: The site name should be like a brand name for the blog. For example, if you write poetry, a poet’s musings could be the site name
You have now successfully installed WordPress. You can now build and customize your newly setup WordPress blog!
Step 3: Installing a WordPress Blog Theme
To start customizing your blog, you need to install a theme that will perfectly represent your blog. Start by logging into your WordPress admin account. Go to <domainname>.com/wp-admin and enter the admin username and password. You will see the dashboard of your account like this after logging into your account:
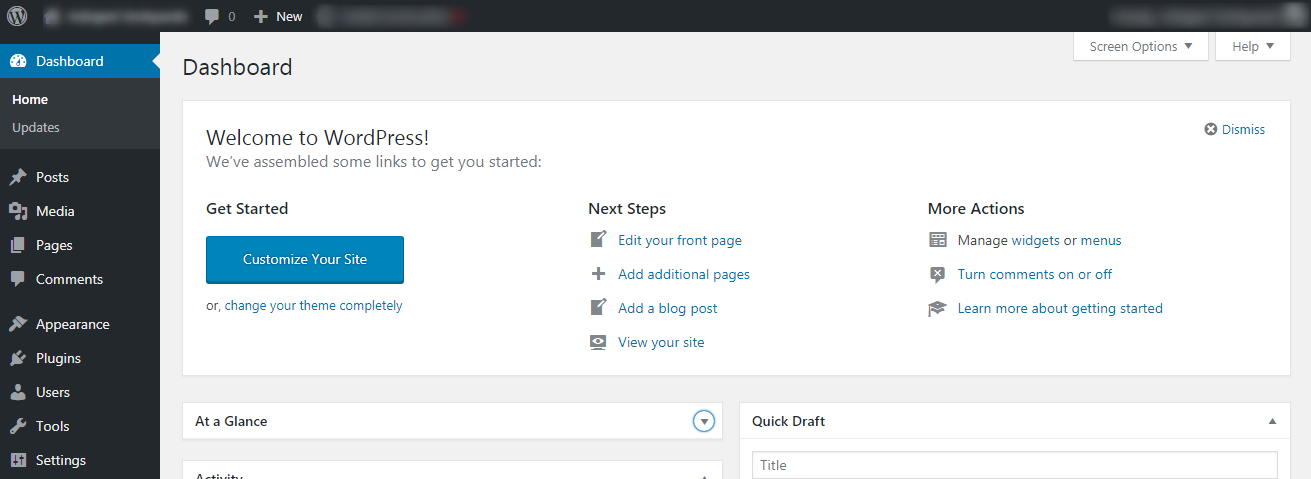
To install a new theme, on the left pane of the dashboard, go to Appearance —> Themes and click on Add New.
To view themes designed specifically for blog layouts, click on Feature Filter and in the Subject column, check the Blog option and click on Apply Filters.
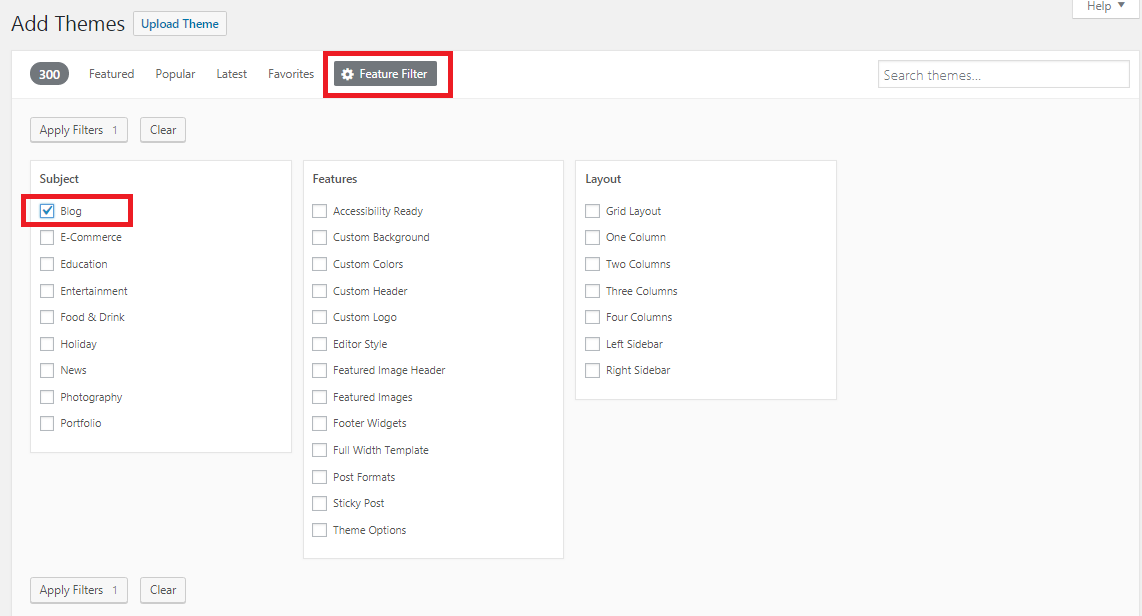
You will now see themes that fit perfectly for blogs. You can filter further by adding keywords such as music, movies, recipe, etc. to see themes that would suit your niche.
Make sure that you choose a WordPress blog theme that is mobile responsive, fast and search engine friendly. You can check these requirements in the theme documentation.
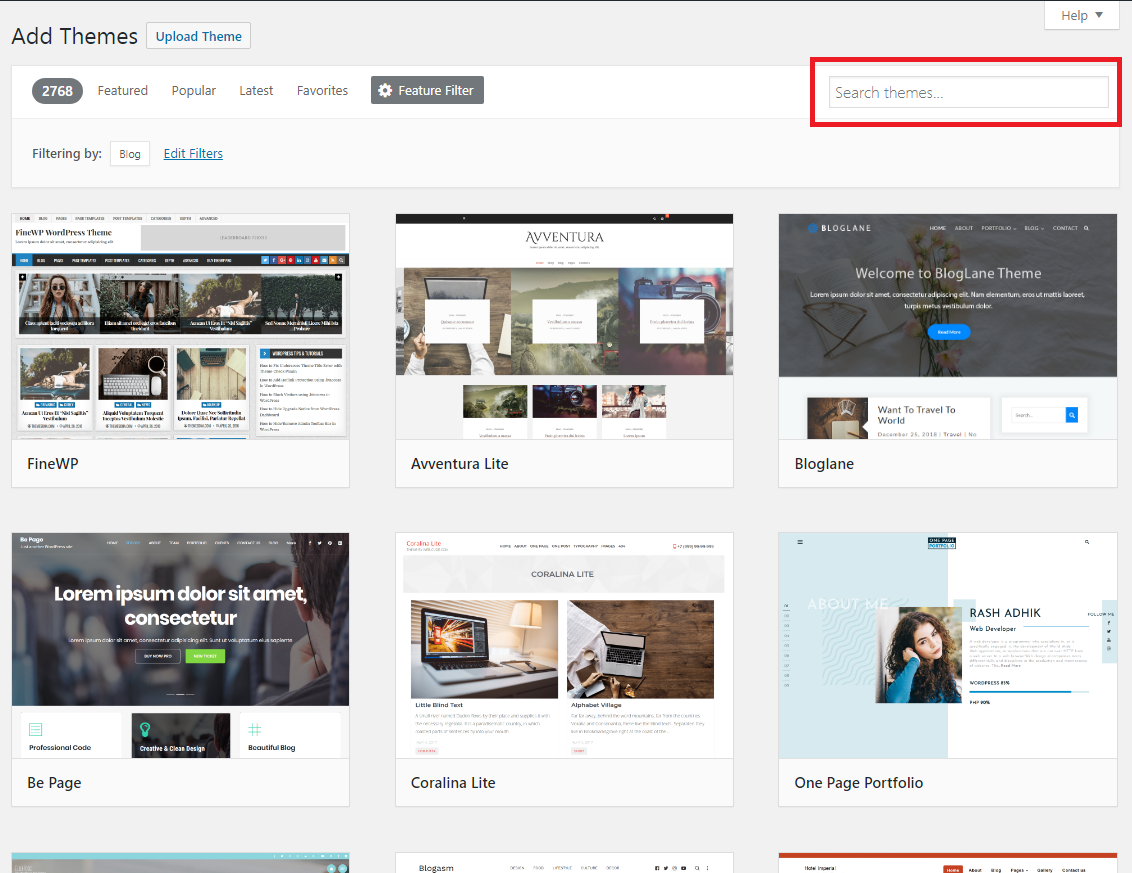
The biggest benefit of WordPress themes is they are user-friendly and intuitive. So, if you play around with it a little bit, you will be able to get the desired blog interface.
Sometimes, the free WordPress themes may have certain restrictions or limitations, therefore, if you feel the need to upgrade, you can buy a Premium WordPress Blog Themes from theme shops like CyberChimps.
Step 4: Creating a Blog Post
Now that you have set up your blog, it’s time to actually do what you wanted to start the blog in the first place – create a blog post!
Creating a blog post in WordPress is very simple. Go to Posts —> Add New, and you will see a text editor where you can write a blog post.

When you are done writing your post, you can click on the Preview button to see how it looks. Once you are satisfied with your post, click on the Publish button, and voila! Your first blog post is now live!
Step 5: Adding New Pages
Adding new pages in WordPress is similar to adding new posts. For a new blog, it is useful to have the following 4 pages:
1. Homepage
This is where your visitors will usually land. The homepage can be arranged in one of the following 3 ways:
- A customized page that explains about you and your blog
- Your latest post
- Your blog posts in reverse chronological order
Go with the one that you think will appeal to your audience. Remember, you can always experiment and tweak things to see what works for you.
2. About
The about page should talk about you and your blog. Take it as an opportunity to talk about your passion, art or craft, how did you get started and how do you intend to use the blog. Explain who is the blog for, write your bio succinctly and talk about what type of content can your readers expect.
3. Blog Page
The blog page should enlist your blog articles in reverse chronological order. If you write about different topics, you can categorize them so that the visitors won’t get jumbled in the stream of posts.
4. Contact
Make it easy for your visitors to get in touch with you. The contact page should ideally have a contact form, your email ID (optional as you might get a lot of spam emails), and links to your social media profiles.
Note: The difference between pages and posts is, a page in WordPress is a static entity whereas a post is a dynamic entity. Posts can be categorized whereas, pages are organized hierarchically.
Step 6: Adding Plugins
There are certain features that do not come with the WordPress theme, and due to feasibility constraints or the lack of technical know-how, you can’t build them in-house either. A solution to this is something known as a plugin.
A plugin is a piece of software that lets you integrate a specific set of features into your website.
Let’s look at a list of must-have plugins for your blog to take it to the next level.
1. Yoast SEO
If you want to improve the rankings of your blog in the search engine, you have to focus on search engine optimization (SEO). The term sounds scary, but with a little effort, every day will enhance your rank over time.
Yoast SEO helps with SEO friendly content, XML sitemaps and provides an easy template to add a title, meta description, and other SEO tags.
2. Akismet Anti-Spam
Once you start publishing blog posts, your website is prone to get flooded by spam comments. It is impossible to identify and keep genuine comments by going through them one by one.
Akismet Anti-Spam makes it easy for you by acting as a filter for spam comments. It blocks the spam comments and shows only genuine comments.
You can also view the spam comment list and unblock the ones that don’t appear to be spam.
3. Editorial Calendar
If you’re getting serious about blogging, then you may realize the importance of planning content in advance. You need to plan and schedule the content that keeps you on track.
Editorial Calendar facilitates the whole planning and scheduling process. You can view the schedule of your content, manage posts from different authors and reschedule your content just through the drag & drop feature. You can also view your drafts, edit the title, content and publish posts in advance.
4. MailChimp for WordPress
One of the crucial ways to grow your blog is by increasing your subscriber base. This way, you can send out new blog posts, announcements, and any other communication periodically.
MailChimp is a widely used email marketing tool that enables you to build an email list and send mass emails. The MailChimp for WordPress plugin lets you collect emails via your website. You can create forms on your site through which you can build your newsletter list. It also integrates with major contact form plugins giving you one more avenue to build your database.
5. Rating-Widget
You’re churning out content on a massive level, but still, you’re finding it difficult to drive traffic to your website. What if you could ask users to rate your blog posts and show the ratings in the search engine result pages (SERP)?
Rating-Widget does exactly that! At the bottom of every blog post, you can ask users to rate your article which then reflects in SERPs. This tactic is particularly effective if you share recipes, lessons or tutorials on a particular topic.
6. Sucuri
As your website starts to gain more traction, it becomes more susceptible to security threats. To curb these potential website attacks, Sucuri is a must-have plugin for your site. The plugin is available for free and offers features such as security activity auditing, file integrity monitoring, remote malware scanning, blacklist monitoring to name a few. Although these terms might sound alien to you, the point is, installing Sucuri is always a safe bet for your website.
7. Contact Form 7
If you’re looking for a nifty, user-friendly way for users to get in touch with you, go for the Contact Form 7 plugin. The plugin is very intuitive, and you’ll be able to set up your contact form in absolutely no time! (Well, not absolutely, but you get the drift.)
The plugin is available for free, and if you are still not sure whether or not to go with the plugin, I think 5 million+ users count should convince you!
8. Insert Headers and Footers
If you want to add some sort of code or script such as Google Analytics or Tag Manager, instead of editing theme files (which is not recommended if you’re not a coder), you can use the Insert Headers and Footers plugin. You can add tracking script in your website through this plugin within a minute.
And if you are getting serious about blogging to treat it as a side project, then you need to use multiple analytics tracking and monetization tools. In such cases, this plugin proves to be super efficient.
9. AddThis
If you are looking to get your content shared across the social media platforms, you need AddThis. AddThis is a powerful plugin that comes with multiple features such as social media share and follow buttons, list building, link promotion, related posts through pop-ups, floating bars and sliders. The most surprising element of all this is, despite being a feature-heavy tool, AddThis is absolutely free!
10. WP Buffs
WP Buffs is a 24/7 WordPress website maintenance service for serious website owners and white-label partners. If you’re just starting a WordPress website for the first time and need help with speed and security optimization, updates, website edits, backups, 24/7 uptime monitoring and more, they’ve got your back!
Conclusion
Congratulations! You have successfully set up your blog on WordPress. As said earlier, blogging gives you a platform to share your art, passion, gifts, and opinions with the world.
Hope this article has given you enough information to get your blog off the ground. If you have any queries or got stuck during set up, do not hesitate to drop a comment below!


