Summary
The article explains how to create a WordPress photography website. It defines steps like choosing hosting and a domain, installing WordPress, and selecting a photography-friendly theme.
It also highlights how to add photo galleries, portfolios, contact pages, and customization tips. Helping readers build a visually appealing site to showcase their photography work.
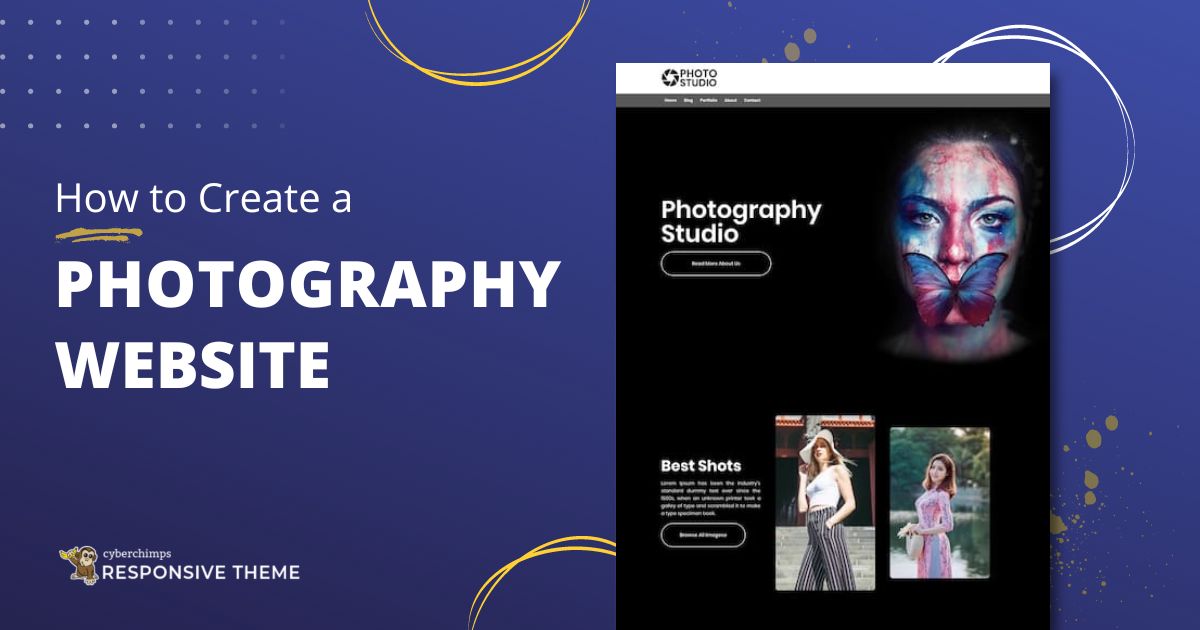
Are you looking to create a Photography website to showcase your work online?
Launching a website is the best way to do that. Social media is a popular platform but is far from fetching much-needed traction to your portfolio.
Not having a website is like being a modern-day caveman!
So if you like to click pictures and want to make money or share photos with a larger audience, making a photography website is the best way to do that.
A WordPress photography website will help you reach a wider audience and bring new clients.
This step-by-step guide has all the information you need to create a photography website.
This guide has everything from inspirational stages to developing and publishing your own website!
So let’s begin!
- Why Choose WordPress For Your Photography Website?
- How To Create a Photography Website
- Step 1: Choosing Your Domain Name and Web Hosting Plan
- Step 2: Installing WordPress
- Step 3: Install and Activate the Responsive Theme
- Step 4: Install & Activate The Responsive Addons Plugin
- Step 5: Import The Photography Studio Template
- Step 6: How to Customize The Blog Layout Using Customizer?
- Step 7: How To Edit Your Photography Website Using Elementor?
- How to Optimize Images on Your Photography Website
- Essential Plugins for Your Photography Website
- FAQ’s
- Wrapping Up!
Responsive Starter Templates is the best plugin to import Website Templates – Get it for free.
Why Choose WordPress For Your Photography Website?
WordPress powers over 39.5% of all the websites on the Internet, and out of all the CMS-built websites, WordPress has a 64% market share, a 4% growth from 2020.
This is because when WordPress came along, building websites was pretty tough, with all the technical stuff involved, like HTML, CSS, and compliance standards.
WordPress, launched in 2003, basically eliminated all these technical barriers. Anyone with general-level computer skills can build a website with WordPress.
It is a CMS platform you don’t have to do anything from scratch. You start with a fully designed website and customize its content & layout.
One important thing to note is WordPress comes in two versions, WordPress.org and WordPress.com. WordPress.org is a community website where you can download WordPress software (for free).
Unlike WordPress.com, WordPress.org does not come with a website hosting service.
How To Create a Photography Website
To reach a broader audience, It is essential for photographers to have a compelling online presence. Whether you’re an aspiring photographer or a seasoned professional, establishing your own photography website can seem like a difficult task.
That is why we have created an ultimate step-by-step guide to help you set up your photography website. Let’s have a look:
Step 1: Choosing Your Domain Name and Web Hosting Plan
A domain name is the address of your website on the internet. It’s the name that users type to get to your website. For example, cyberchimps.com or wpeka.com.
Web hostingstarter is basically where your website’s files are stored. The hosting service allows the websites to be accessible via the World Wide Web.

Now let’s go ahead and purchase the domain and hosting.
Just open Bluehost on another tab and click on the Get Started Button. On the next screen, select the plan of your choice and move ahead to choose the domain name.
Now add your account information and finalize the package info to complete the purchase. You can go for the 36-month plan because that’s the best value.
After adding the payment details, you’ll receive a confirmation mail and instructions on logging in to your control panel.
Once you’re registered with Bluehost, you’re good to go!
Step 2: Installing WordPress
Now let’s see how to install WordPress with Bluehost easily.
Bluehost offers a 1-click installation of WordPress and other CMSs such as Joomla and Drupal.
1. Log into Bluehost
2. Go to the control panel
3. Click on the WordPress icon (Install WordPress), which you can find under the website section
4. Choose the domain where you’d like to install WordPress
5. Enter the site name, admin username, and admin password of your choice, and once you’re done, click on Install Now
And you’re done!
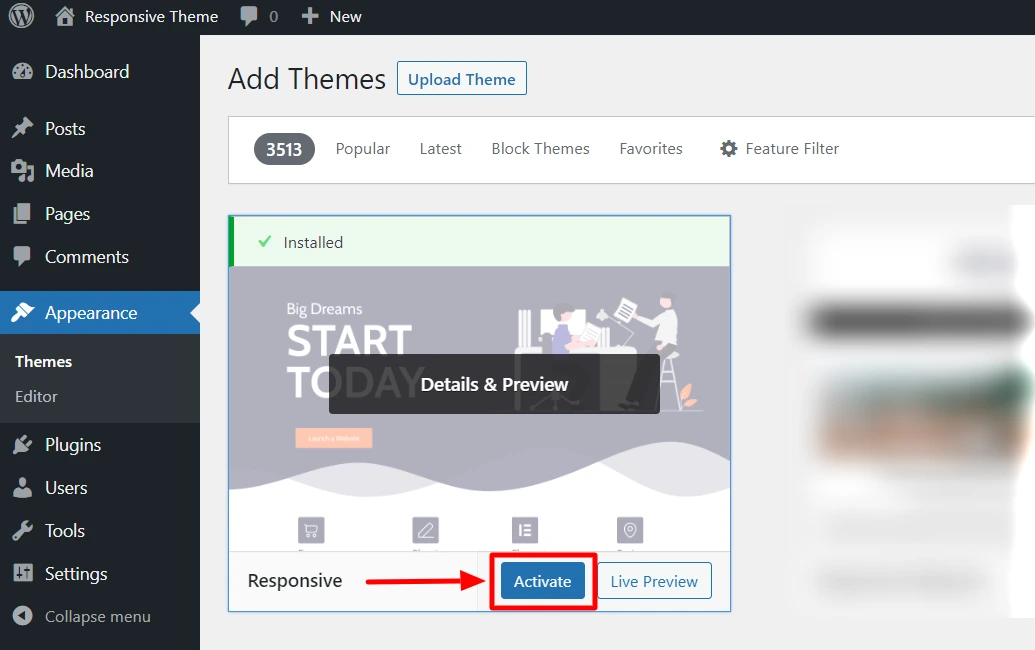
Step 3: Install and Activate the Responsive Theme
The Responsive theme is a stunning WordPress theme that allows you to customize every part of your website.
You can get a free copy of the theme from the website.
Alternatively, you can also download it from the WordPress repository. We have also compiled a list of free WordPress themes you can check out!
After you have downloaded the theme, log in to your WordPress Dashboard.
Go to Appearance > Themes > Add New.

Type Responsive in the search bar.

Click Install to Install the Responsive theme.

Click Activate to activate the theme.
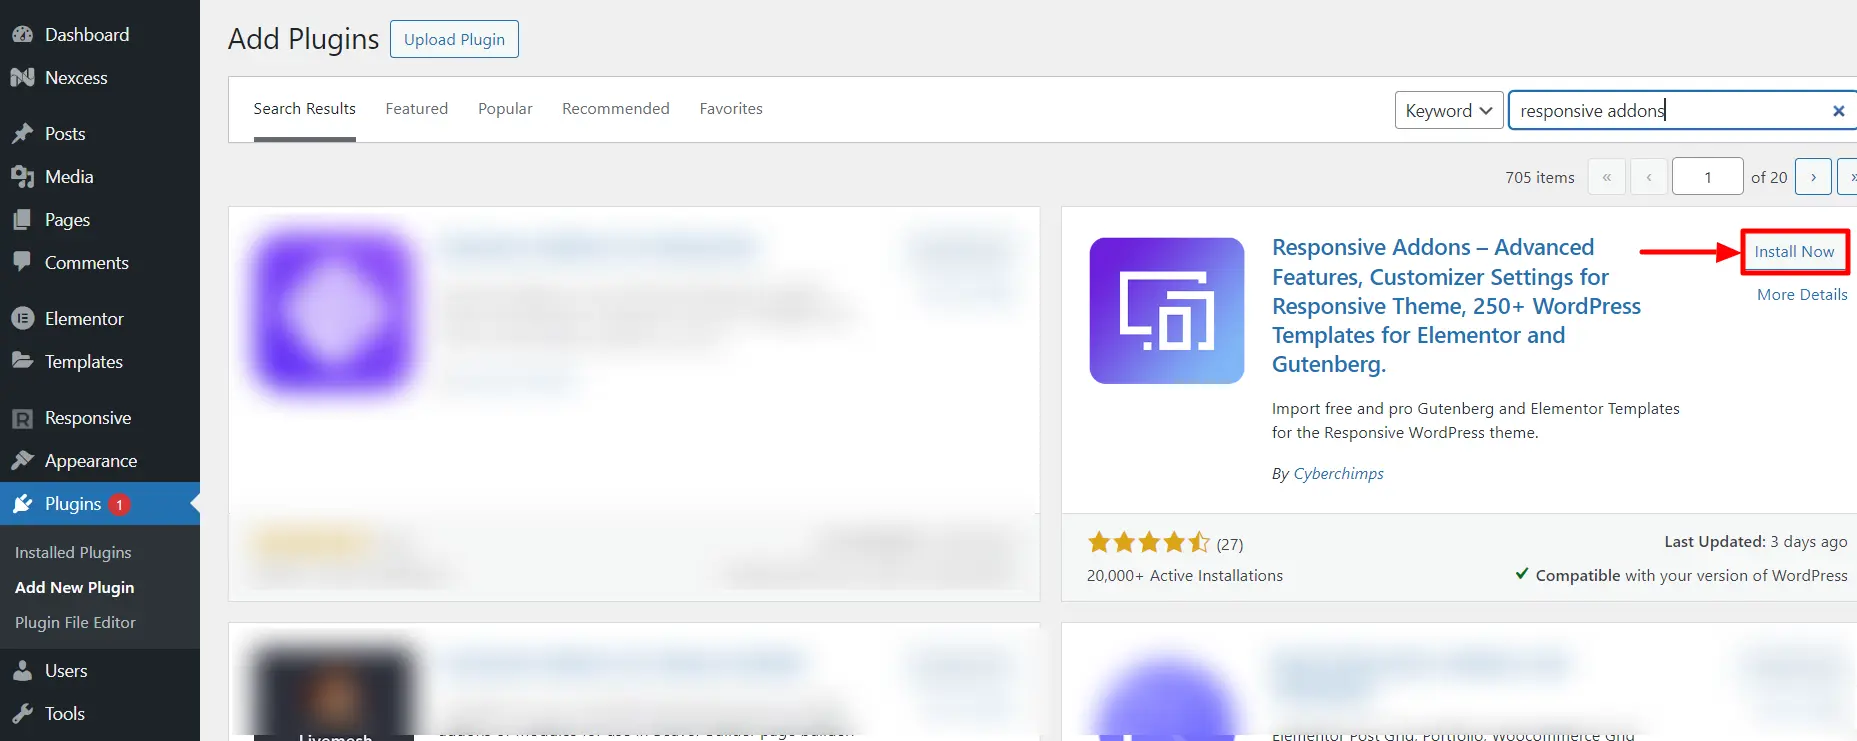
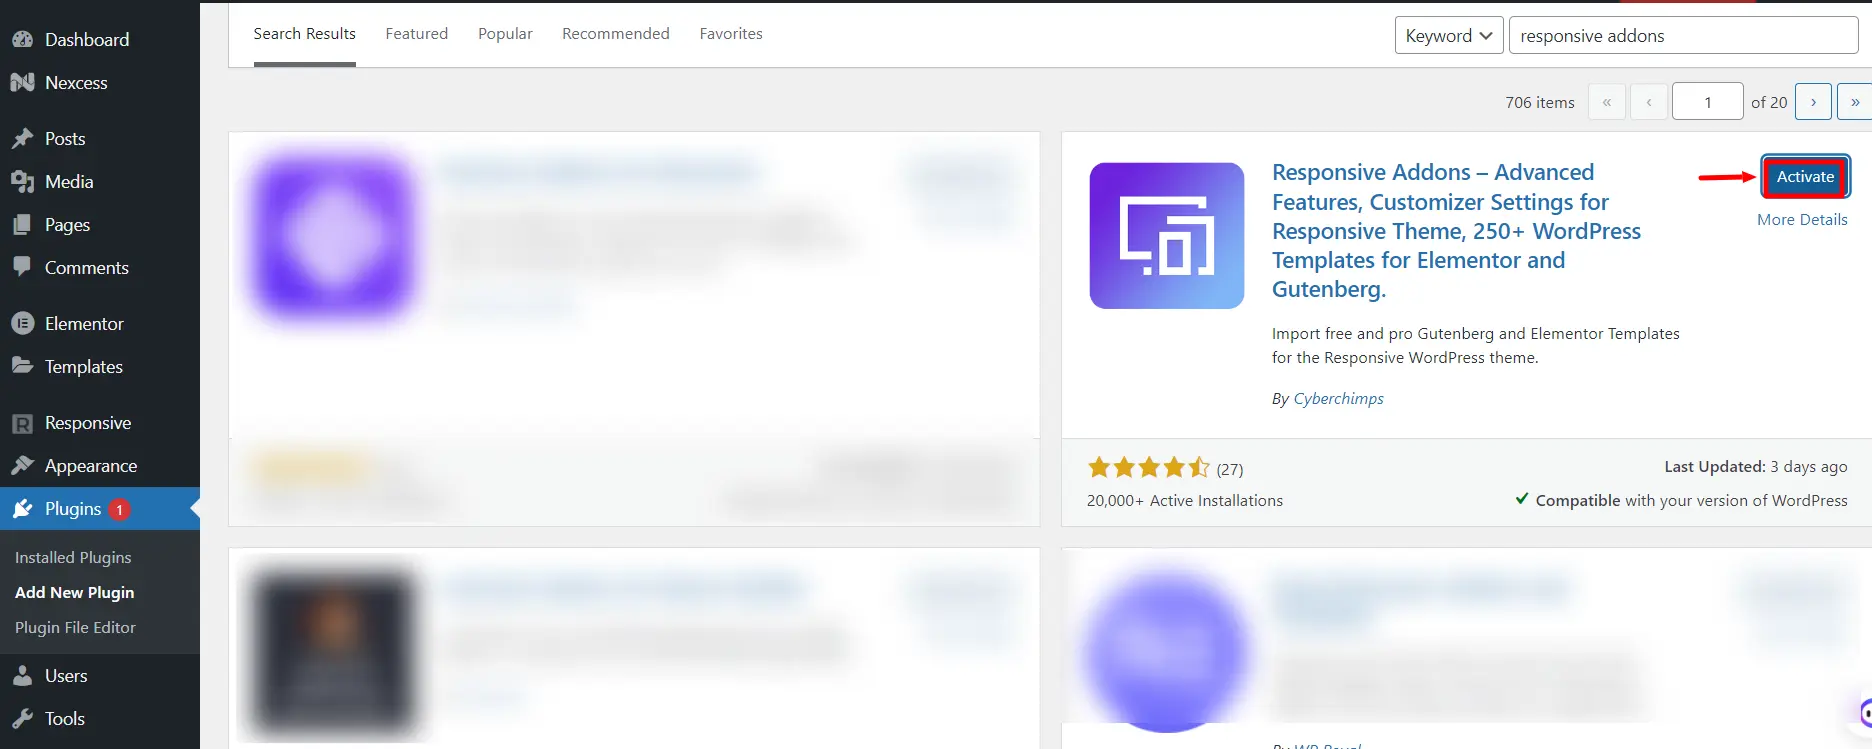
Step 4: Install & Activate The Responsive Addons Plugin
Responsive Addons is a plugin that extends the function of the free theme. It offers 150+ WordPress website templates for Elementor and WordPress Block Editorelementor which help you build fully functional websites in few clicks.
There are plenty of free WordPress website templates that you can use for every niche.
Here in this tutorial, we’ll be showing you, how you can use the free photography template to make a stunning photography website.
In addition, It also provides additional exclusive customization features and extensions, such as a mega menu and white label for free, allowing you to design beautiful and responsive websites.
The plugin can be installed like any other WordPress plugin.
Log in to your WordPress Dashboard
Go to Plugins > Add New.

Seach responsive addons in the search bar.

Click on Install Now to Install the Plugin
Now, click on the Activate button to activate the plugin.
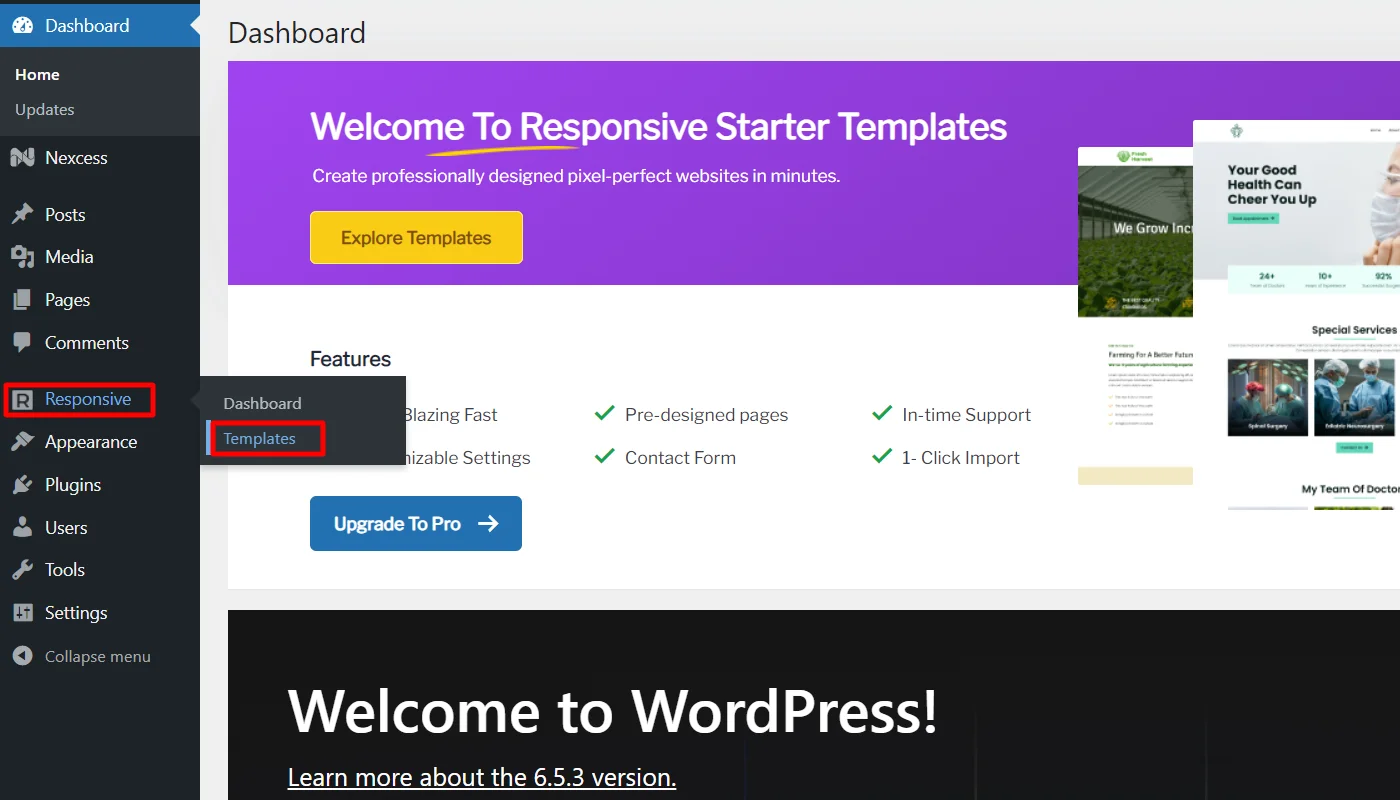
Once the plugin is active, navigate to your admin dashboard, and click Responsive> Dashboard, and go to the Settings tab.
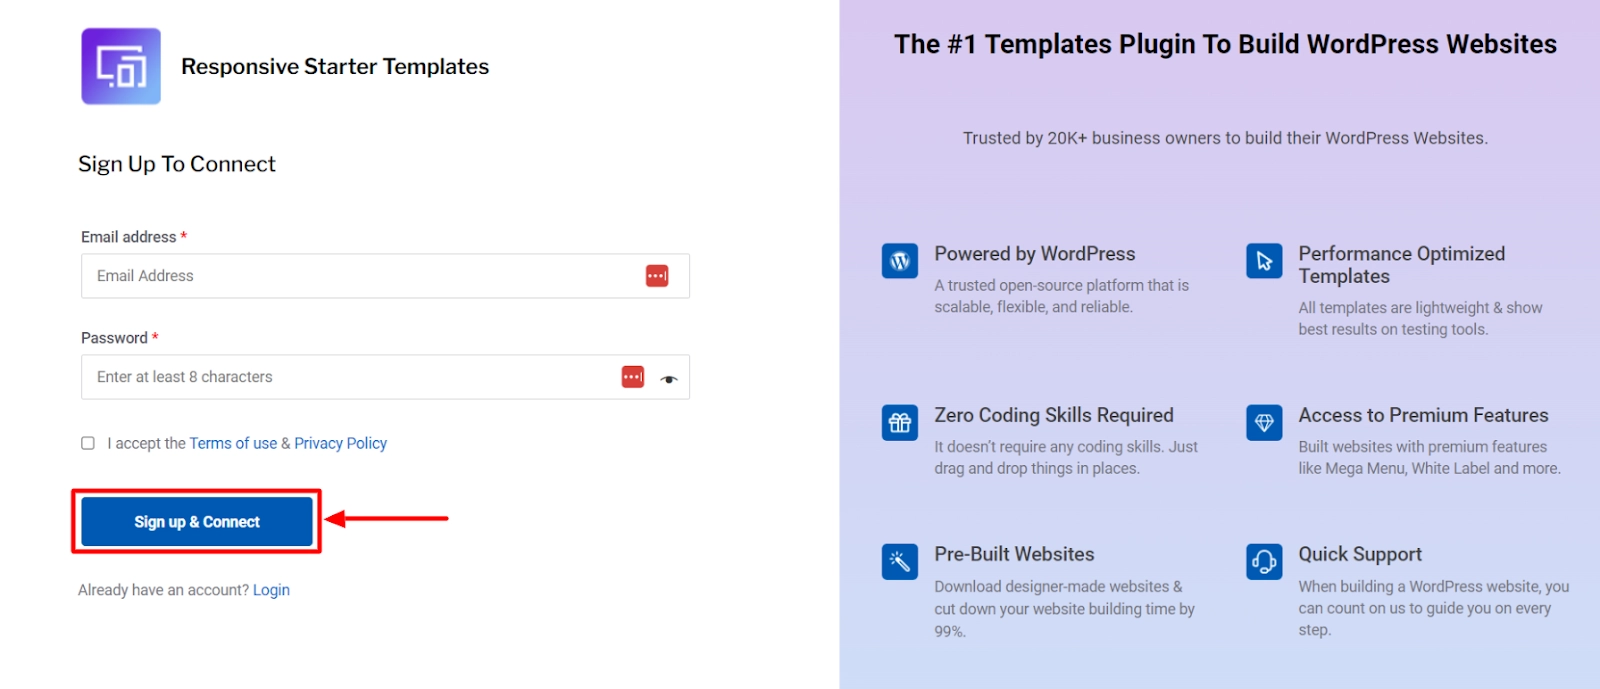
Click on New? Create a free account.

You will be redirected to the signup page window, where you need to enter your details and click on the Sign up & Connect button.
[Note: You need to sign up and connect only if you are a new user, else you skip to the next step]
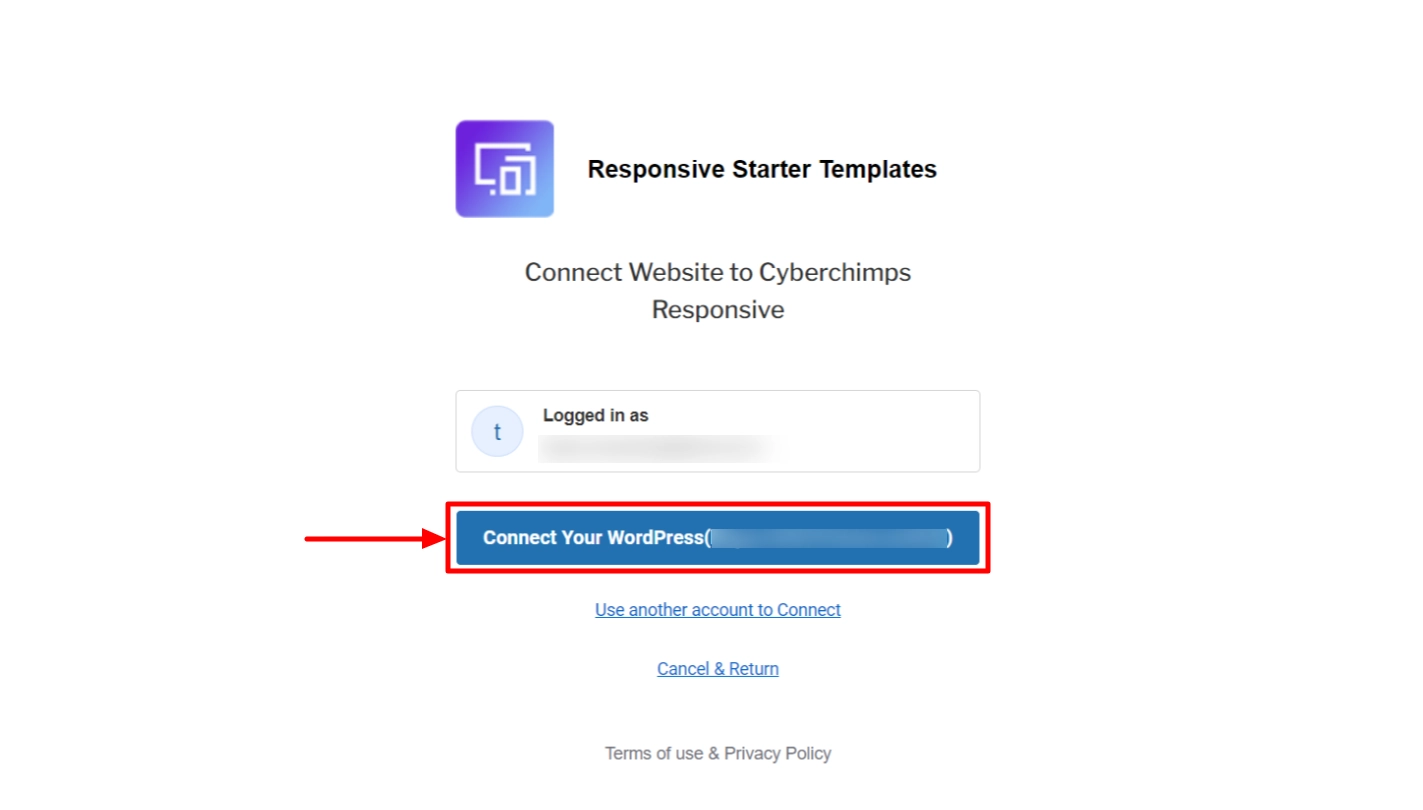
5. Click on Connect Your WordPress and you’re done.
Step 5: Import The Photography Studio Template
The photography studio is a free ready-site template that can be installed in just a click. Next after activating the Responsive Addons plugin to import the website follow these steps:
Go to Responsive > Templates on your WordPress dashboard to import the Photography template.
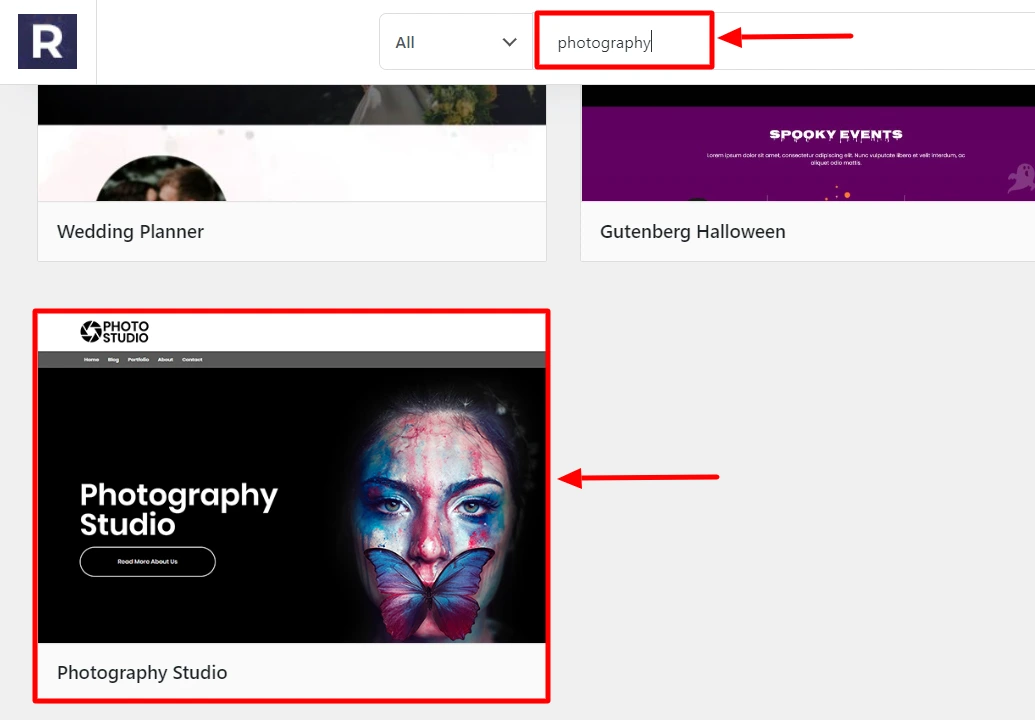
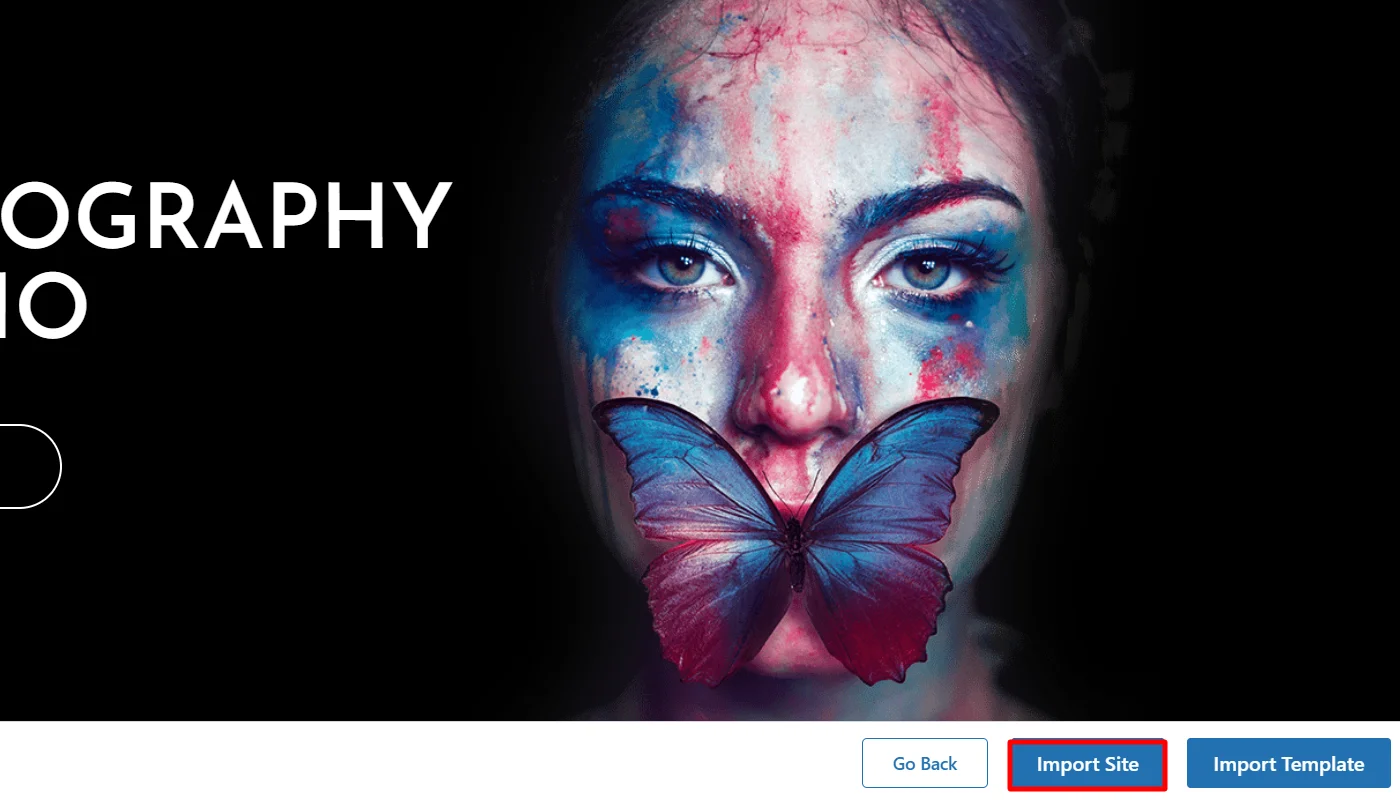
Search for Photography in the search bar, and click on the Photography Studio template.
Click on Import Site button.
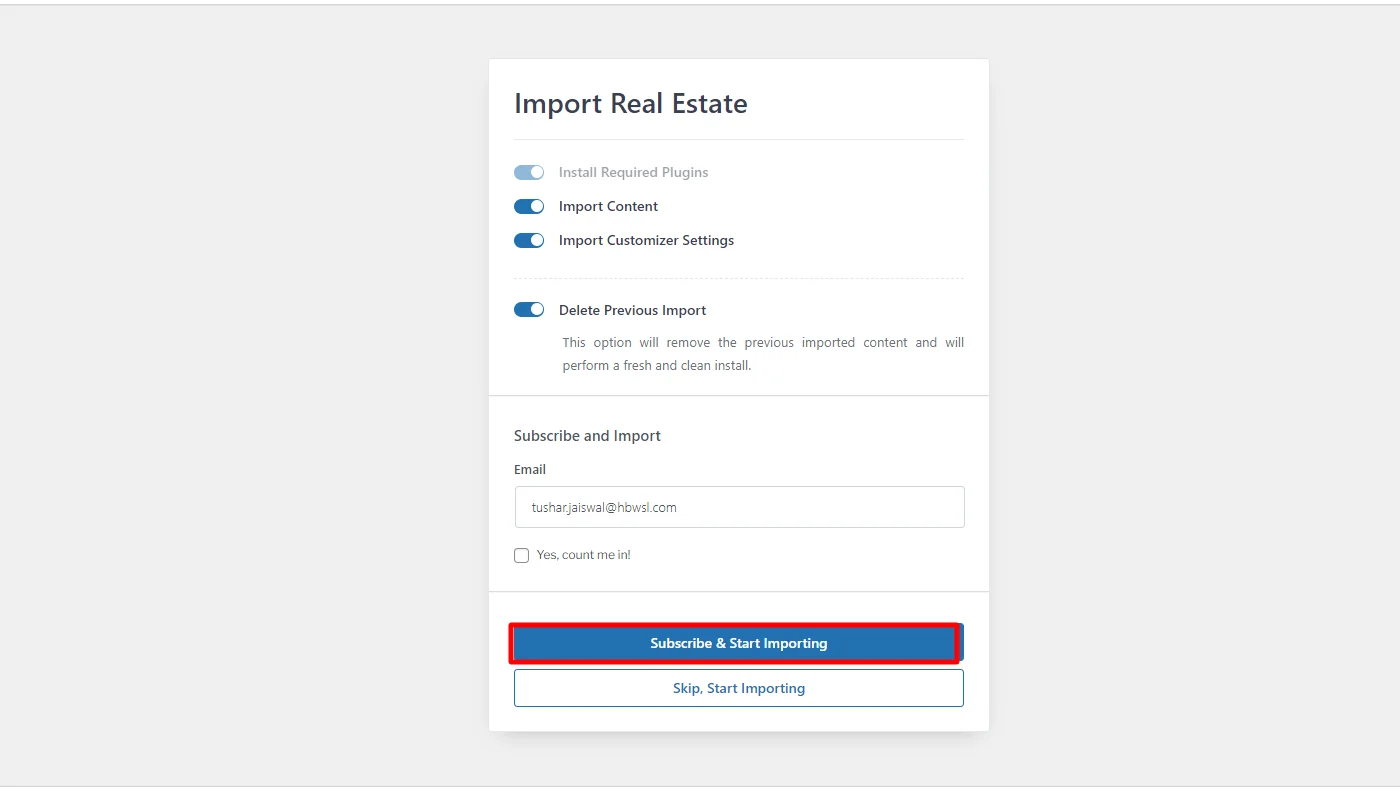
After which, you’ll be directed to the action page to start importing the template
Next, click on Subscribe & Start Importing button.

After completing the Import, a Visit Website button will take you to the newly created website.
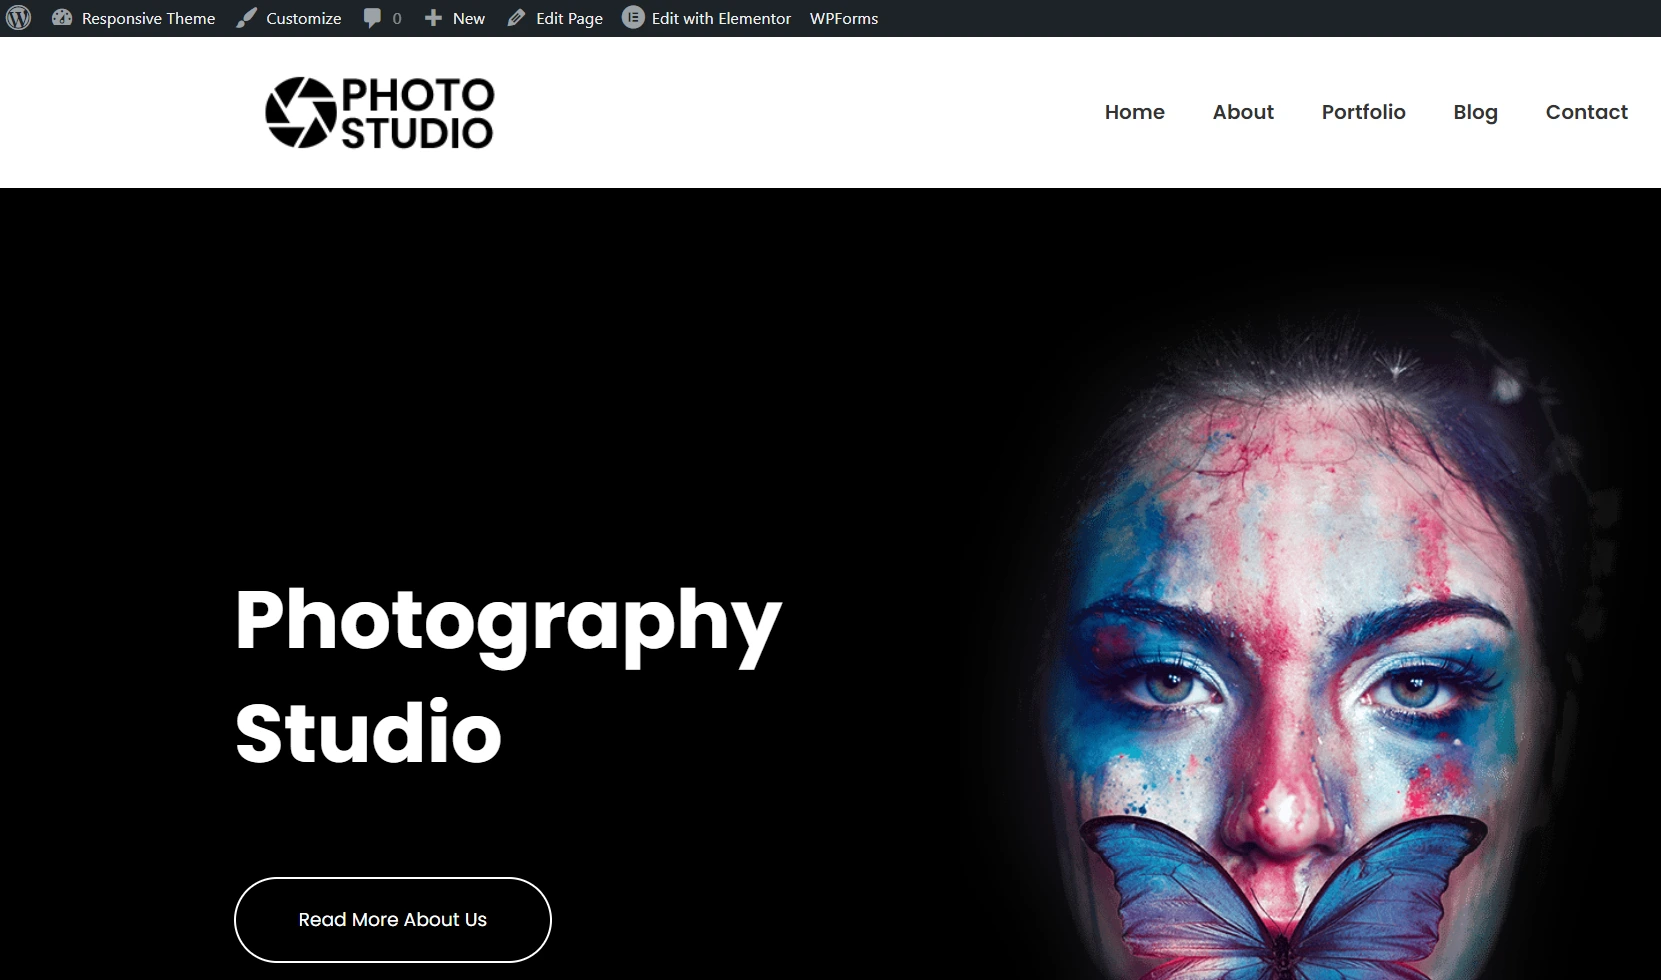
And this is how your Photography website will look. How easy was that?
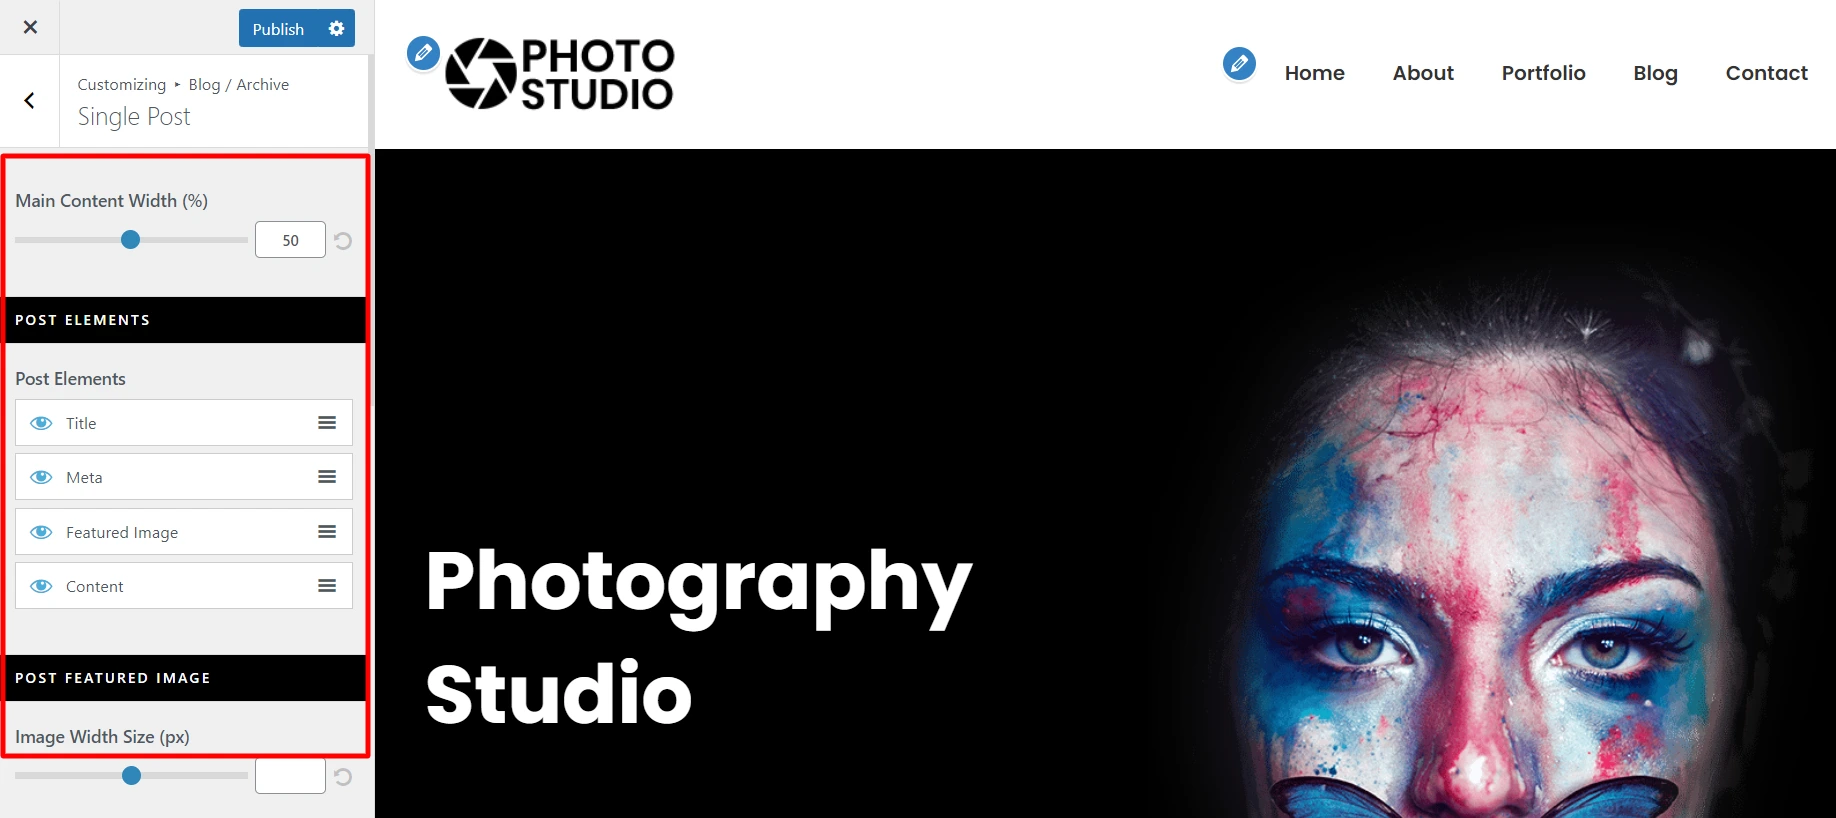
Step 6: How to Customize The Blog Layout Using Customizer?
Follow the steps below to customize the blog layout using Customizer:
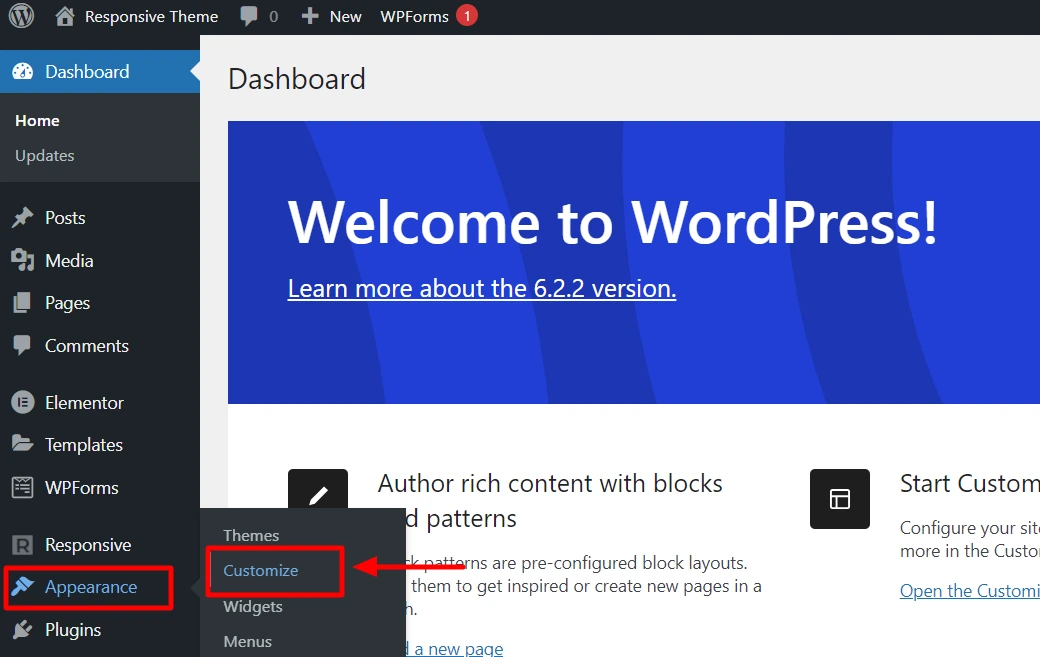
From the WordPress dashboard, navigate to Appearance > Customize
Next, select Blog/Archive

To select a layout you can seitch between a Blog/Archieve or Single post
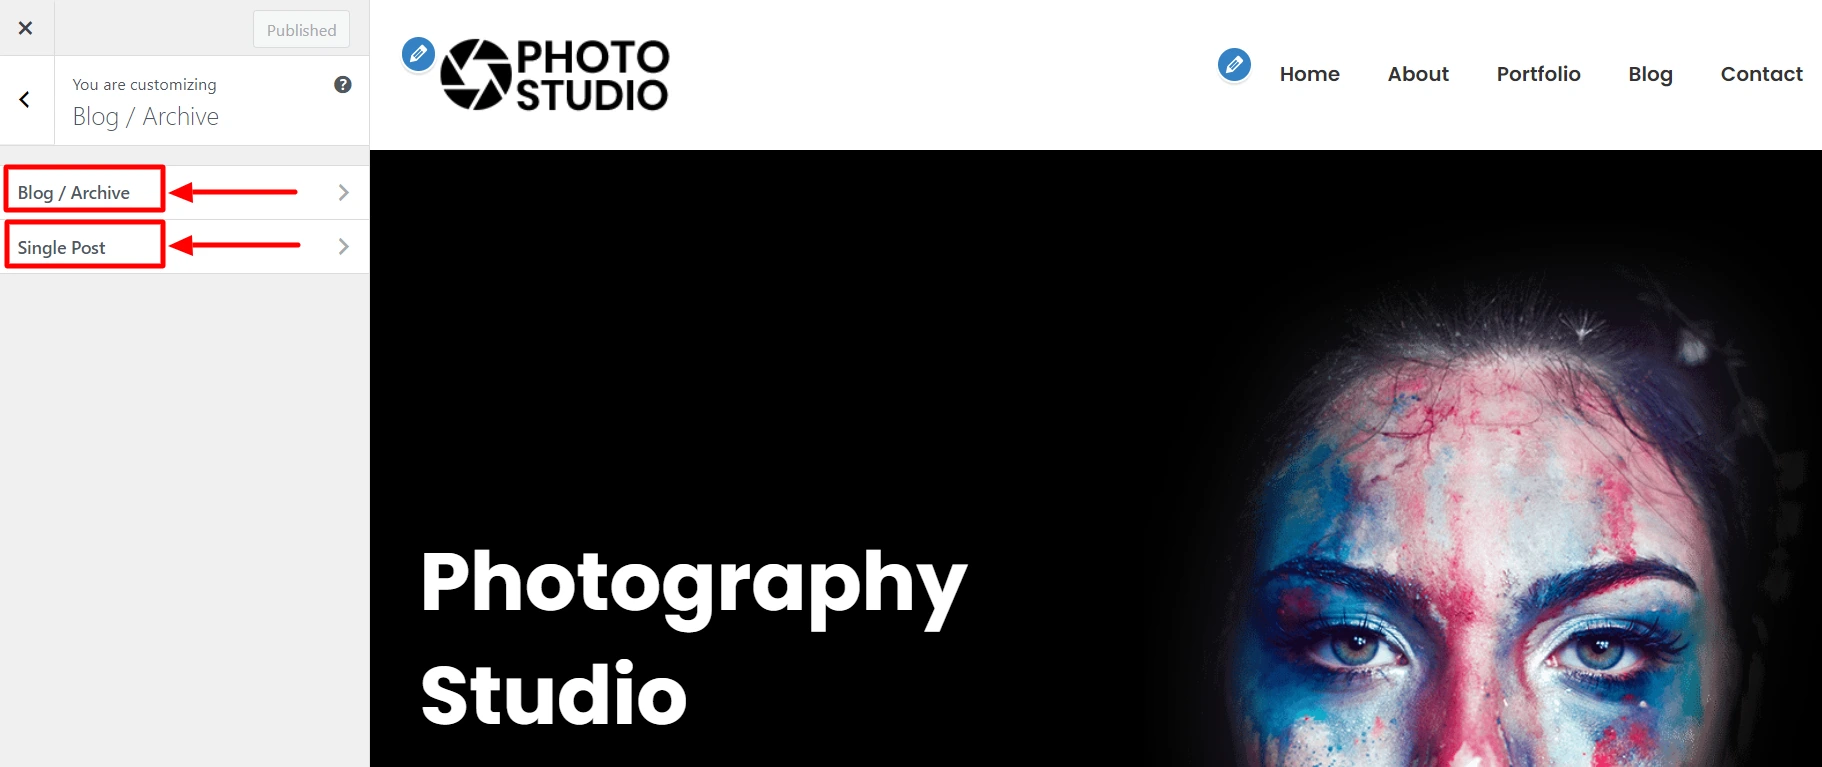
On the next page, you will see different options to change the layout of your blog page.
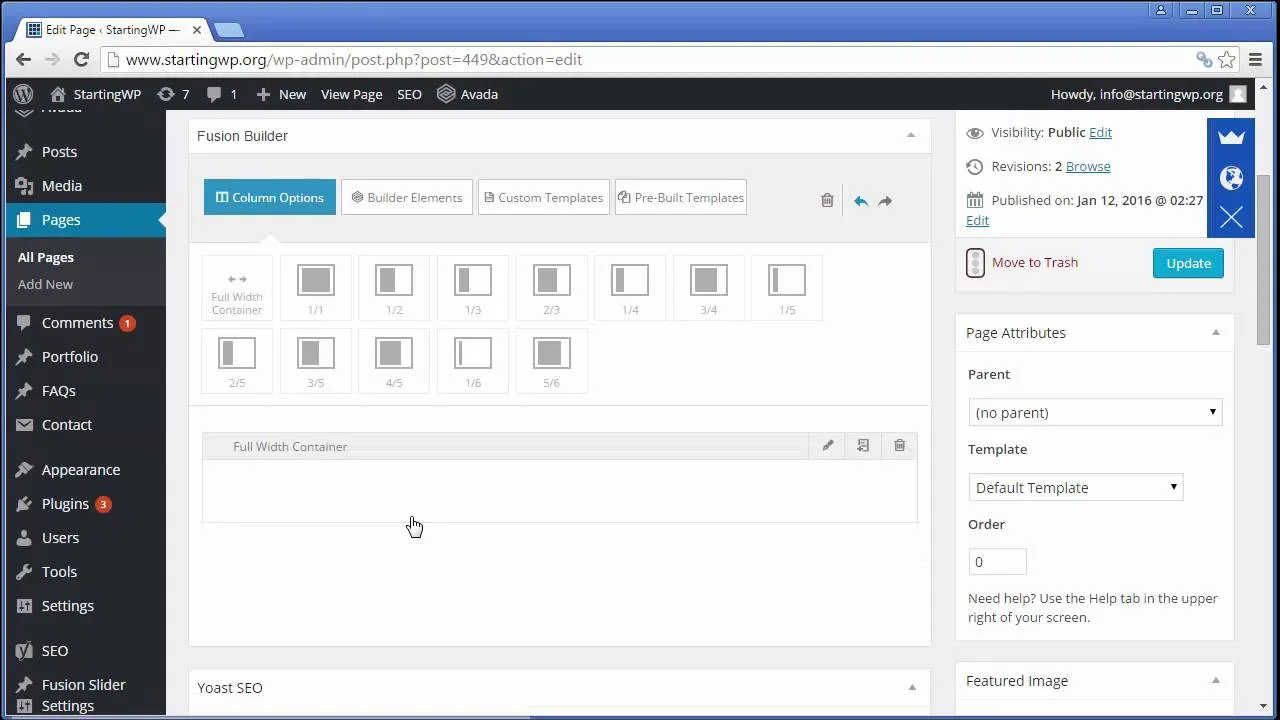
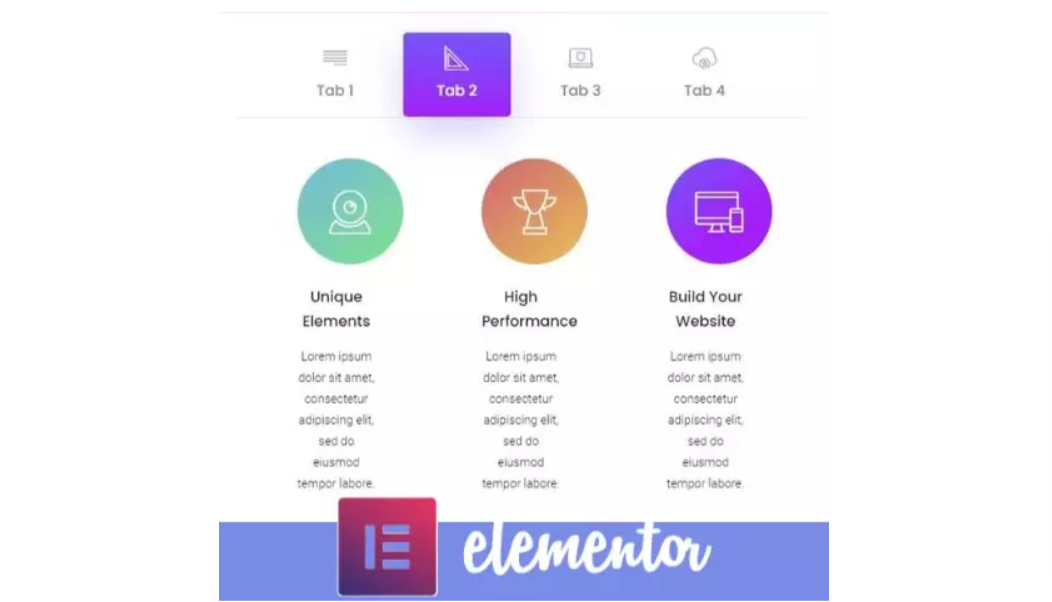
Step 7: How To Edit Your Photography Website Using Elementor?
Follow the steps below to edit the photography website using Elementor drag-and-drop page builder.
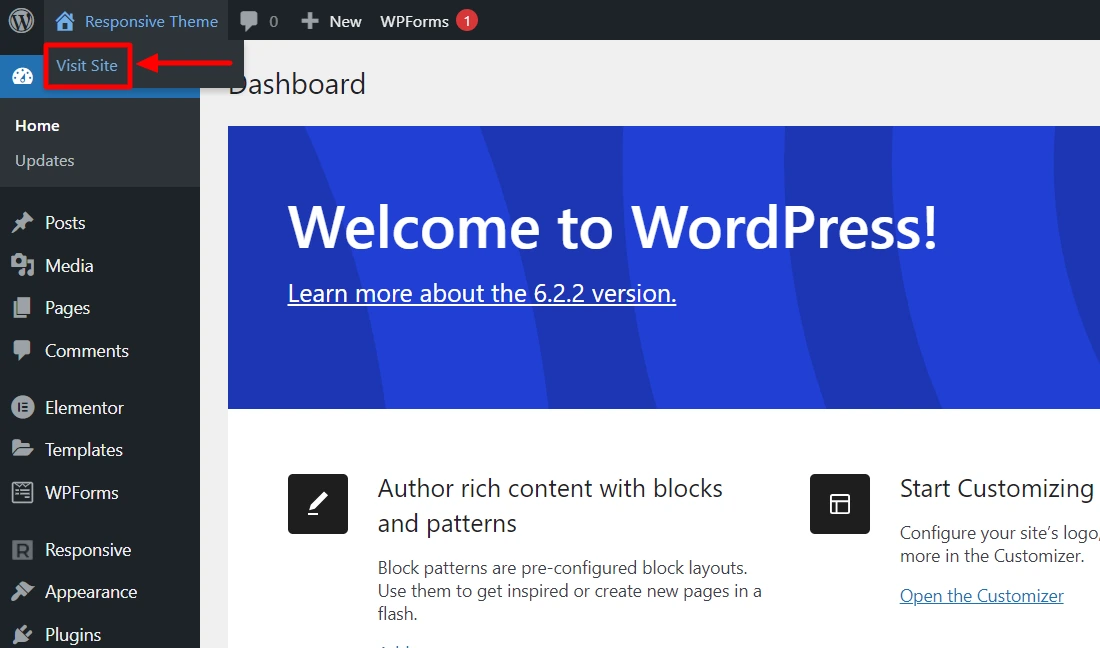
Go to your WordPress dashboard and click on Visit site.
After your website opens, click Edit with Elementor at the top.
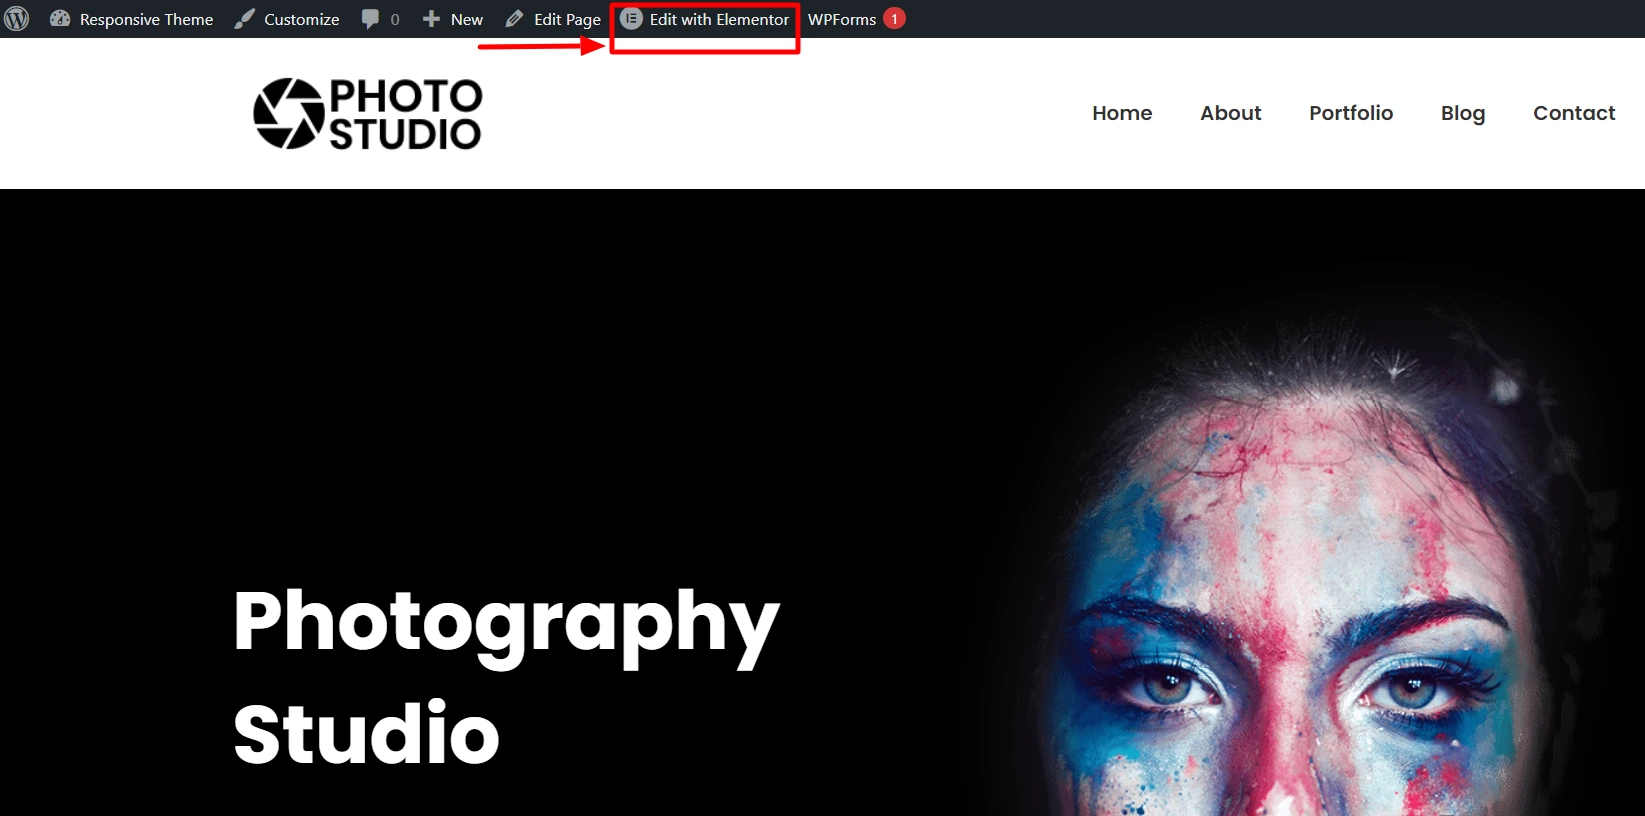
You’ll find many options to change your page’s content and style here.
After you’re done making the changes, click on Update.
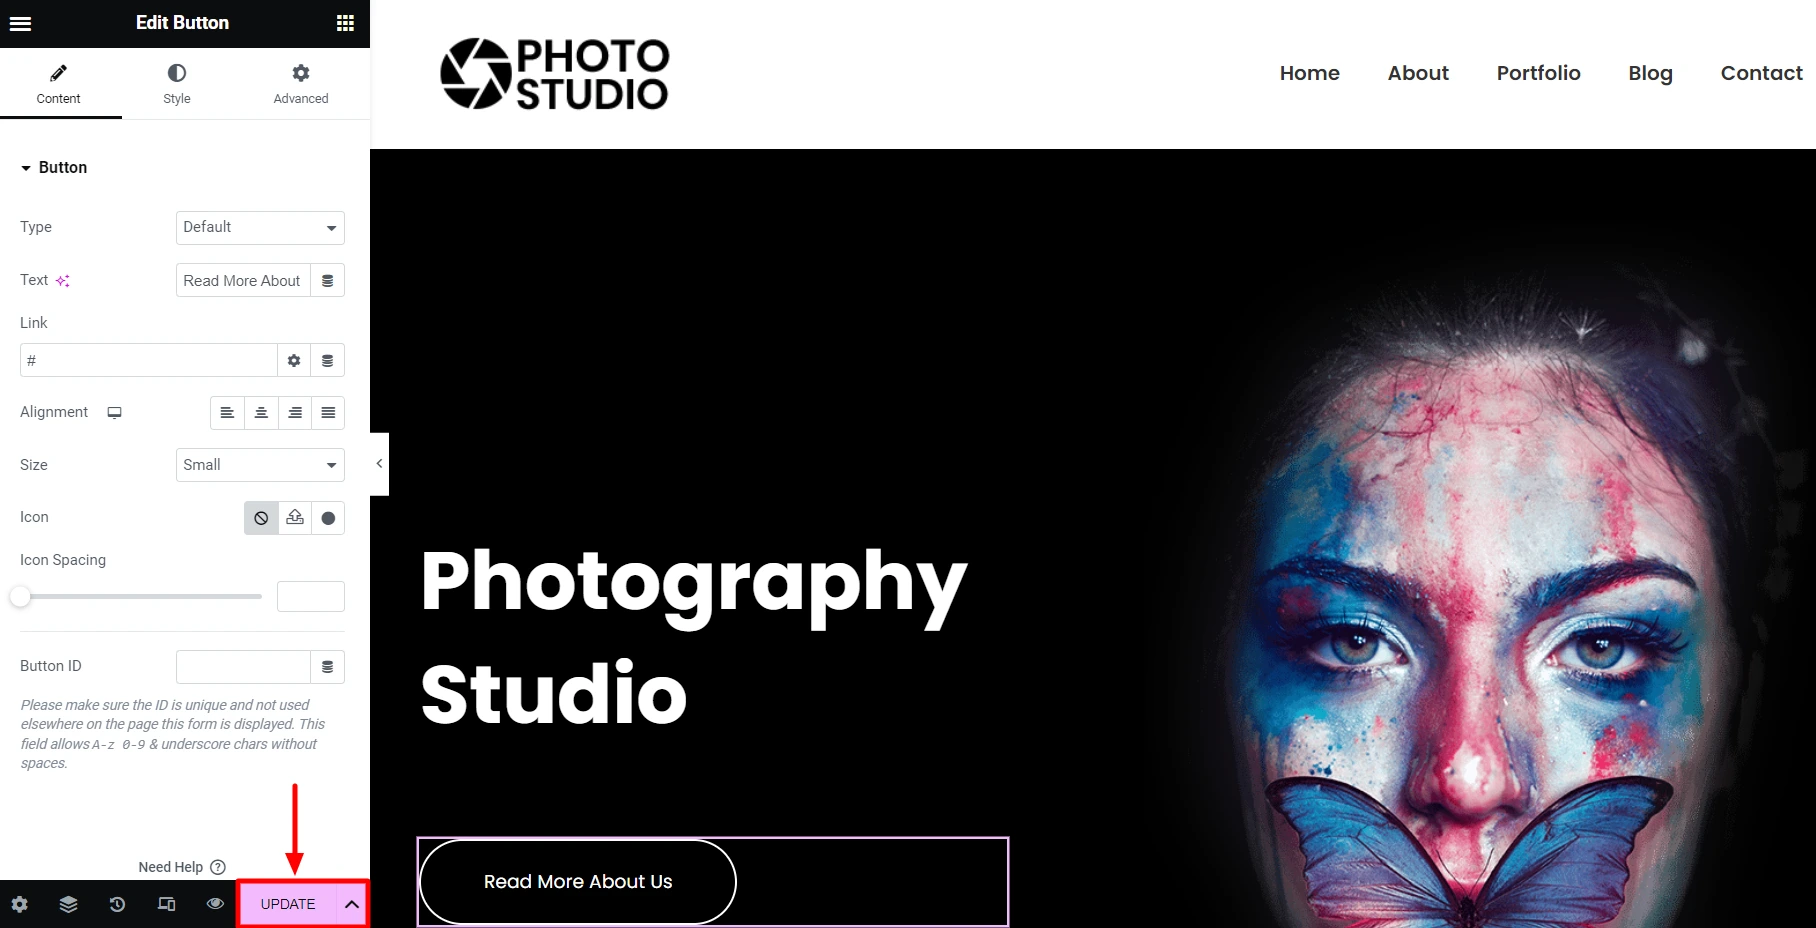
And you’re done!
How to Optimize Images on Your Photography Website
Optimization is an essential part of delivering a beautiful user experience. High-resolution images are a visual treat but can slow down your website’s loading speed, leading to potential visitor frustration. To create the perfect balance between visual appeal and performance, always optimize your images.
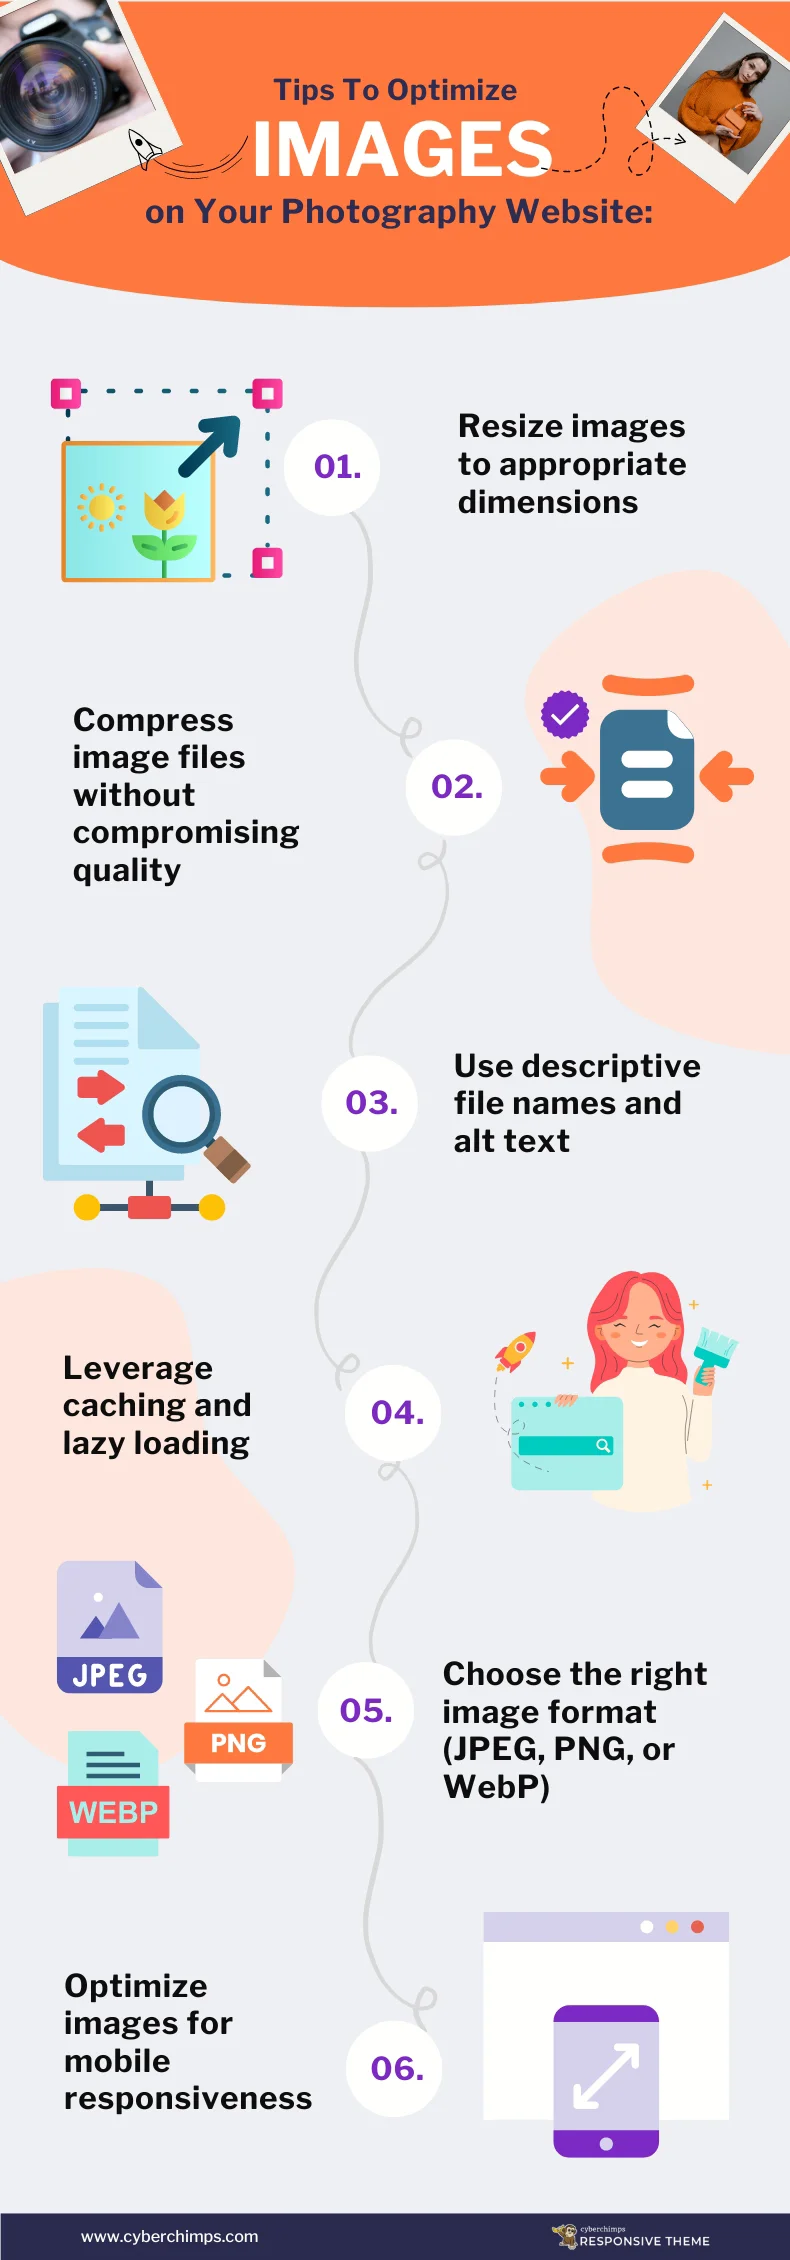
Here are the best practices you can follow for optimizing your images:
Choose the Right Format- Select Appropriate Image Formats that Retain Your Photographic Properties. Use JPEG, PNG, or WEBP Formats, and avoid using TIFF or BMP formats as they Compromise the Size and Colors.
- Resize and Compress Images– This Reduces Website Loading Time and Improves User Experience.
- Add Descriptive File Names– Rename Images to Descriptive Names that Reflect their Content. This helps with SEO and Accessibility.
- Add Alt Text– Add Relevant Alt Text to all Images. It helps Search Engines Understand the Content of your Images.
- Enable Lazy Loading– This Delays the Loading of Images Until a User Scrolls Down to the Image. It helps Improve Initial Page Load Time.
The goal is to maintain visual appeal while ensuring optimal website performance. Let’s hop on to some of the Plugins designed to do this!
Essential Plugins for Your Photography Website
Creating an online portfolio through a photography website demands more than just stunning visuals; it requires the right tools to enhance user experience and boost your artistic flair.
Here is a list of must-have plugins that act as the backbone of your digital gallery by elevating its functionality and overall aesthetics.
1. Responsive Elementor Addons
Responsive Elementor Addons is a premium plugin that offers 50+ premium widgets and extensions that help you design beautiful Elementor websites efficiently, without writing any code. These power-packed drag-and-drop widgets provide ease of structure, and layout designs and speed up the designing process.
Check out the following widgets for a seamless Photography website!
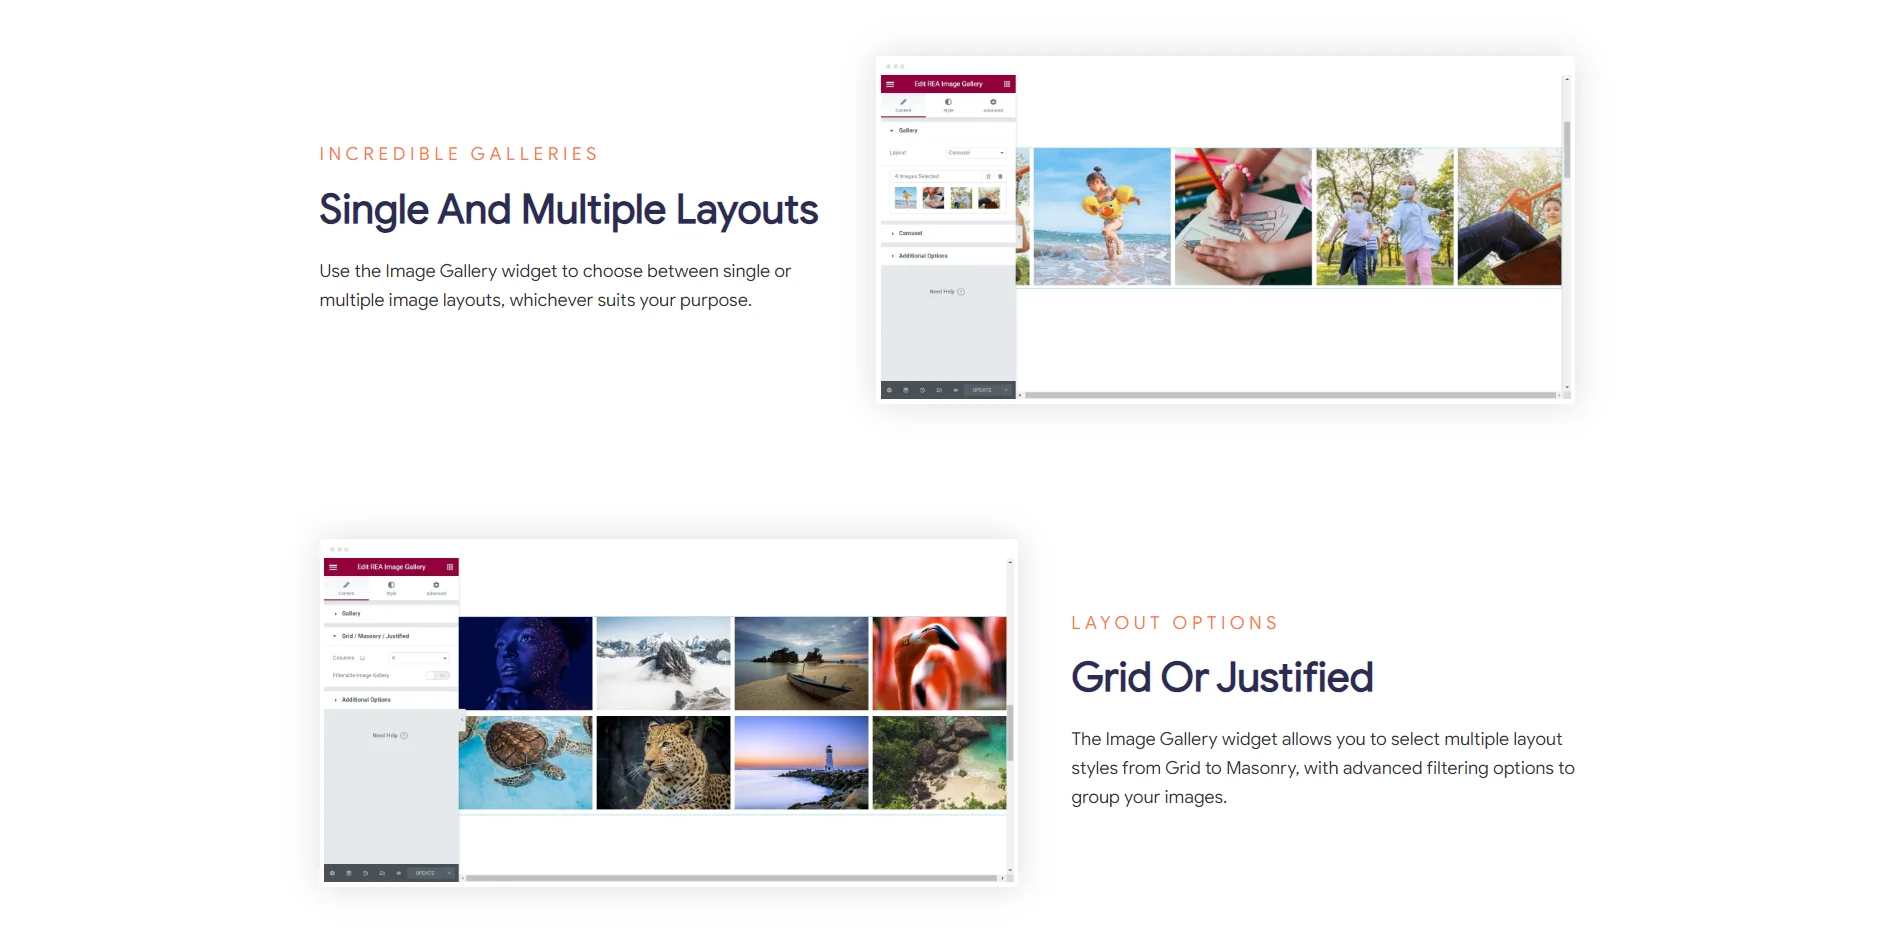
Image Gallery Widget – Elementor Addons by Cyberchimps
Image Gallery widget offers multiple features and options for complete and easy customization with a responsive design.
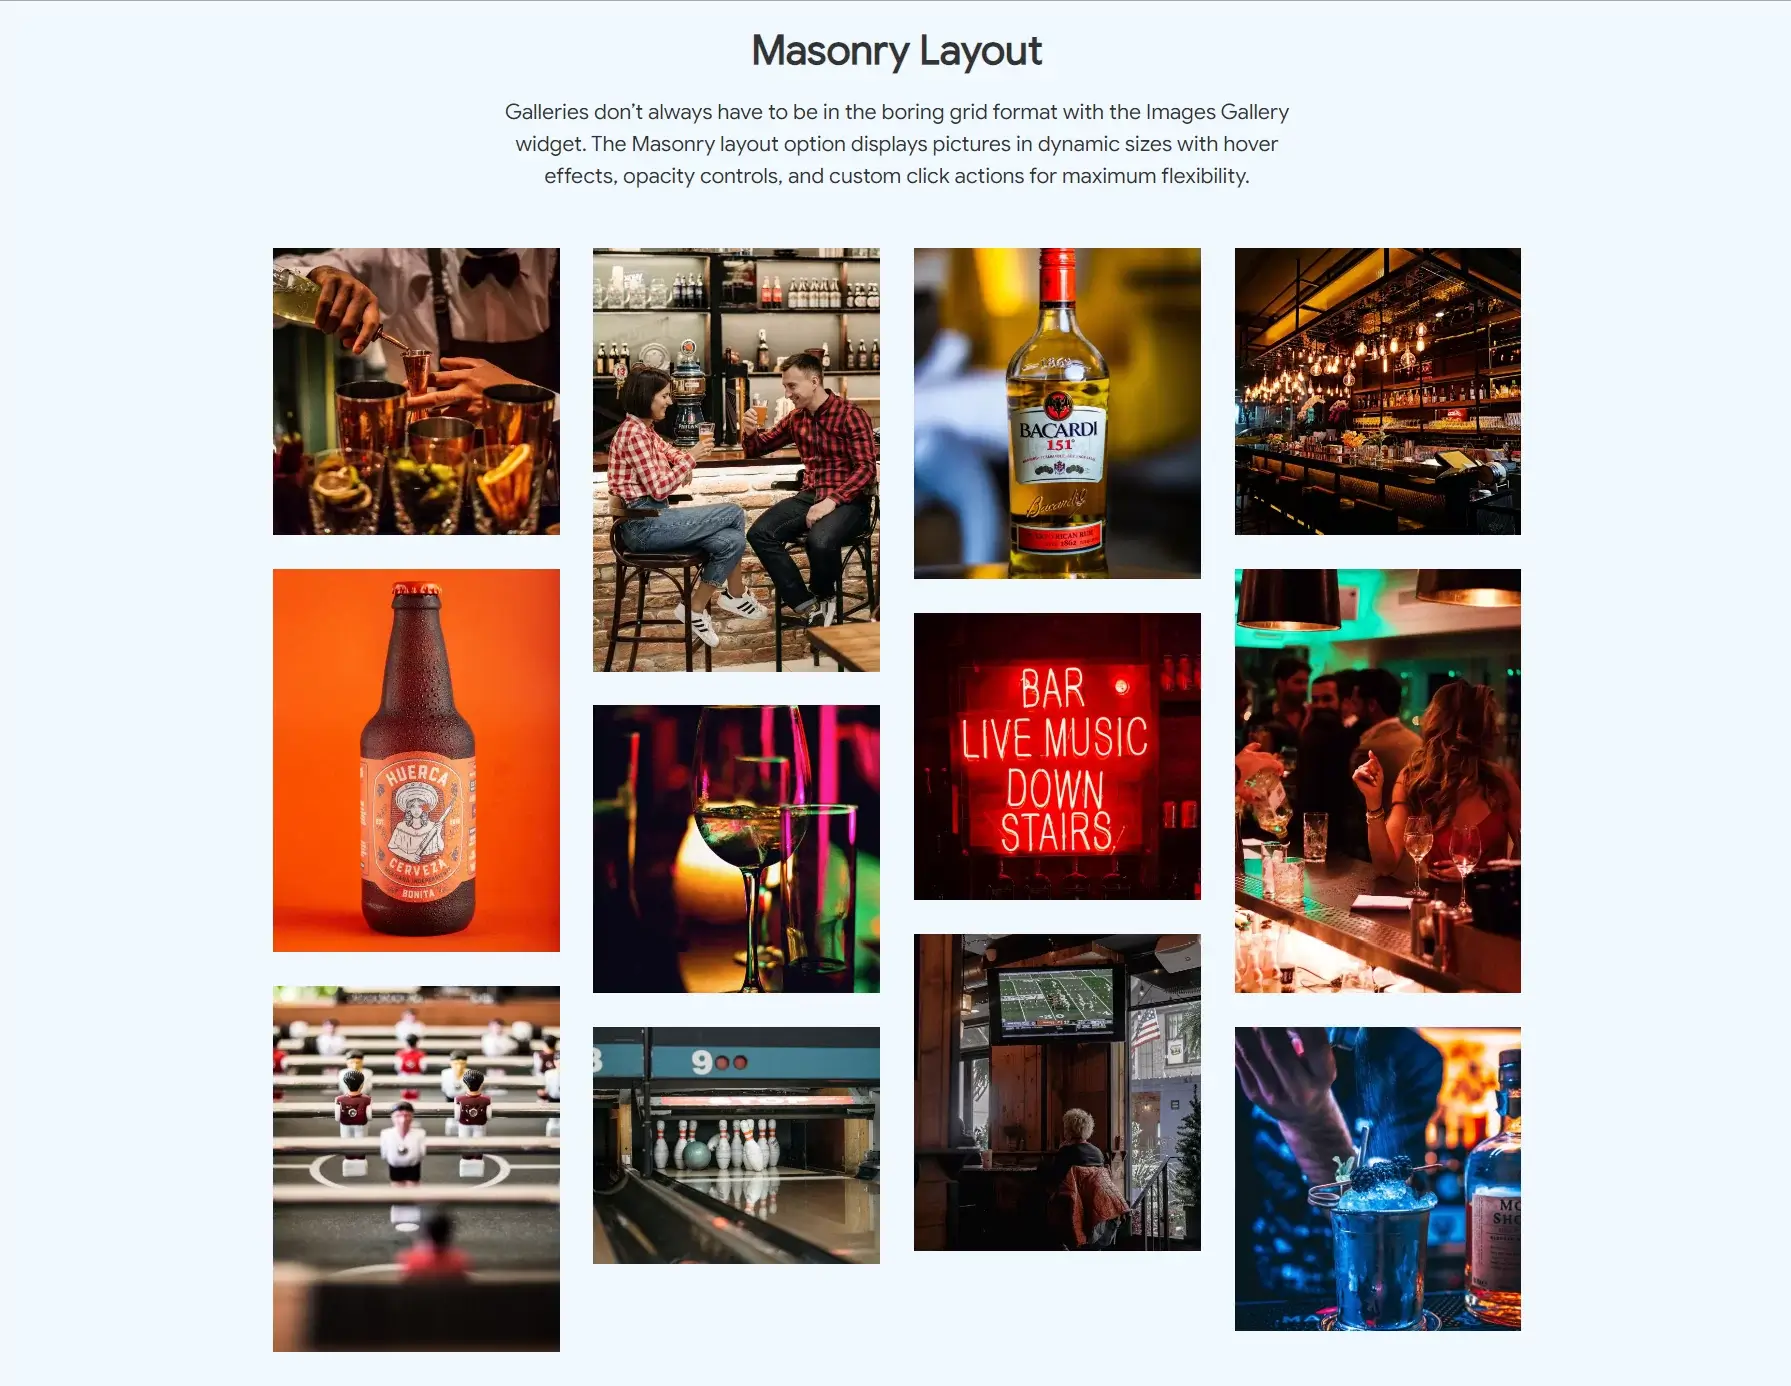
- Layout– Get completely customizable and responsive gallery layouts.
- Filterable Tabs– Advanced segmentation features to group images using a single gallery widget
- Thumbnail Image Effects– Choose between eleven image effects that can be added statically or on hover to thumbnails.
- Thumbnail Overlays– Advanced options to add effects, such as color overlays or icon overlays to thumbnails.
- Custom Typography– Customize colors, fonts, sizes, and much more with easy edit options.
- Essential Features– define image display sizes, click action, link target, and more.
Grab the Responsive Elementor Addons, tailored for the best performance and efficient website-building experience!
2. EWWW Image Optimizer
Do oversized images make you feel EWWW? Let EWWW Image Optimizer help you make your site faster, improve your bounce rate, and boost your SEO.
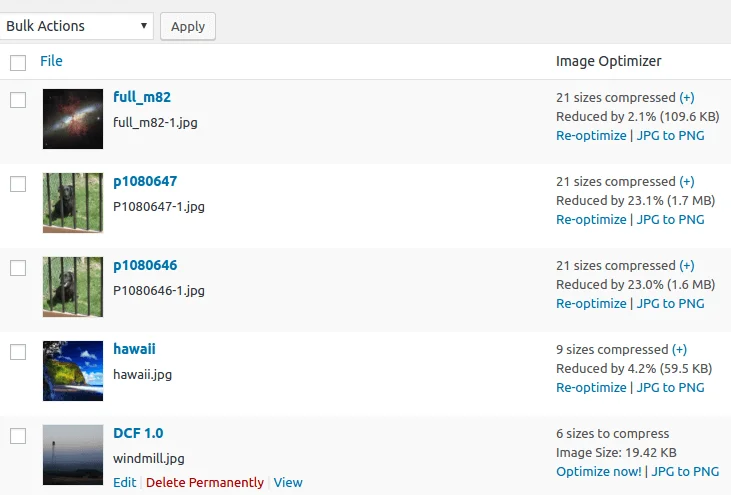
With EWWW, images are automatically compressed, scaled to fit the page, lazy loaded, and converted to the next-gen WebP format.
3. SEO Friendly Images
SEOaddons Friendly Images automatically adds proper alt and title attributes to all your images, ensuring that search engines can better understand and index them. It renames files to accurately reflect the content of the images, the plugin enhances the accessibility of your website for users with visual impairments and also improves your site’s search engine visibility.
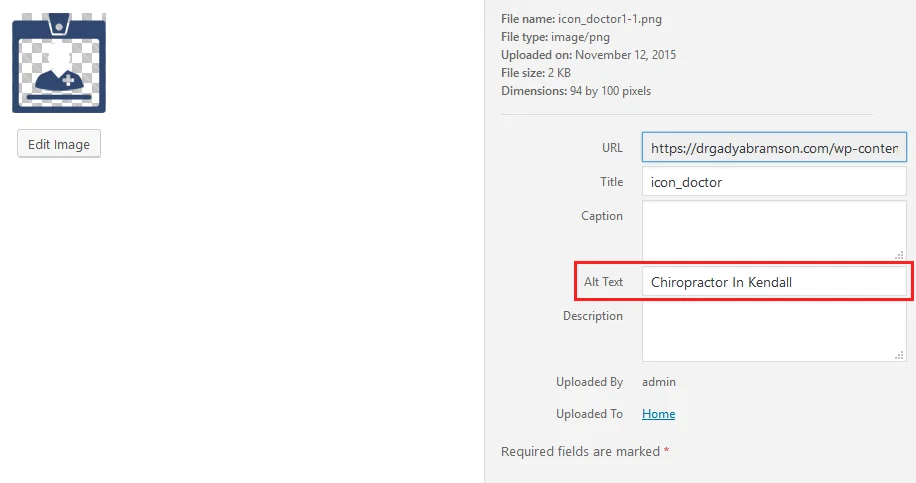
The plugin renames the images to the full product name, Thus making it more descriptive. Image names like DSC80085.jpg are automatically converted to the more optimized version like your-image-name.jpg and automatically reads images and writes a relevant ALT text for it.
4. Envira Gallery
Envira Gallery is a powerful plugin that helps easily customize galleries with the built-in WordPress templates and layouts or create your own templates to customize the appearance of your gallery.
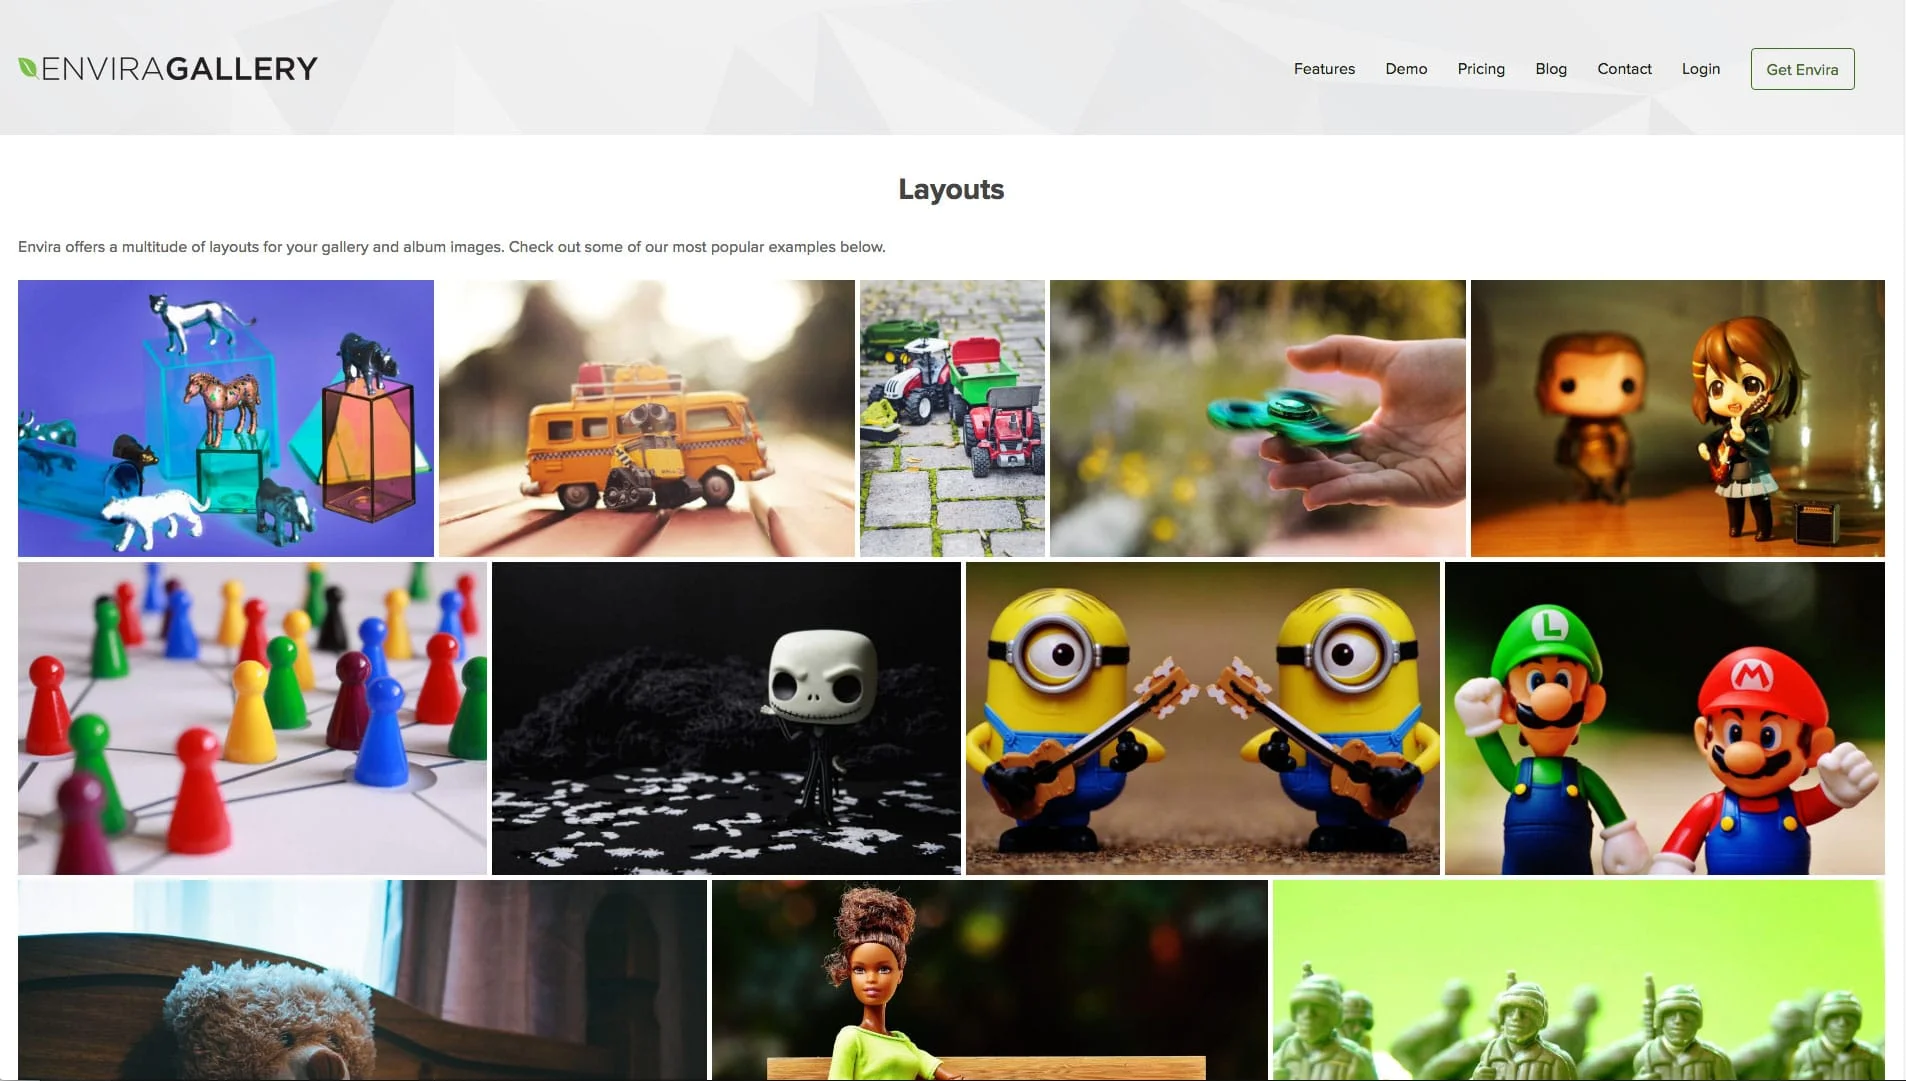
This Plugin is equipped with Albums, Social Sharing, Slideshows, Tags, and more!
5. Easy Watermark
As a Photography website, the images are at risk of being pirated and used without authority. Easy watermark helps to filter illegal usage of your images and helps in branding and recognition.
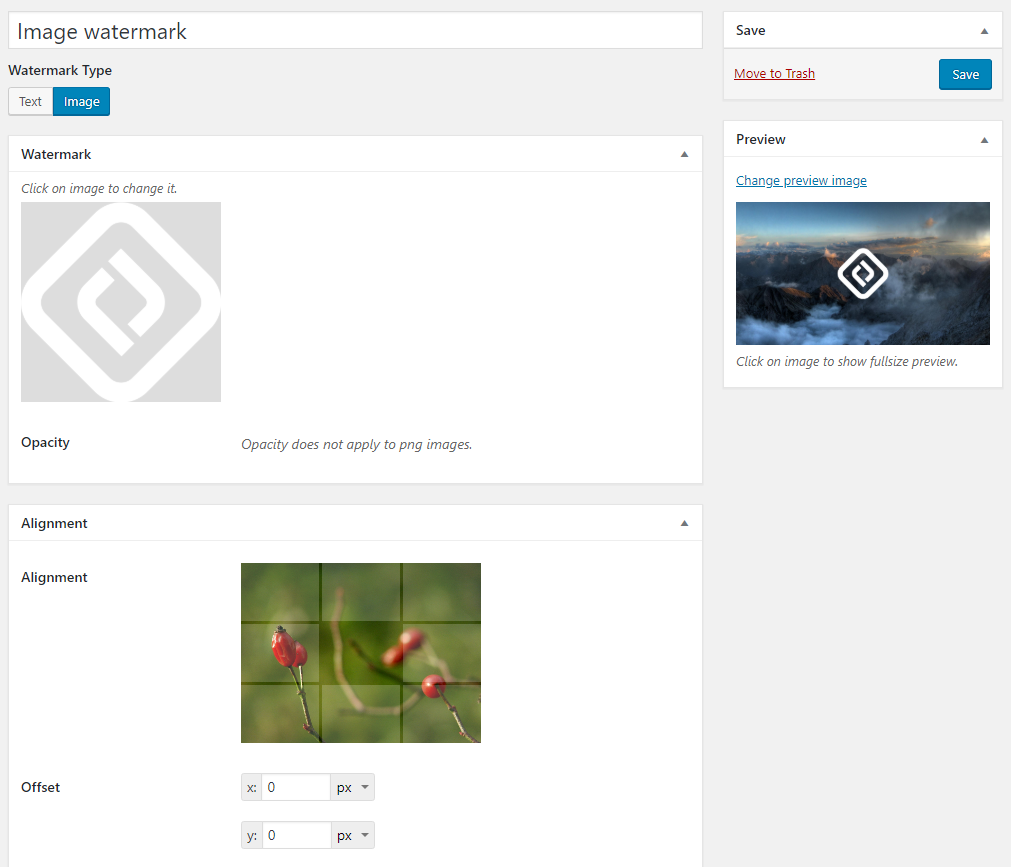
It supports both Text and Image watermarks for your images, It allows you to control the position and size and apply them to your media independently. Works smoothly with all image formats and allows
6. Slider by Soliloquy
Soliloquy helps you to create attractive responsive images and video sliders for your Website. You can add carousels, sliders, and much more in no time. According to multiple independent speed tests, this is the fastest plugin in the market of its kind.

7. WP Forms
WPForms is the best WordPress contact form plugin. This allows you to create beautiful contact forms, feedback forms, subscription forms, payment forms, and other types of forms for your site.
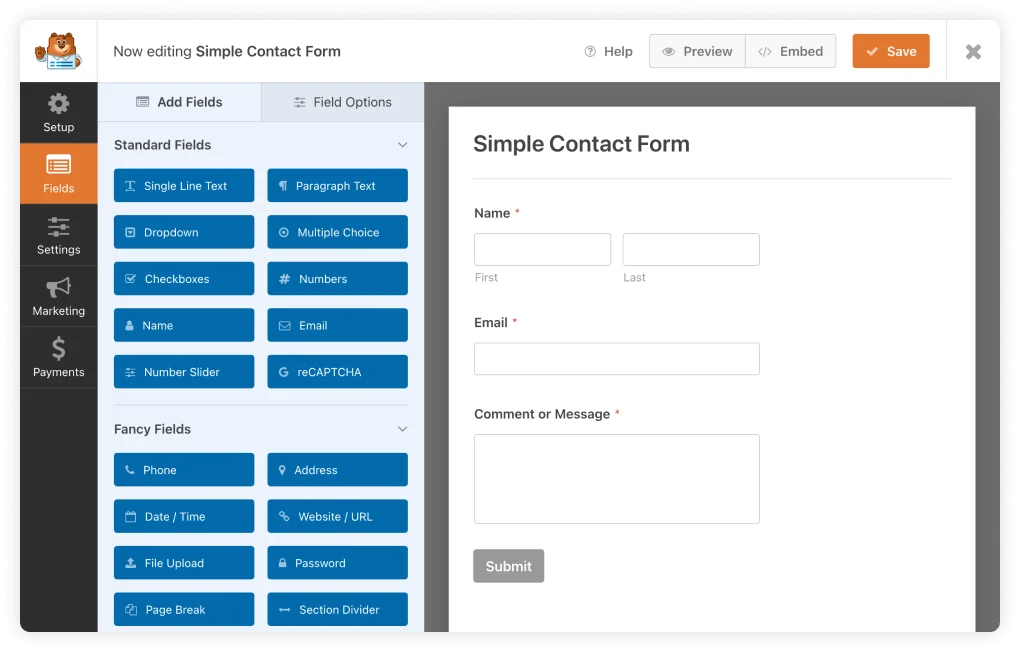
This plugin offers integration with various email marketing services and CRM platforms which allows us for efficient data collection and lead generation. Helps to foster better communication and interaction with their audience.
A captivating and user-friendly website is greatly enhanced by the strategic use of plugins and features. Professional photographers and artists often leverage a range of plugins to showcase their portfolios in the most appealing and functional manner possible.
The above-mentioned plugins are carefully tailored to meet the visual needs and enhance functionality, presentation, and user experience.
FAQ’s
WordPress is a top-notch website-building tool for photographers. It is open-source, simple to use, and works with well-known plugins. It can make it simple for you to present your work in its best light.
WordPress is an excellent platform for photographers because it is flexible and simple. But it won’t come with all you require. These WordPress plugins for photographers might assist you if you want to ensure you have all the necessary features.
Yes, WordPress now reduces all uploaded images to 82% of their original quality as of version 4.5. However, the speed of the sites stays relatively high with this level of compression.
With WordPress, it is entirely possible to sell your photos online. Your camera, MemberPress, and a little bit of drive are all you’ll need.
WEBP File Format is the ideal file type for web content. For pictures, use a WEBP because they have a lot of colors. While maintaining image clarity, this format applies advanced compression to reduce file size.
Depending on your web hosting settings, the maximum upload size for WordPress might range from 2MB to 100 MB. To avoid timeouts, your hosting company often sets this limit at the server level. On Cloudways, a 10MB upload file size is the standard.
Wrapping Up!
You have successfully set up your photography website on WordPress. All you need is the free Responsive theme and a few clicks of your mouse, and you have yourself a full-fledged website of any niche.
I hope you enjoyed reading this article. If you did, don’t forget to check our other engaging articles:
- Top Free and Premium WordPress Photography Themes
- What Are Responsive Starter Templates And How To Use Them?
- How to Create a Tattoo Website?
Ready to get started? Check out the Responsive Theme and start building your Photogrpahy website today!
If this article has helped you launch your photography website off the ground, drop us a comment.
Happy Blogging :)