Are you looking for the key website essentials you’ll need for creating a good website?
A website is more than just a business tool; it’s a window to your brand, an interactive platform for your audience, and a platform that helps to showcase your commitment.
Having a website helps improve your business by providing a wider reach to the users, helping them better understand your business. This makes you different from competitors who don’t use a website leading to better conversion.
In this detailed guide, we will explore the three core website essentials: the website design, the quality of the content, and the website’s legal compliance to run the website successfully.
Essential Elements For Your Website
A website must always be an integral part of your business. It provides a platform to drive more users to your products.
To make your website visible on the first page of Google search results, it needs to contain the three essentials. Here in this section, we’ll discuss the key website essentials required when making a WordPress website.
- Designing Your Website: Your website’s visual aesthetics and functionality are significant in capturing and retaining visitors’ attention. Themes like Responsive by Cyberchimps play a key role in shaping a unique web design of your website.
- Crafting Quality Content: The essence of a website lies in its content. High-quality, engaging content is a magnet for users and helps result in improved SEO rankings.
- Ensuring Legal Compliance: Navigating the legal aspects of a website is often underestimated. It’s crucial for making the website legally strong so you don’t face any issues in the future. This section will shed light on the need for legal documents such as privacy policies, terms of service, and cookie consent.
Let’s take a deeper look at these website essentials to make your website creation process easier.
Designing a Quality Website
Website design goes beyond aesthetics; it’s more about creating an immersive and user-friendly experience. Your website’s design is the first impression visitors form, and it plays a pivotal role in retaining their interest. Hence, designing a quality website stands as one of the key website essentials.
Two factors that majorly affect your website’s design are themes and plugins. Themes are responsible for the visual aspects, while plugins help to provide additional features in shaping your website.
We recommend using the Responsive theme for creating any website as it’s addons-optimized, fast, and easy to use.
Responsive Theme

Responsive WordPress theme, the most popular among themes, is equipped with over 150 professionally designed templates that you can use to create any website. What sets this theme apart is its adaptability to various niches, ensuring a perfect solution for your specific needs.
Features:
Here are the top features of Responsive theme:
- Versatility: The premium version Responsive Pro extends the functionality of the free Responsive theme, providing a diverse range of customization options.
- Responsiveness: It ensures that your website looks stunning and functions seamlessly on all devices, from desktops to smartphones.
- SEO Optimized: With built-in SEO features, your website is optimized for search engines, thereby improving your online visibility.
- Responsive Starter Templates: A plugin that simplifies the website creation process by offering 150+ pre-made templates.
How To Install Responsive Theme
To install Responsive theme, all you need is a WordPress account.
Assuming you want to create a WordPress website, we’ll see how to install the Responsive theme. Follow these simple steps:
Log into your WordPress account and head over to your dashboard.
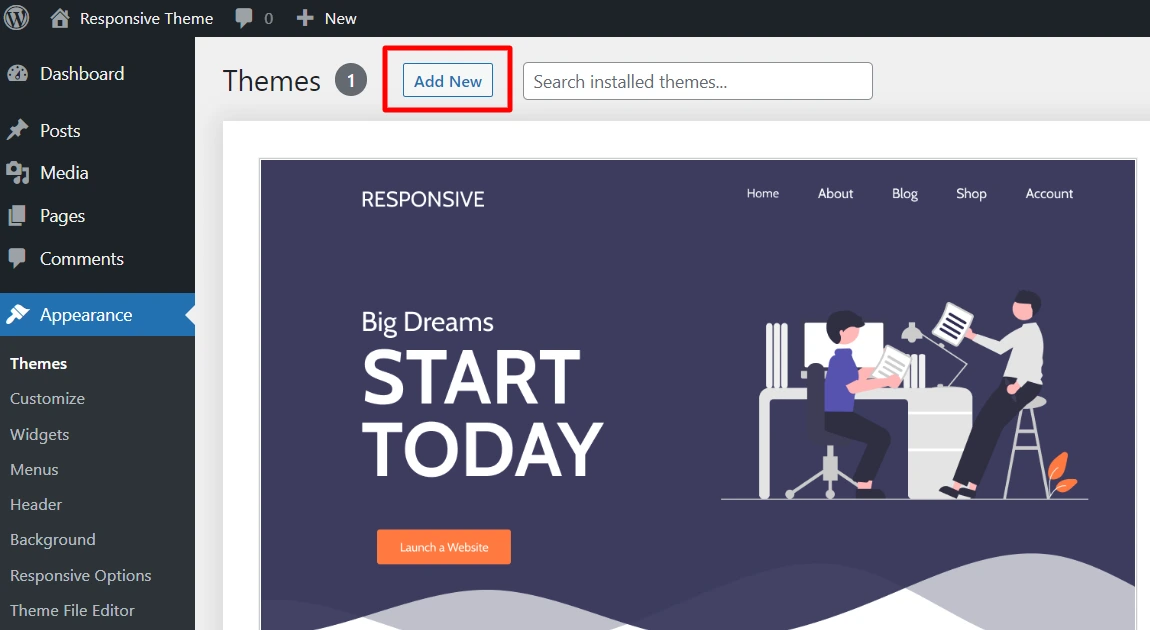
From WordPress dashboard, navigate to Appearance > Themes.

Click on the Add New button.
Search for Responsive in the search bar provided above.
Here, you can also Preview the whole theme before installing it.
Click on the Install button to begin the installation process.

Next, click on the Activate button.

That’s it you’ve successfully activated the Responsive theme.
Responsive Starter Templates (RST) is a WordPress plugin that comes bundled with the Responsive Pro. Responsive Pro is a premium extension to the free Responsive theme.
RST plugin brings numerous advantages to the table. It provides 150+ templates for both Elementor and Block page builders.
These templates save you time, effort, and resources to create a website when compared to starting from scratch. They are meticulously crafted to follow user interface (UI) and user experience (UX) best practices, ensuring an intuitive and visually appealing design.
How to Install the Plugin
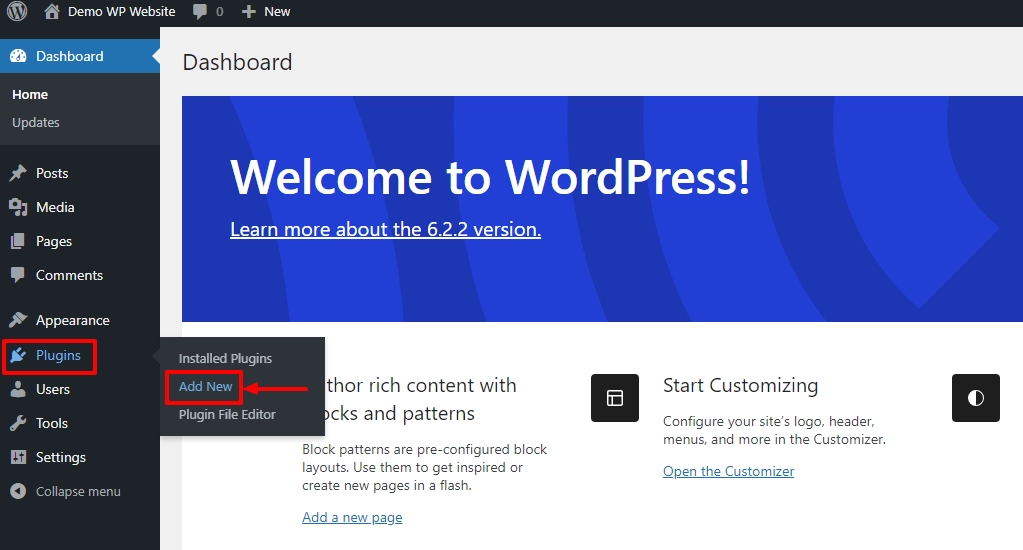
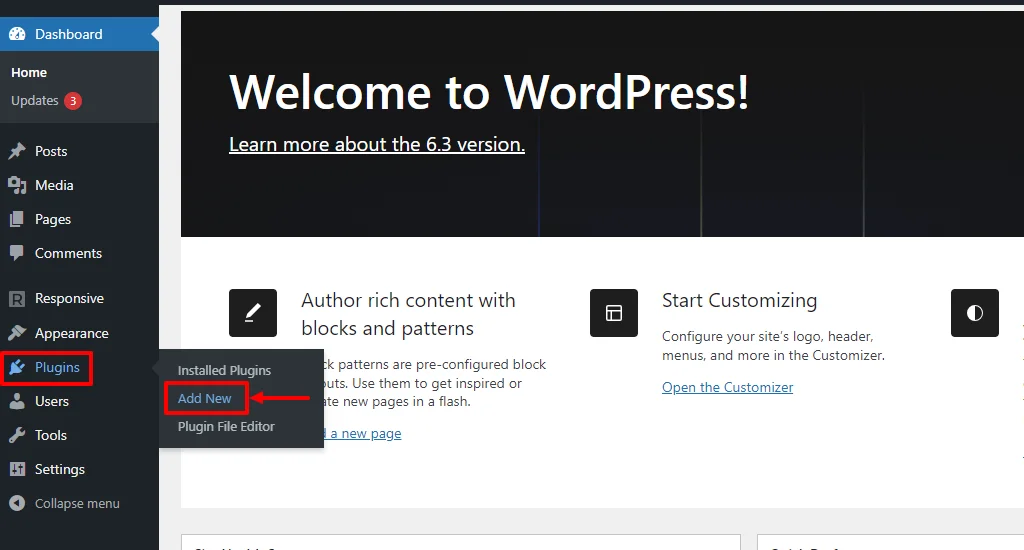
To install Responsive Starter Templates plugin, go to your WordPress dashboard. Hover over Plugins and click on the Add New button.
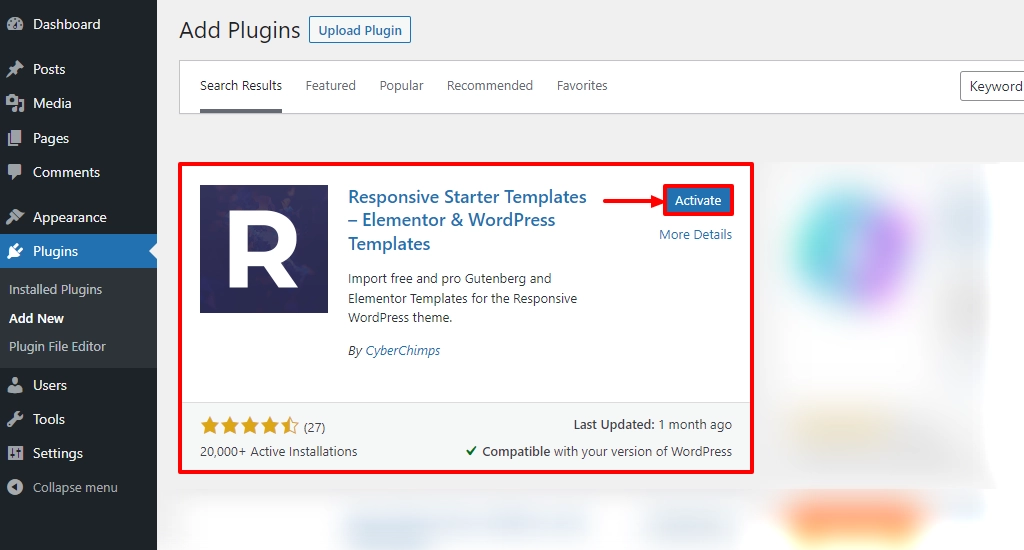
In the search bar above, search for Responsive Starter Templates and click on the Install Now button.

Next, click on the Activate button.
That’s it! You’ve successfully installed and activated the plugin.
How to Import a Template Using RST Plugin
In this step, we’ll see how to use a pre-made template to create a WordPress website.
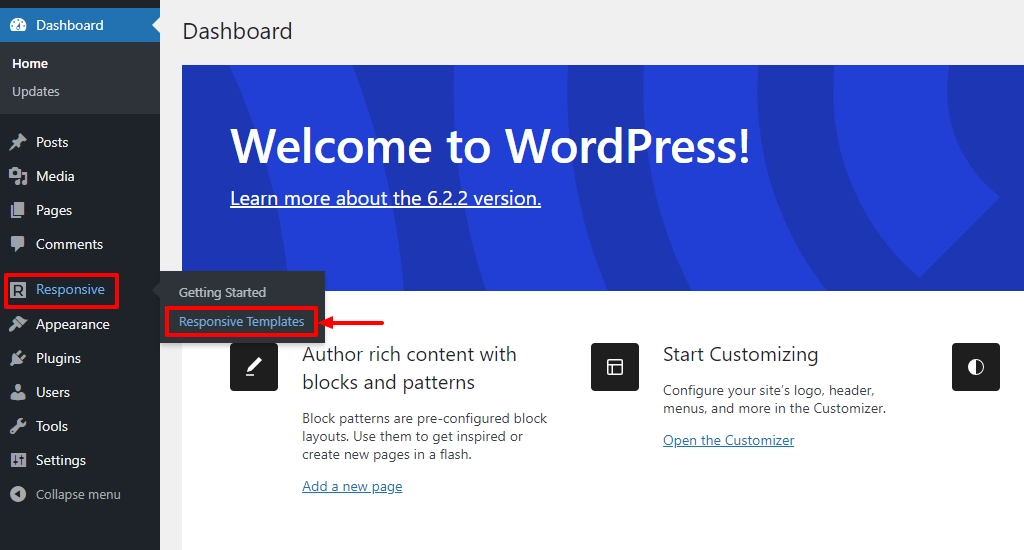
From the dashboard, hover over Responsive and click on the Responsive Templates button.
Now, you’ll see a list of 150+ beautiful pre-made templates. You can choose the one according to your specific needs and easily create a stunning website in a few minutes.

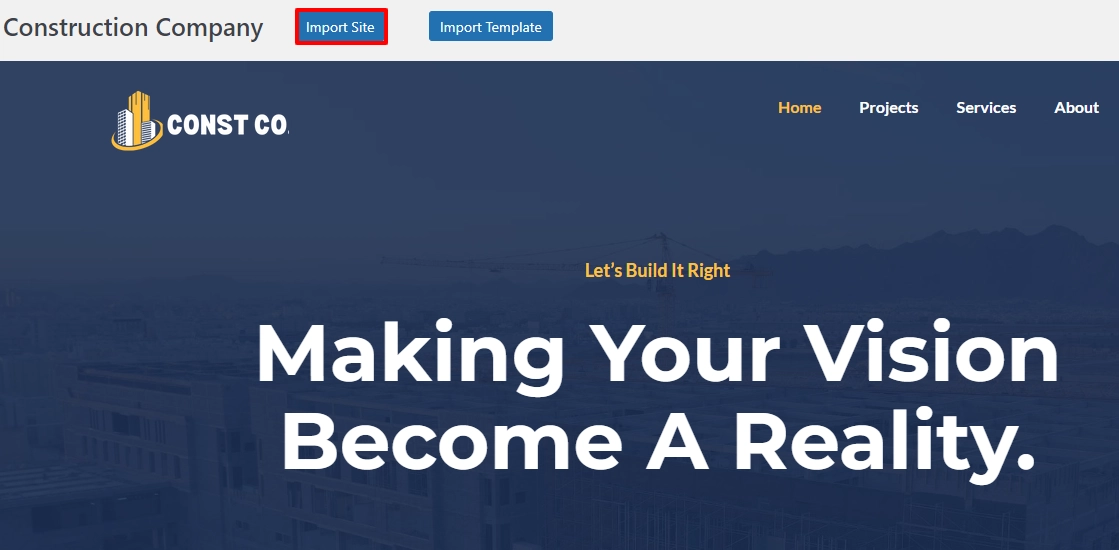
For tutorial purposes, we’re using the Construction Company template.

Select the template, and click on the Import Site button.
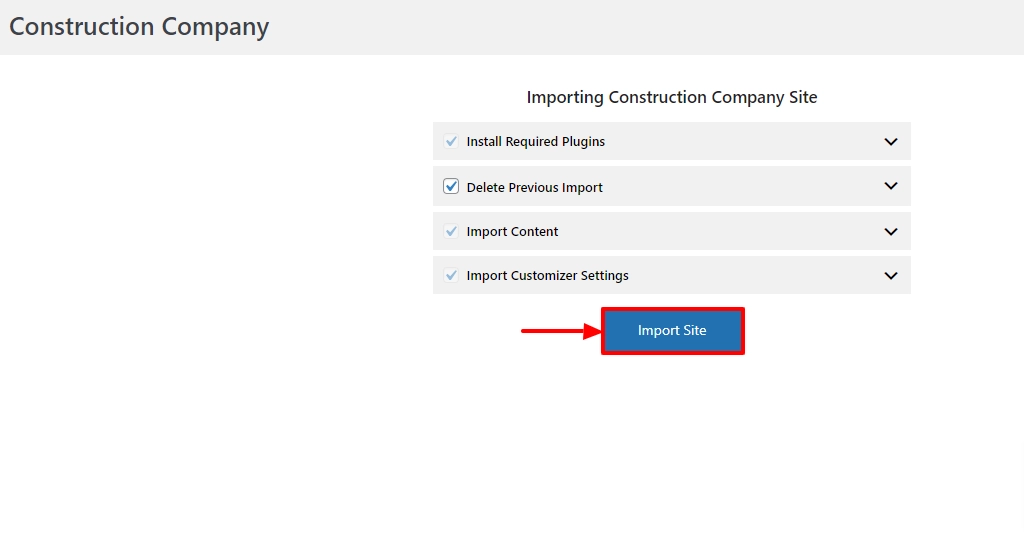
Tick all the boxes and click on the Import Site button.
Once you’ve imported your template, click on the Launch Site button.
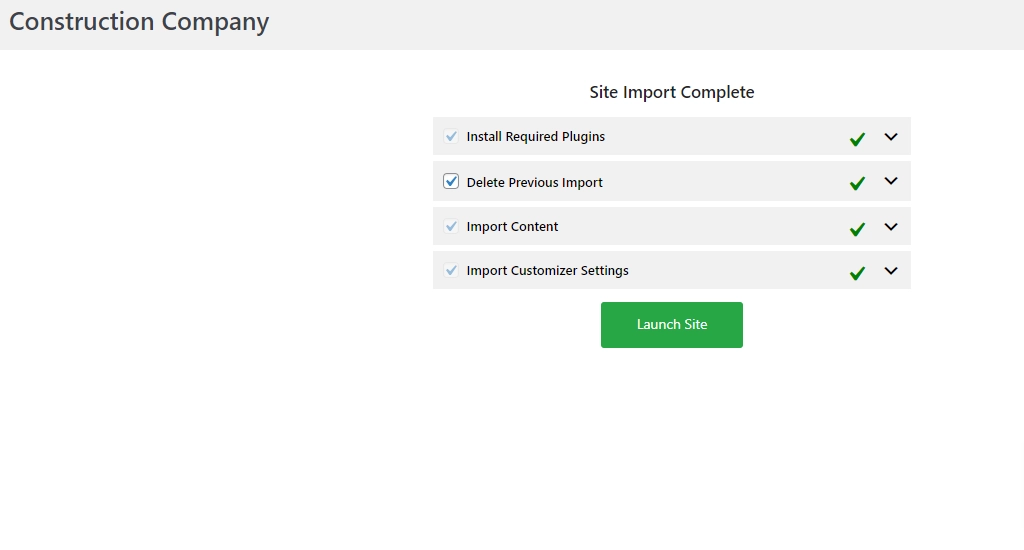
That’s it! You now have a construction company website.

You can create many such websites using Responsive Starter Templates plugin.
Crafting Quality Content
Content is the key to any website’s success, thereby making it one of the top website essentials. When you’re serving your users with quality content, it’s natural for users to stay attracted to your website.
Good content captivates users and elevates your search engine rankings. It’s not just about words; it’s about delivering value and ensuring a great reading experience.
Crafting quality content is much more than just writing. It involves creating user-friendly layouts, concise text, and engaging visuals. Also, utilize headings, bullet points, and images to enhance readability and engagement to make things appear better for your audience.
Content Management in WordPress
Within WordPress, plugins such as Yoast SEO play a pivotal role in optimizing your content. They offer keyword suggestions, enhance meta descriptions, and ensure your content is search engine friendly. These plugins empower you to maximize the potential of your content effortlessly.
Features of Yoast SEO plugin:
- Content Analysis: Yoast SEO provides real-time content analysis and suggests improvements for readability and SEO.
- On-Page SEO: It offers on-page optimization guidance, helping you improve individual pages for search engine visibility.
- XML Sitemap Generation: The plugin automatically generates XML sitemaps, making it easier for search engines to crawl your site.
Ensuring Legal Compliance For Your Website
Addressing the legal aspects of your website is considered one of the top website essentials. The legal aspects include privacy policies, terms of service, cookie consent banners, and much more. Neglecting these aspects can lead to severe consequences.
Now let’s help you decide on the key plugins that you can use to create legal pages and cookie consent banners for your website.
For creating important legal pages, we recommend using the WP Legal Pages plugin, as it provides 25+ premium templates to create any legal page you want for your website.
Coming to the cookie consent banners, WP Cookie Consent plugin is the most popular plugin to create a unique cookie consent banner for your website.
Now, let’s explore each of the plugins in detail.
WP Legal Pages Plugin
WP Legal Pages is one of the best WordPress plugin that’s designed to simplify the creation of crucial legal documents. This plugin eases the process, ensuring that you’re legally covered without the need for specialized legal expertise.
Key Features of WP Legal Pages plugin:
- Template Library: Access a library of customizable templates for privacy policies, terms of service, disclaimers, and more.
- Auto-Updating: Stay compliant with changing regulations as the plugin automatically updates legal documents to align with the latest requirements.
- GDPR Compliance: Ensure compliance with the General Data Protection Regulation (GDPR) and other data privacy laws.
How to Install WP Legal Pages Plugin
To install the plugin, follow these simple steps:
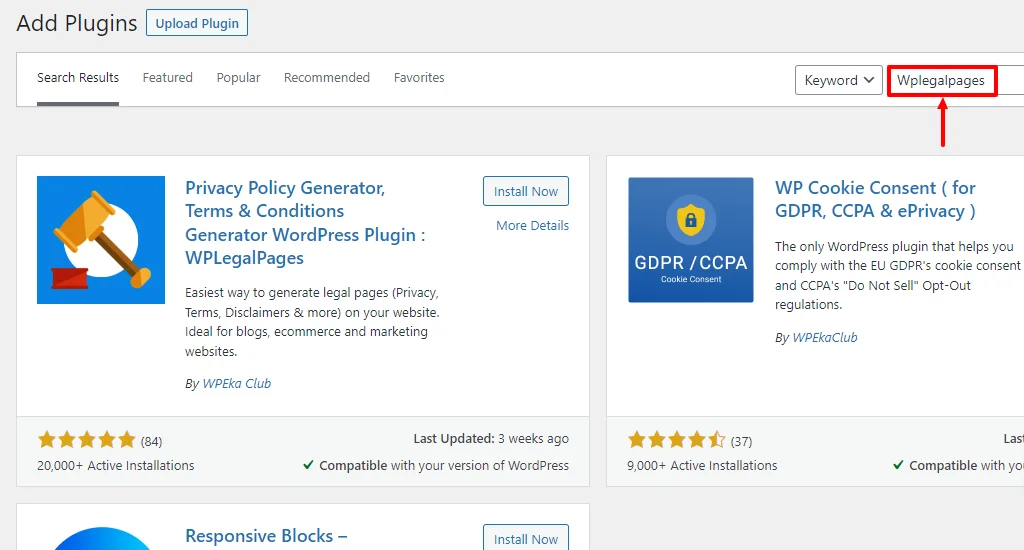
Head over to your WordPress dashboard. Hover over Plugins and click on the Add New menu.
Search for Wplegalpages in the search bar above.
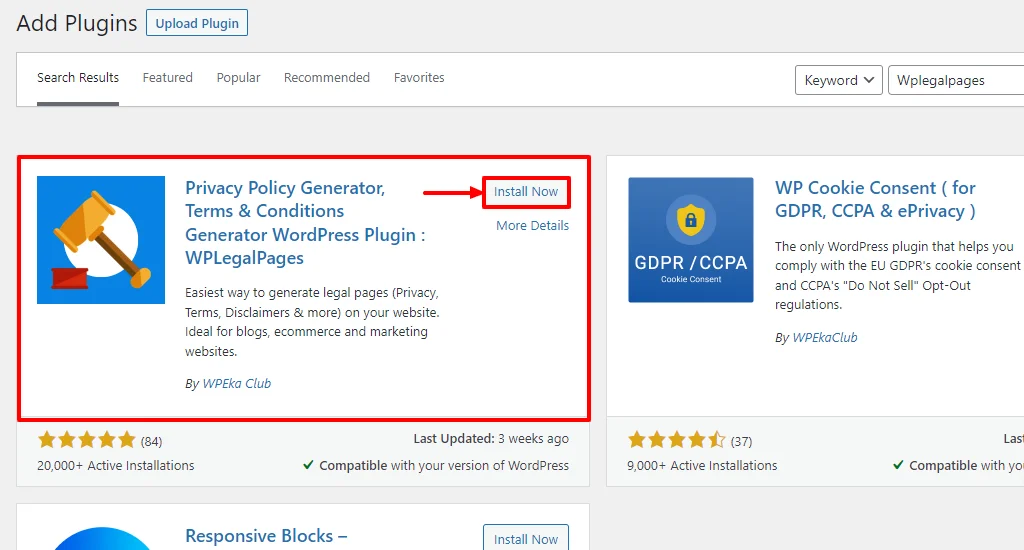
Click on the Install Now button.
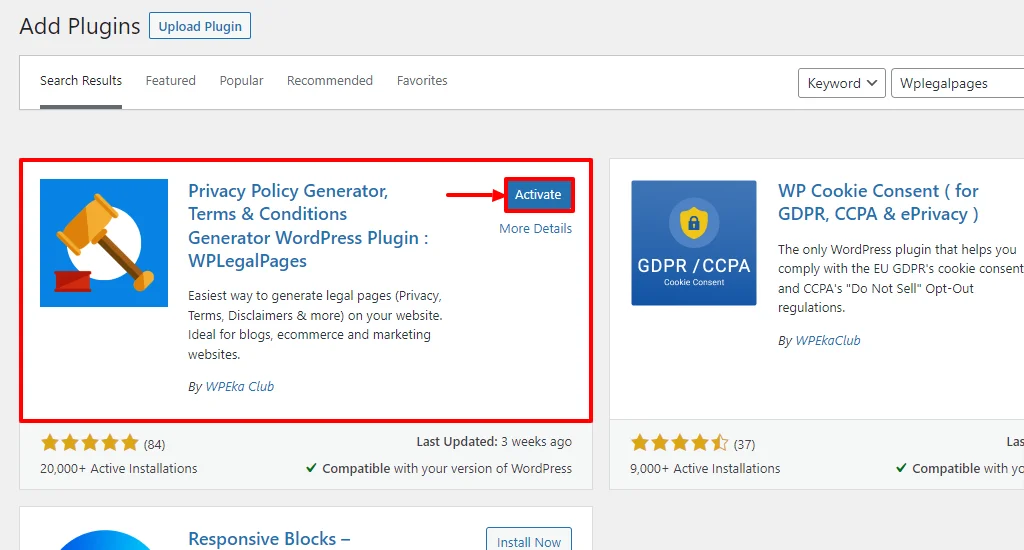
Next, click on the Activate button.
Next, accept the terms of use of the WPLegalPages plugin.
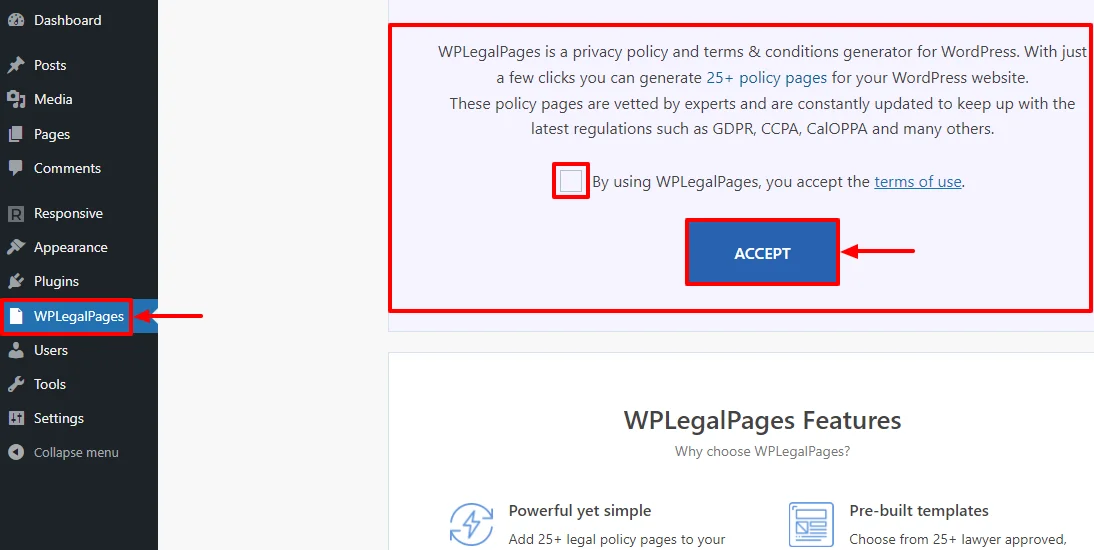
That’s it. You have successfully installed the WPLegalPages plugin.
The premium version of the WP Legal Pages plugin provides access 25+ legal page templates. But here for tutorial purposes, we’ll see how to install a free template using WP Legal Pages plugin.
How to Create a Free Privacy Policy Page
To create a free privacy policy page, follow these simple steps.
Head over to the WordPress dashboard. Navigate to WPLegalPages and click on the Create Legal Page menu.
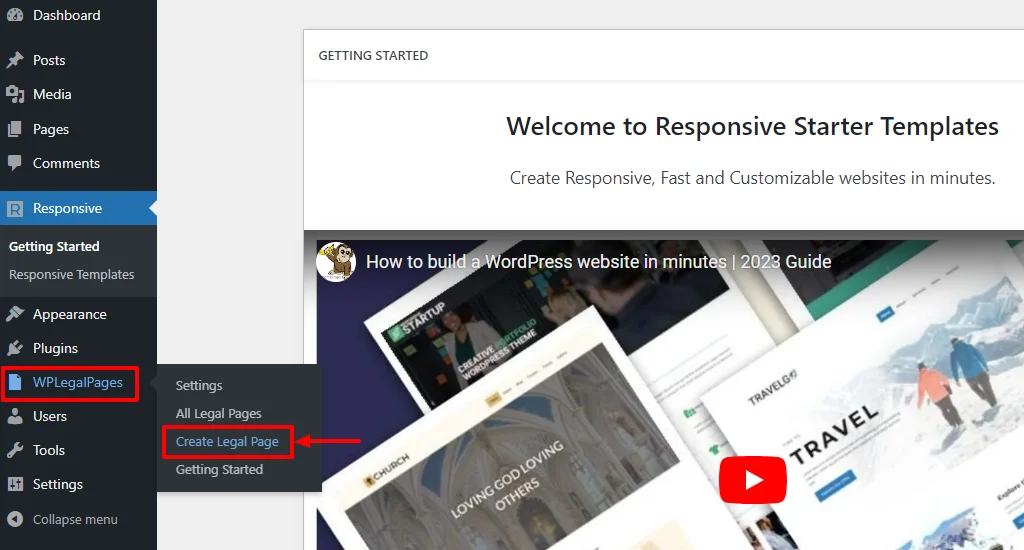
This will open the WPLegalPages wizard. From the WPLegalPages wizard, choose the Standard Privacy Policy template and click on the Create button.

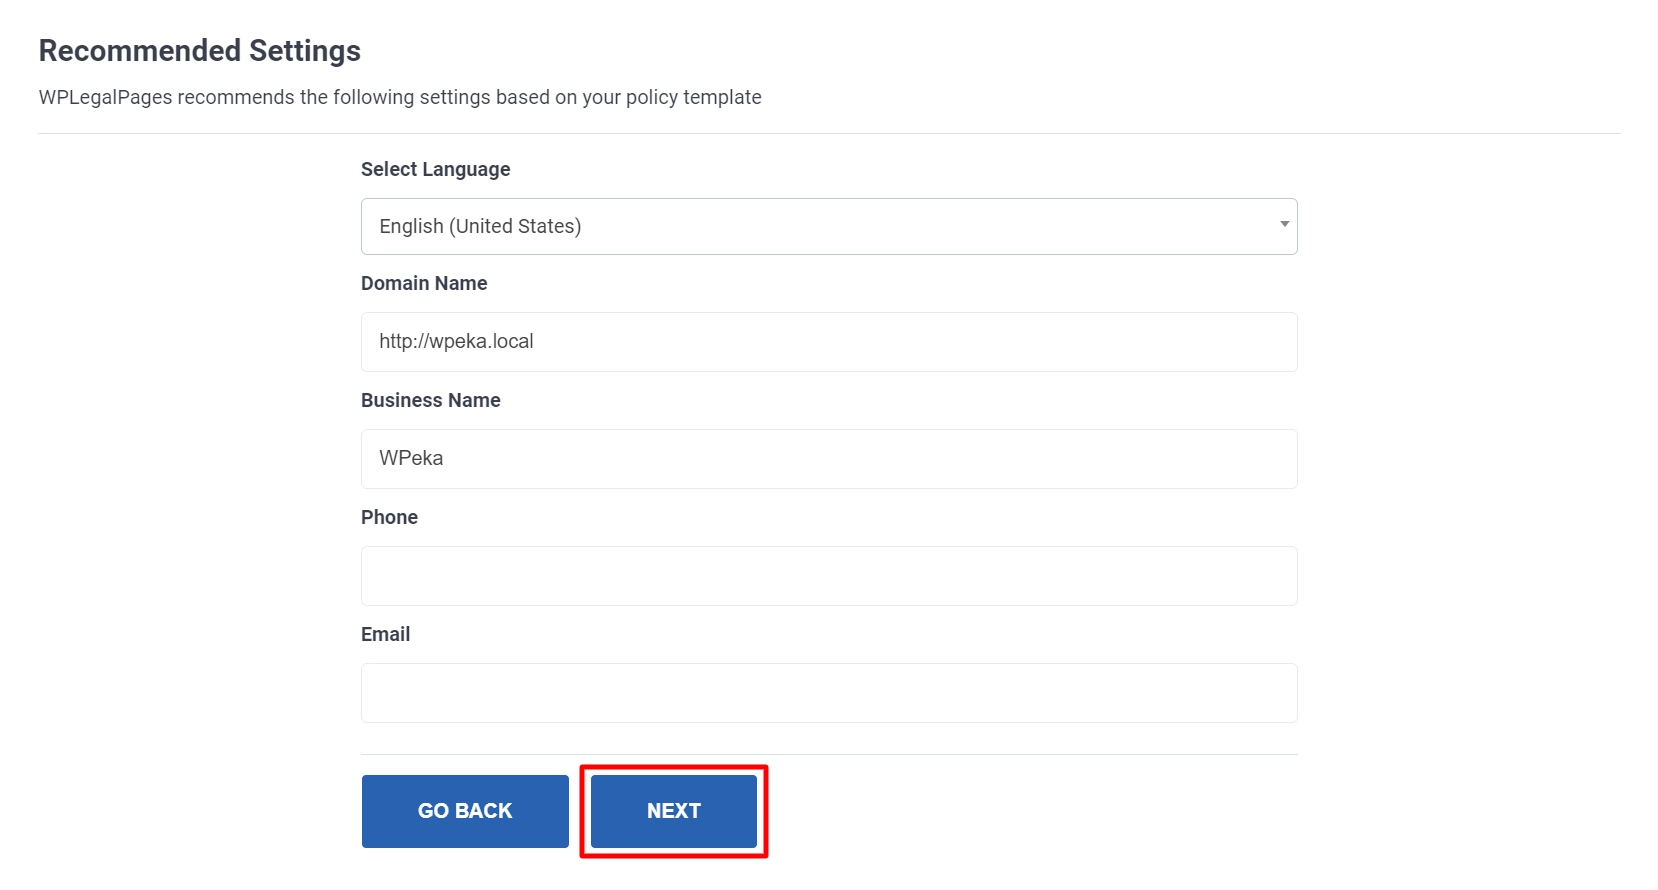
Next, fill in the Recommended Settings page fields and click on the NEXT button.
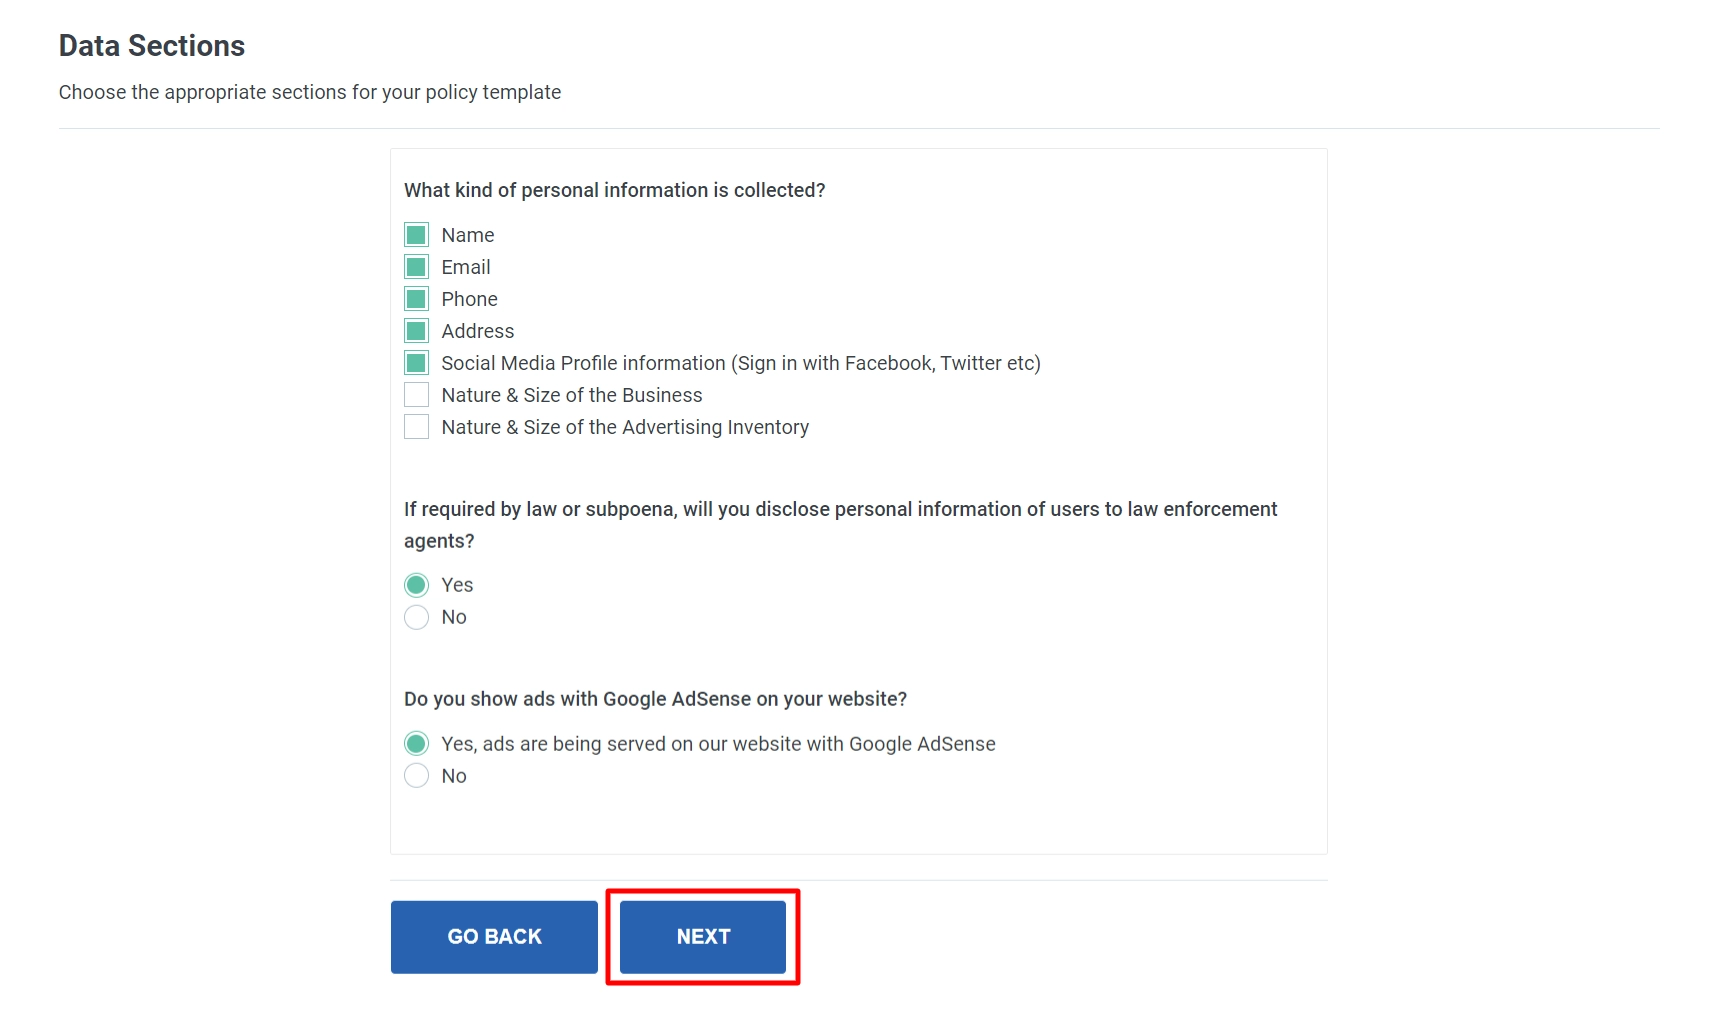
Now, choose the appropriate options in the Data Sections for your page and click on the NEXT button.
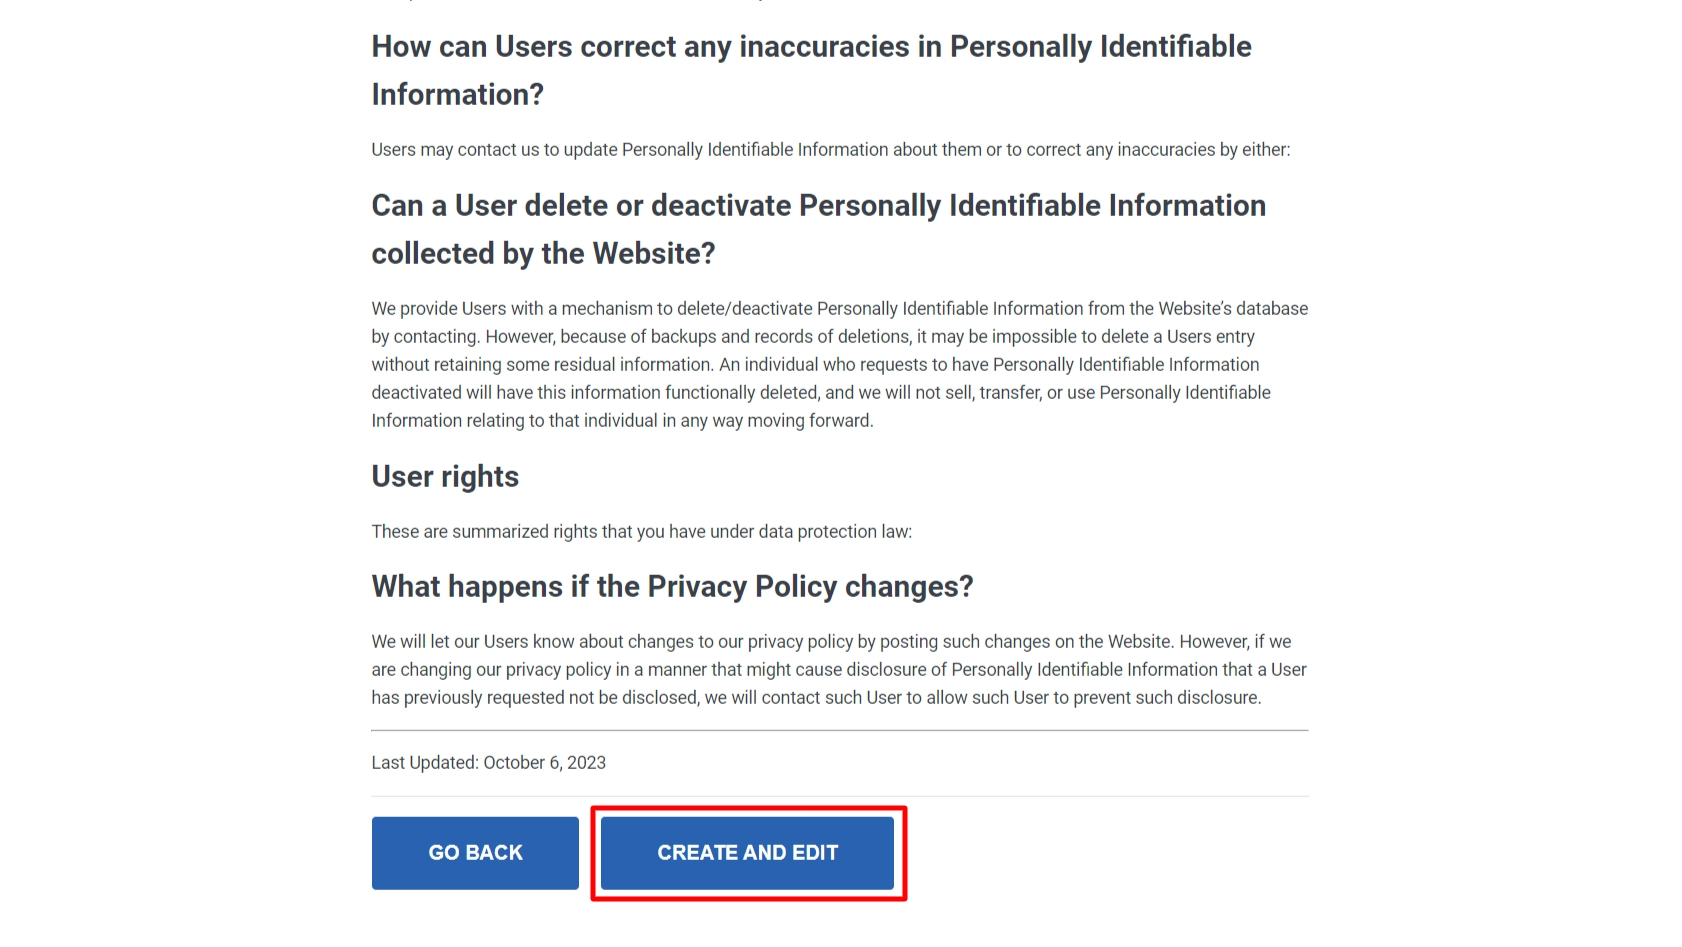
You can now check the preview of the Privacy Policy page.
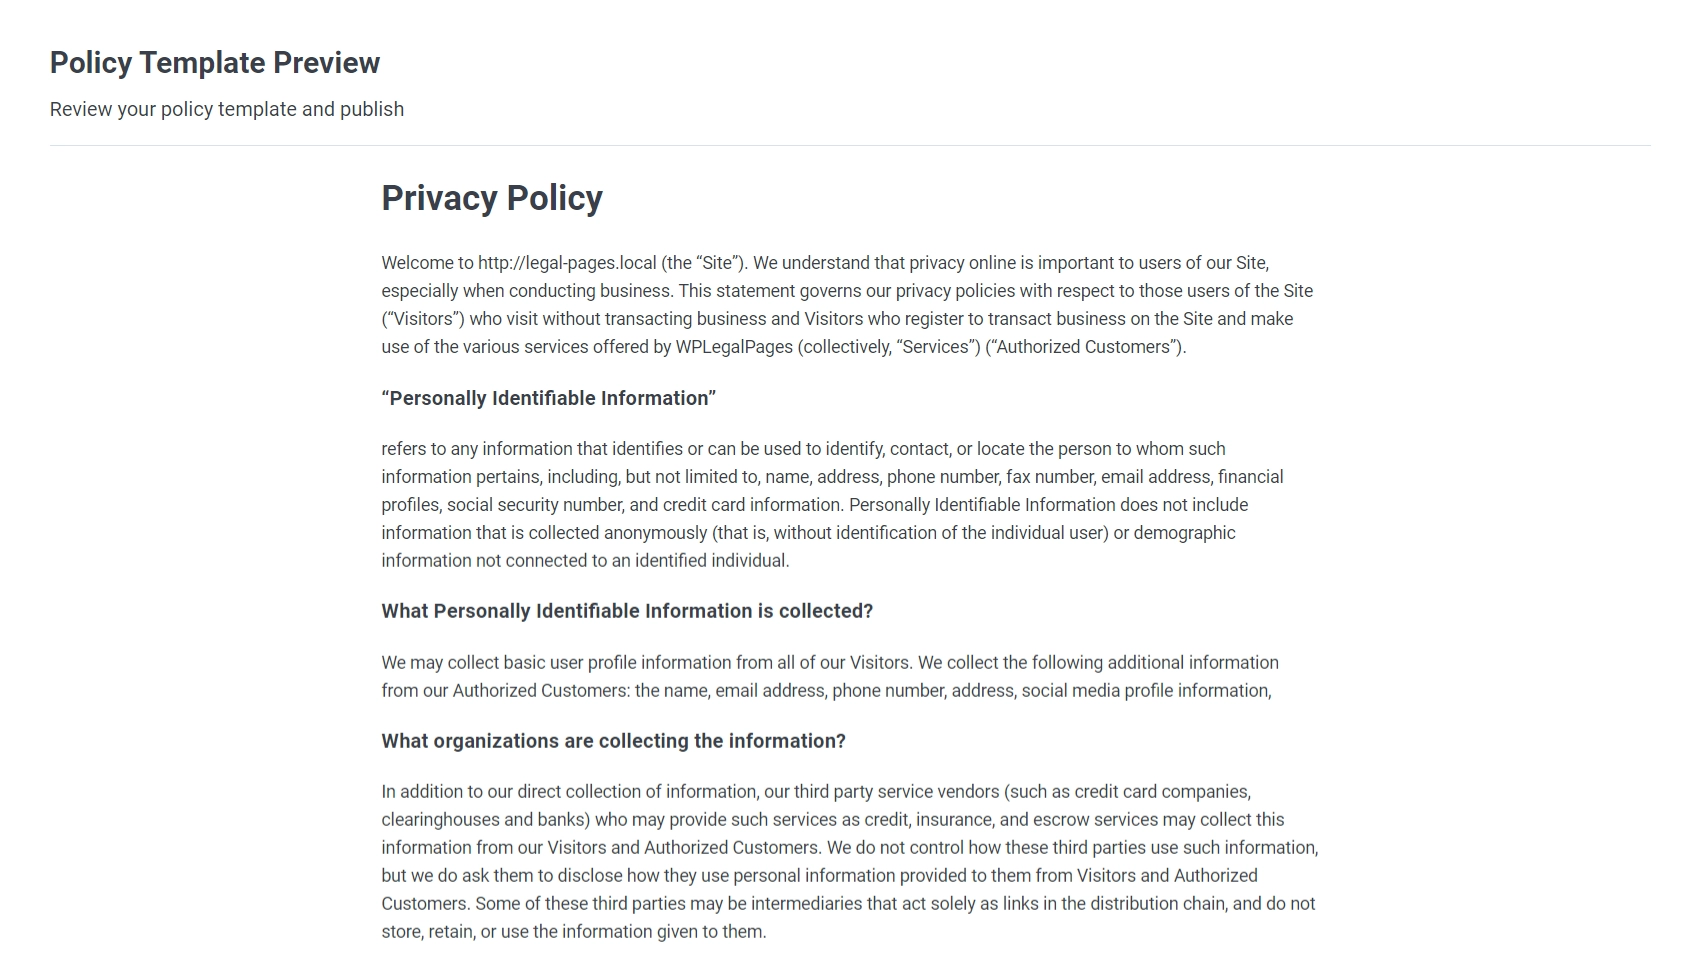
Once reviewed, click on the CREATE AND EDIT button at the bottom of the page.
This will open the WordPress editor. Review all the details in the editor again and click the Publish button.
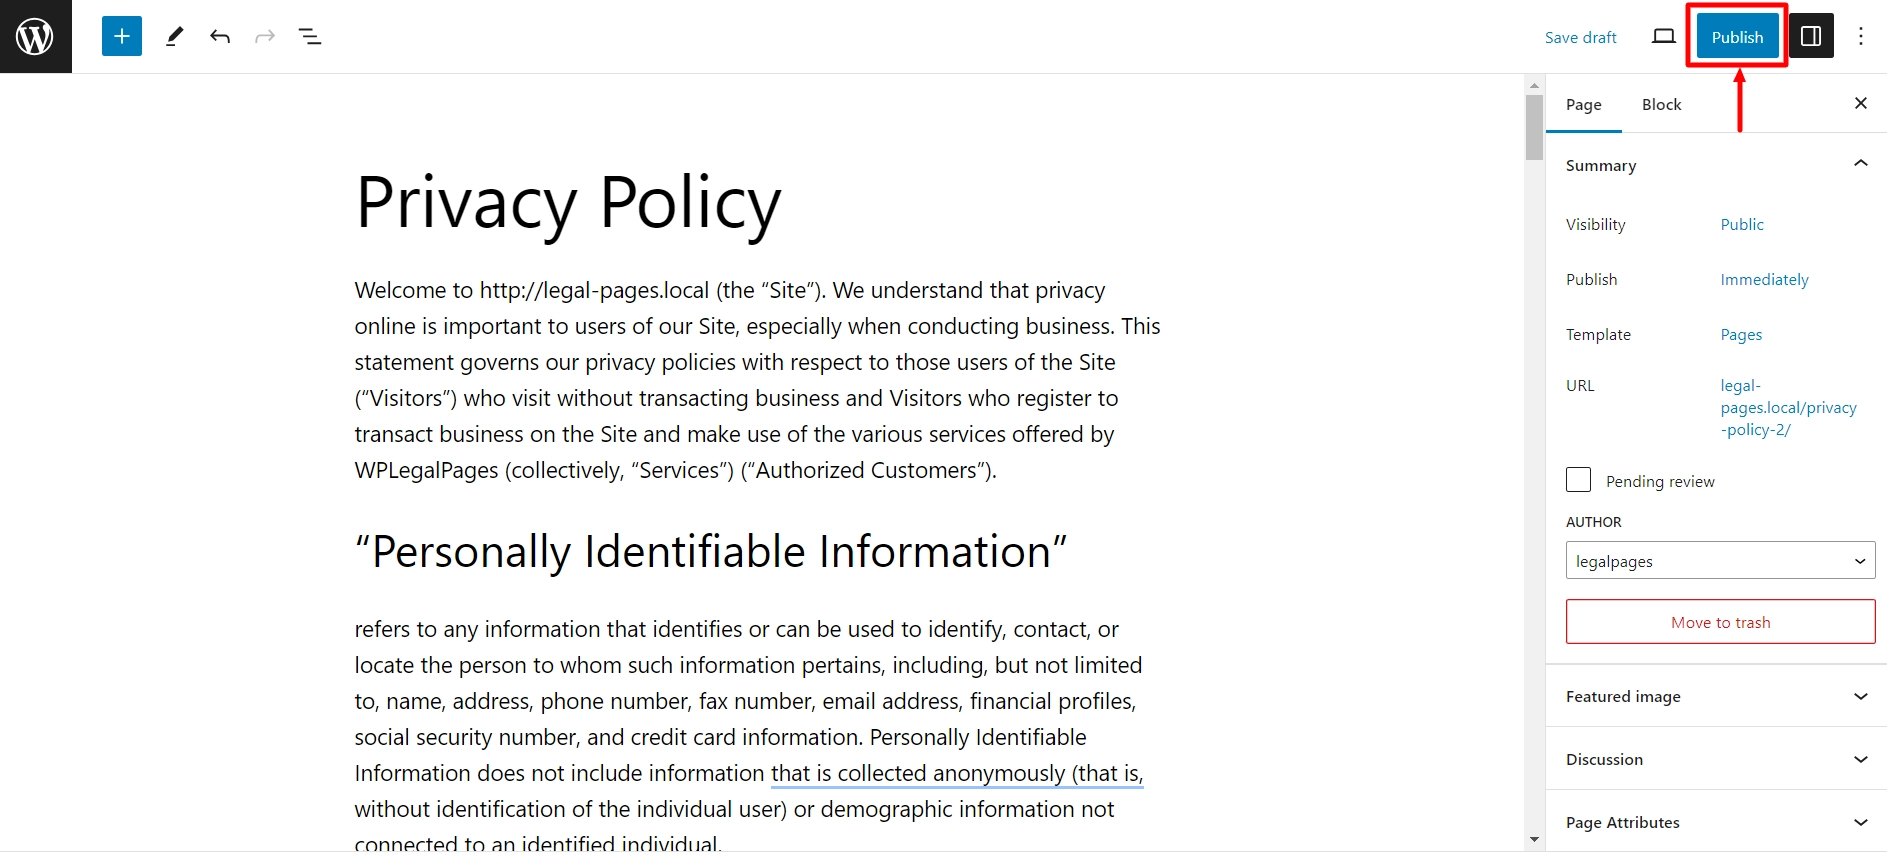
Once published, your Standard Privacy Policy page is ready for your website.
You can create many such legal pages using WPLegalPages plugin.
WP Cookie Consent
Consider using the WP Cookie Consent plugin for seamless compliance with data privacy regulations. This versatile plugin effortlessly adds customizable cookie consent banners to your website by providing plenty of customization options.
Features of WP Cookie Consent Plugin:
- Customization: Easily customize cookie consent banners to match your website’s colors, fonts, and styling.
- Cookie List: Provide users with transparency by displaying a list of cookies used and their purposes.
- Compliance with Regulations: Comply with GDPR, CCPA, ePrivacy Directive, and other data privacy regulations.
Let’s check out how to install WP Cookie Consent plugin in WordPress.
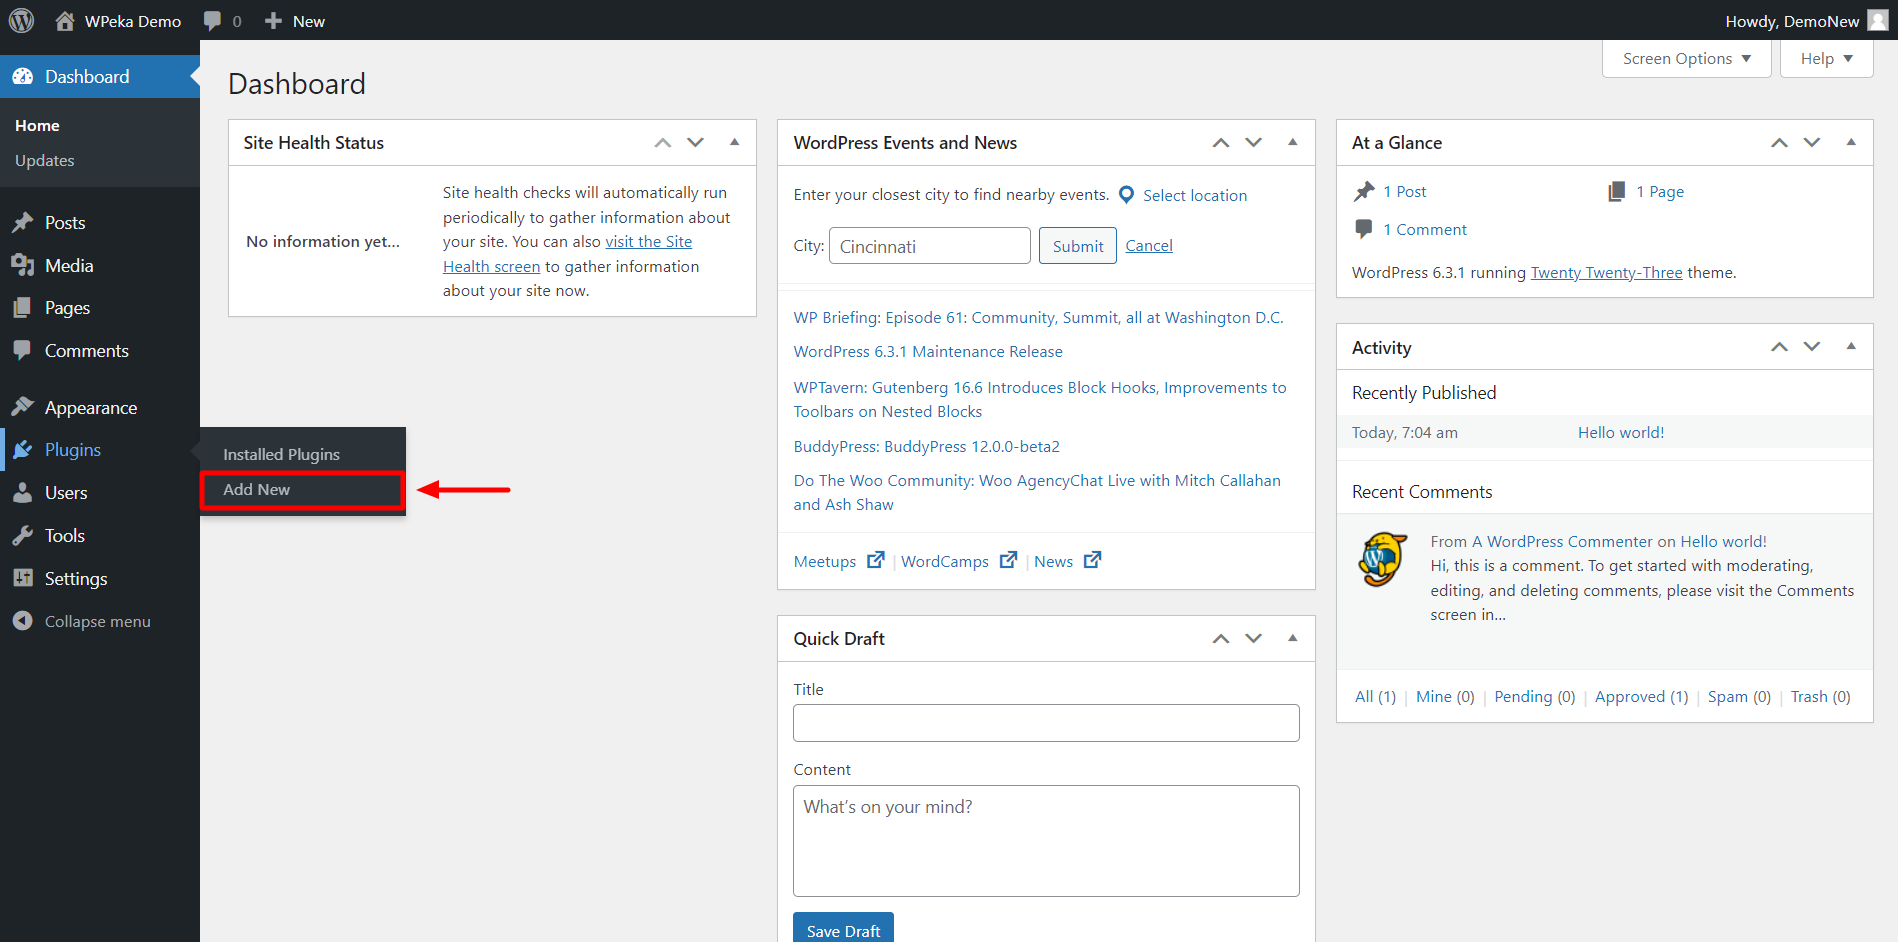
Open your WordPress dashboard.
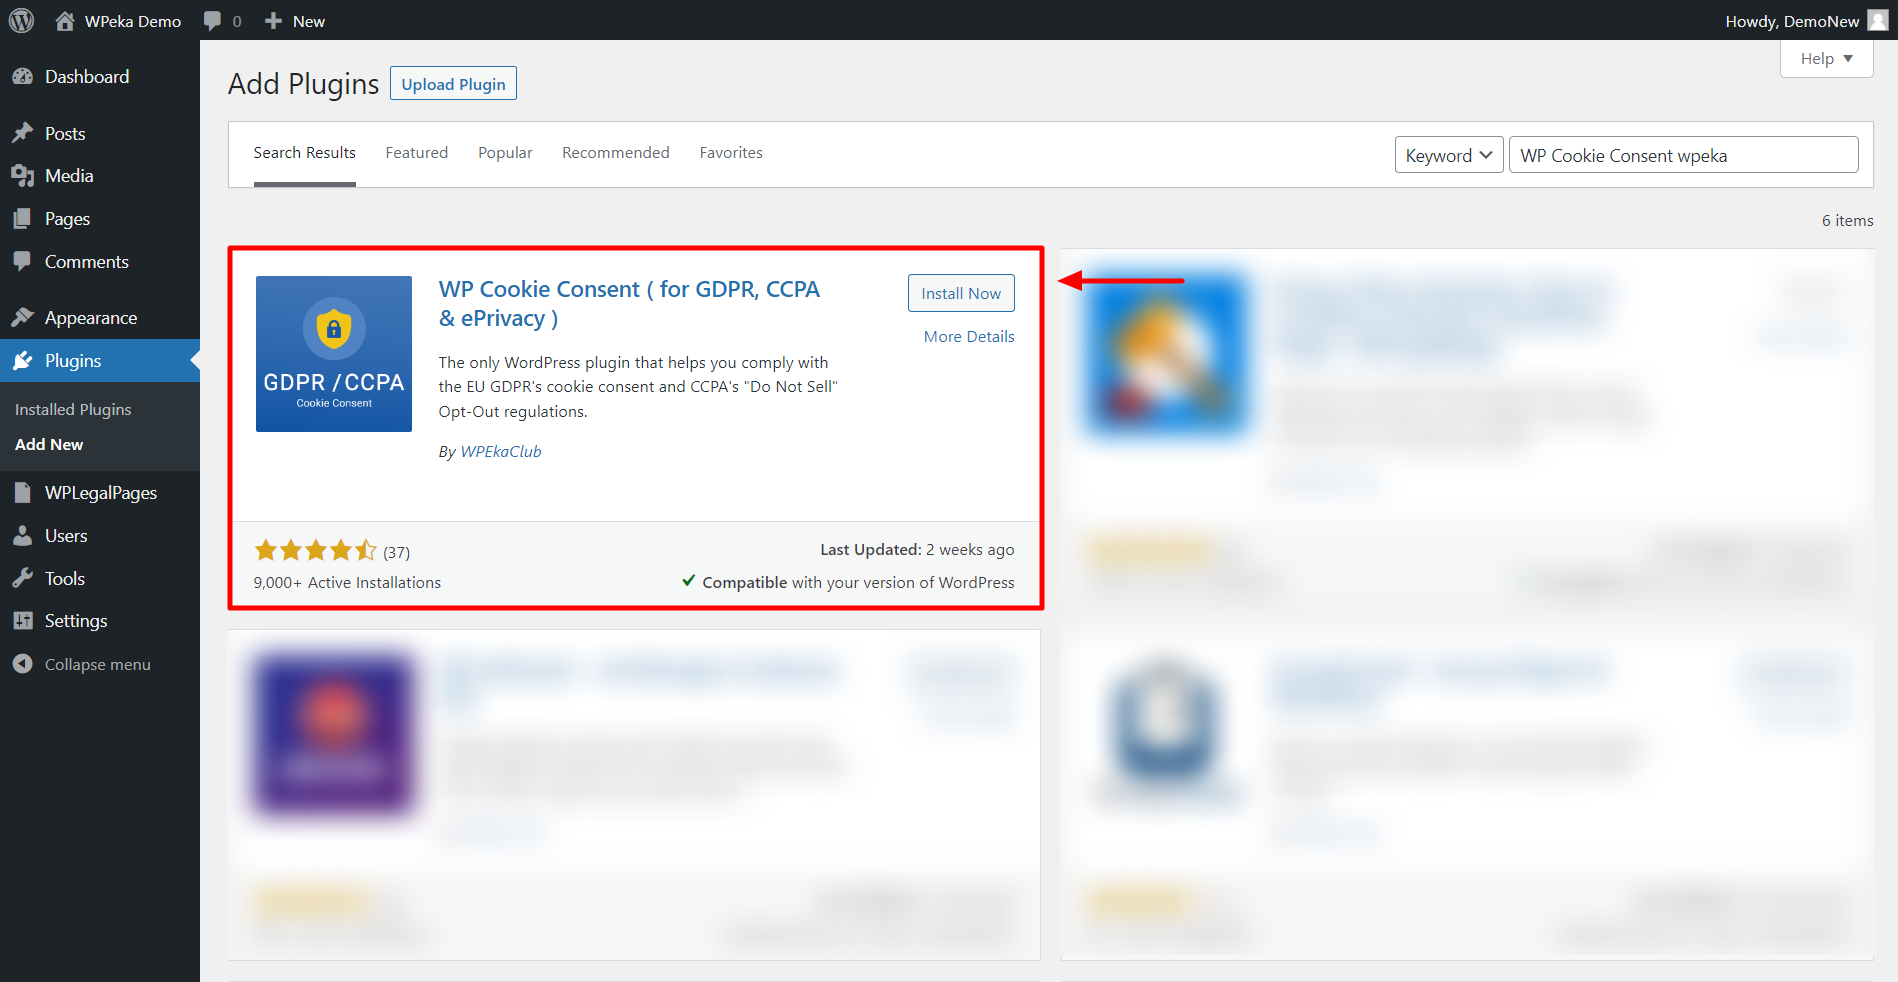
Navigate to Plugins > Add New.
Search for WP Cookie Consent in the search bar.
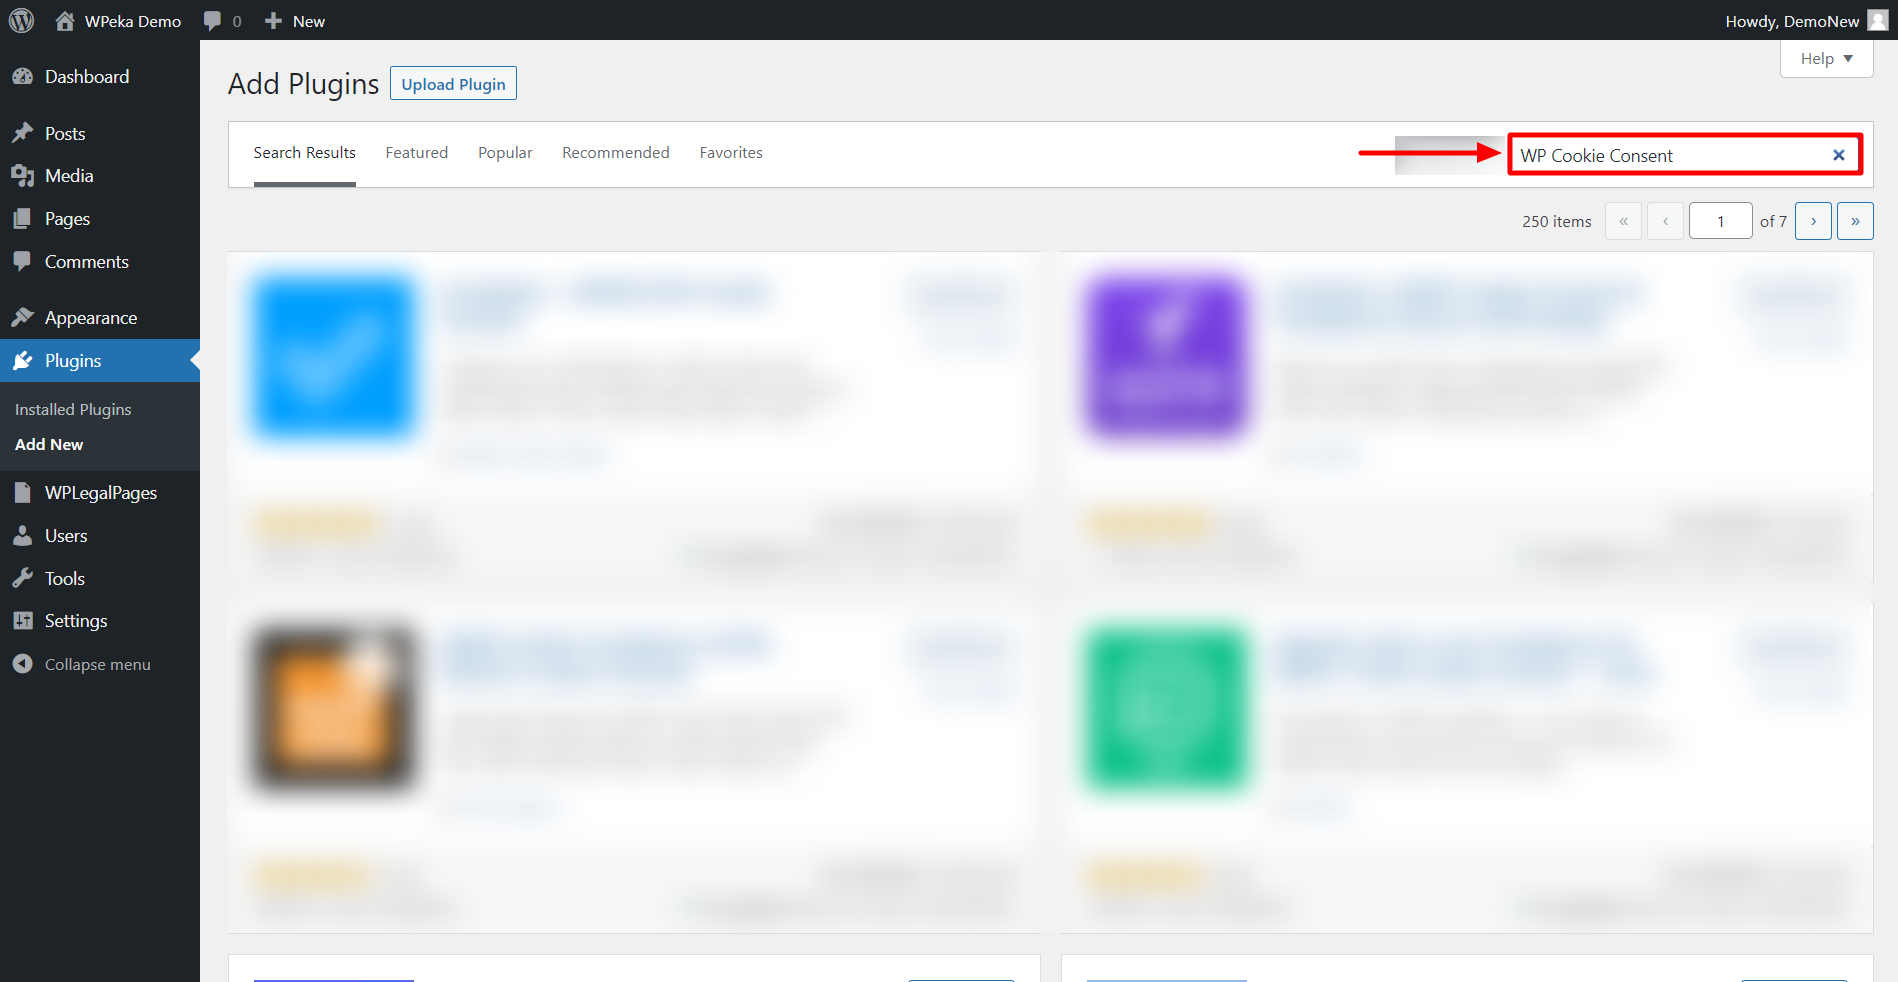
Click on the Install Now button.
After installation, click on Activate to start using the plugin.
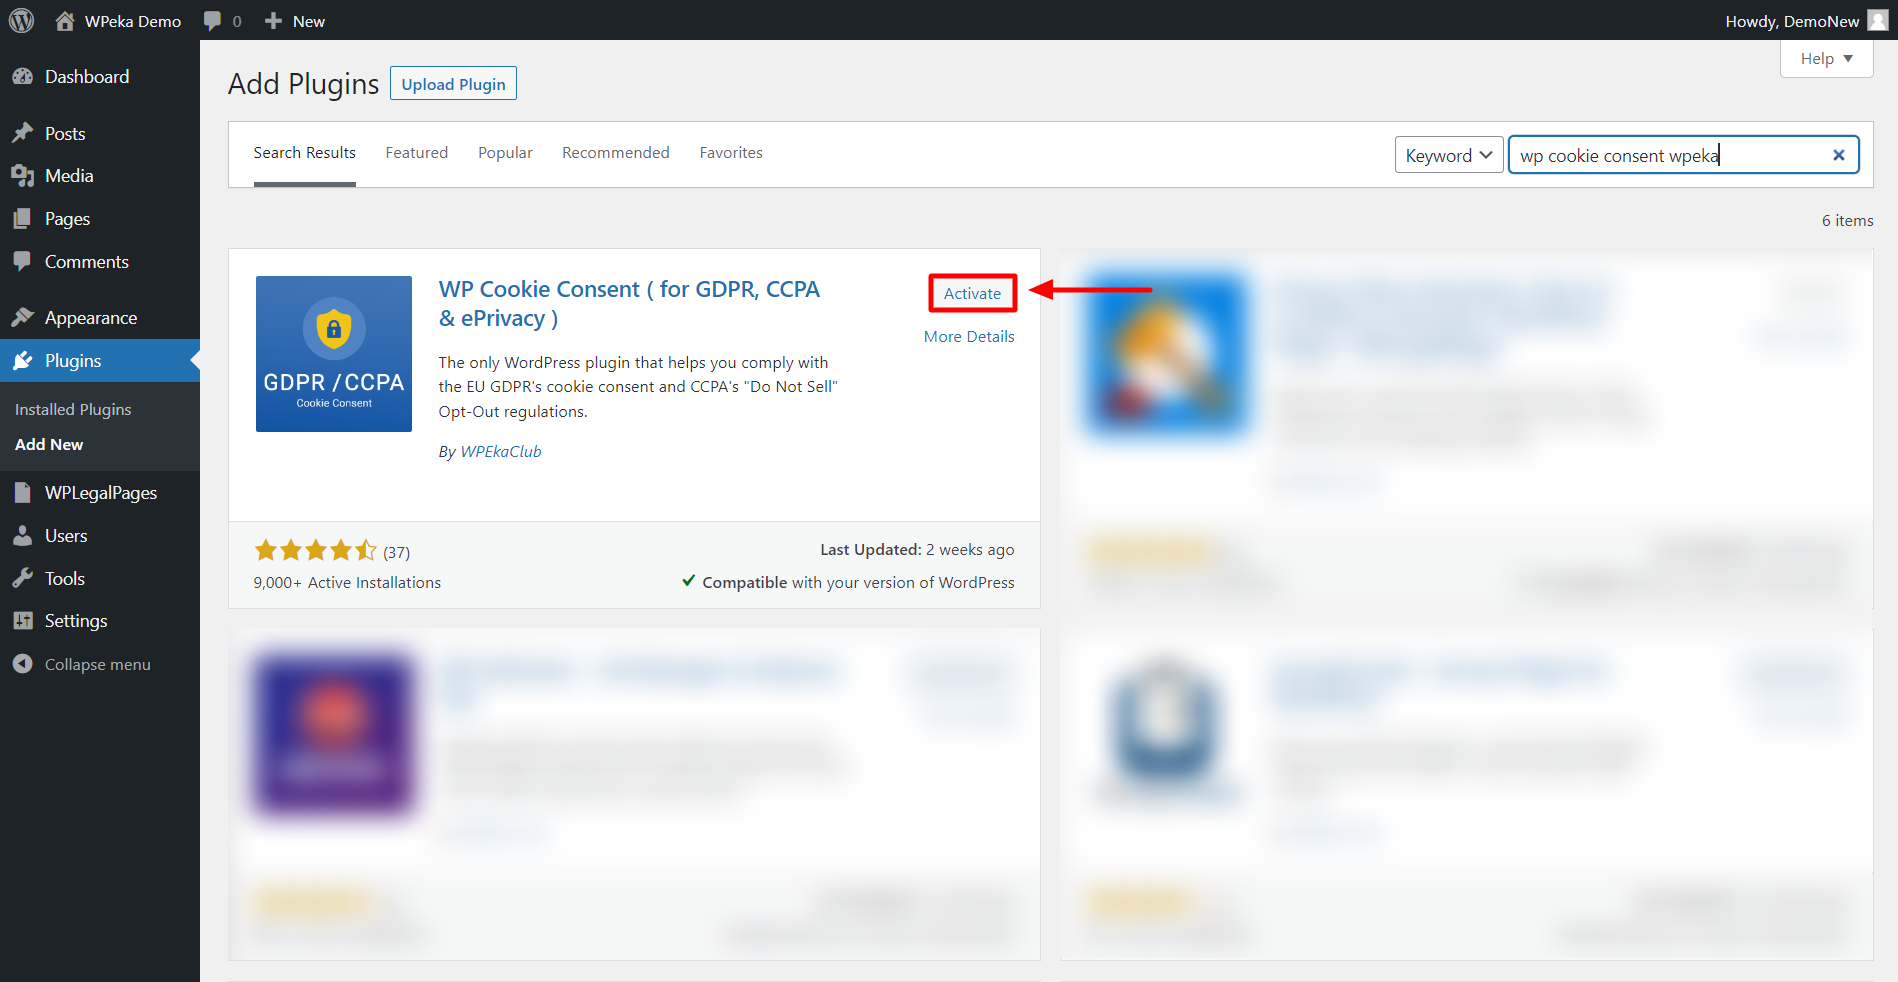
The WP Cookie Consent plugin is now installed and activated!
To activate the pro version of the WP Cookie Consent plugin, you must install and activate the most recent free version using the steps described above.
How To Activate WP Cookie Consent Pro
Download the zip files of the product you purchased from WPeka, along with the API key and Product ID.
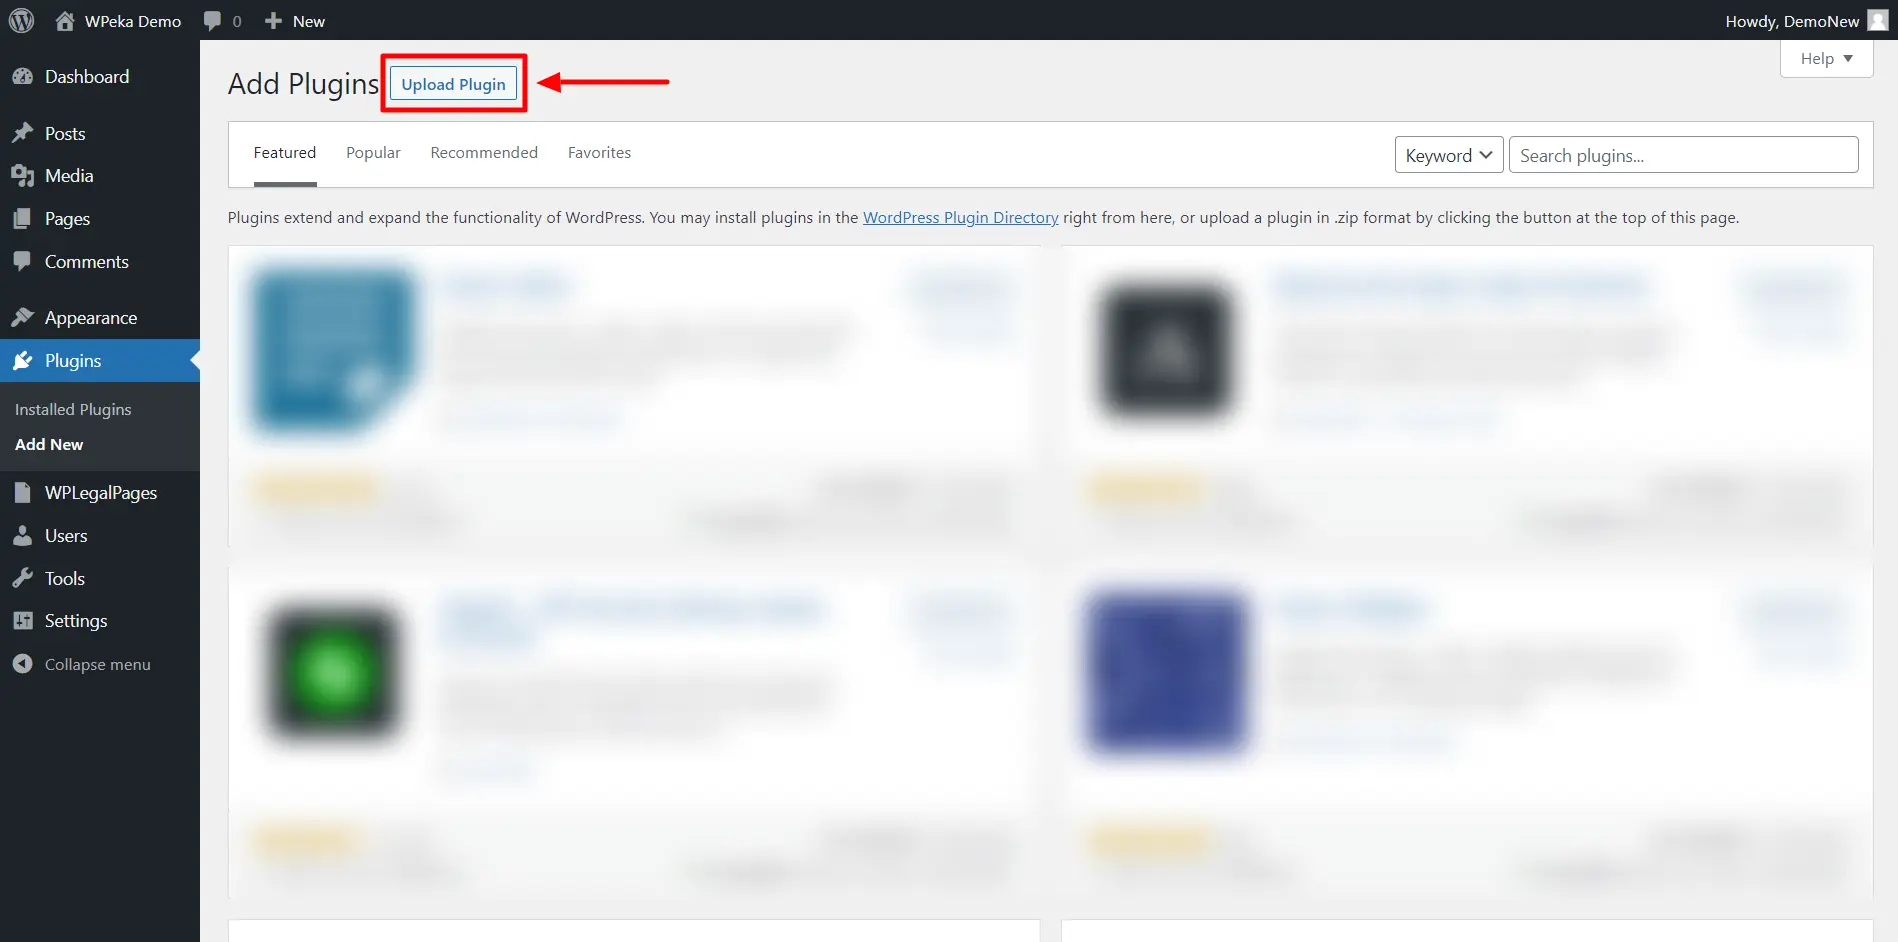
From your WordPress dashboard, navigate to Plugins>Add new.
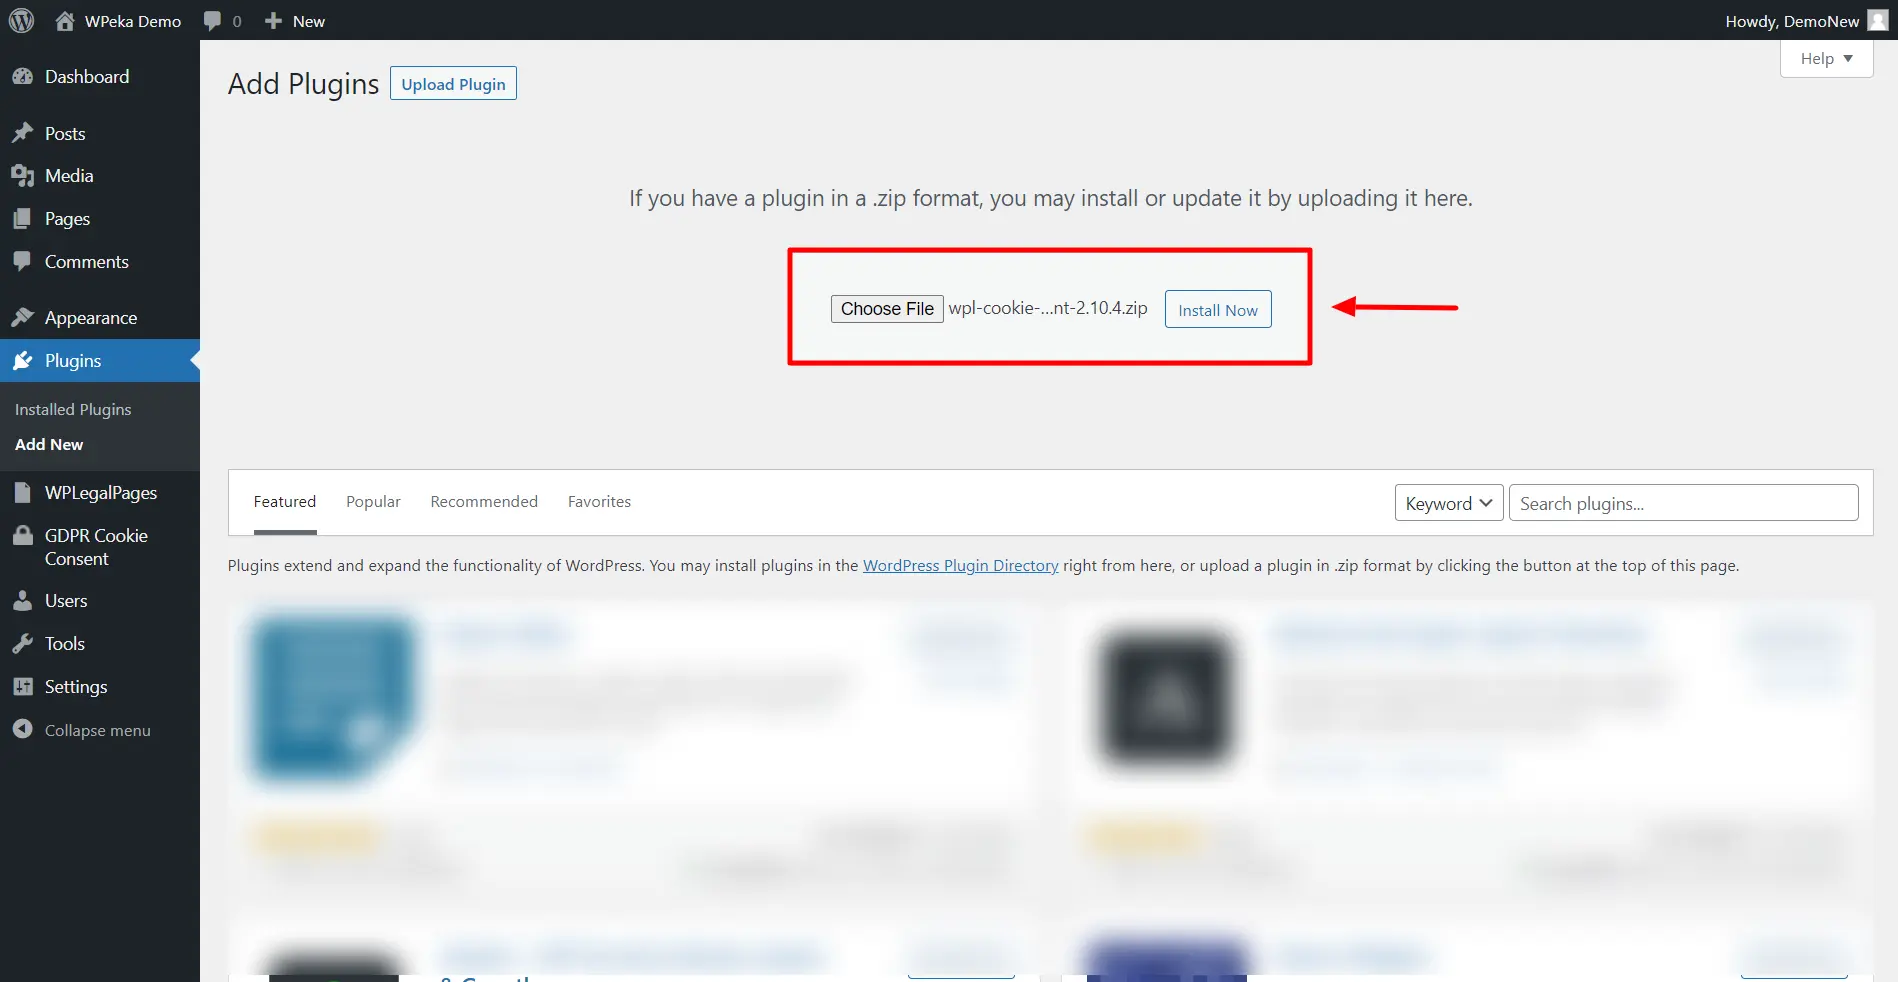
In the Plugins menu, select Upload Plugin.
Upload the downloaded WP Cookie Consent Pro zip file and Click on Install Now.
After installation, click Activate Plugin.
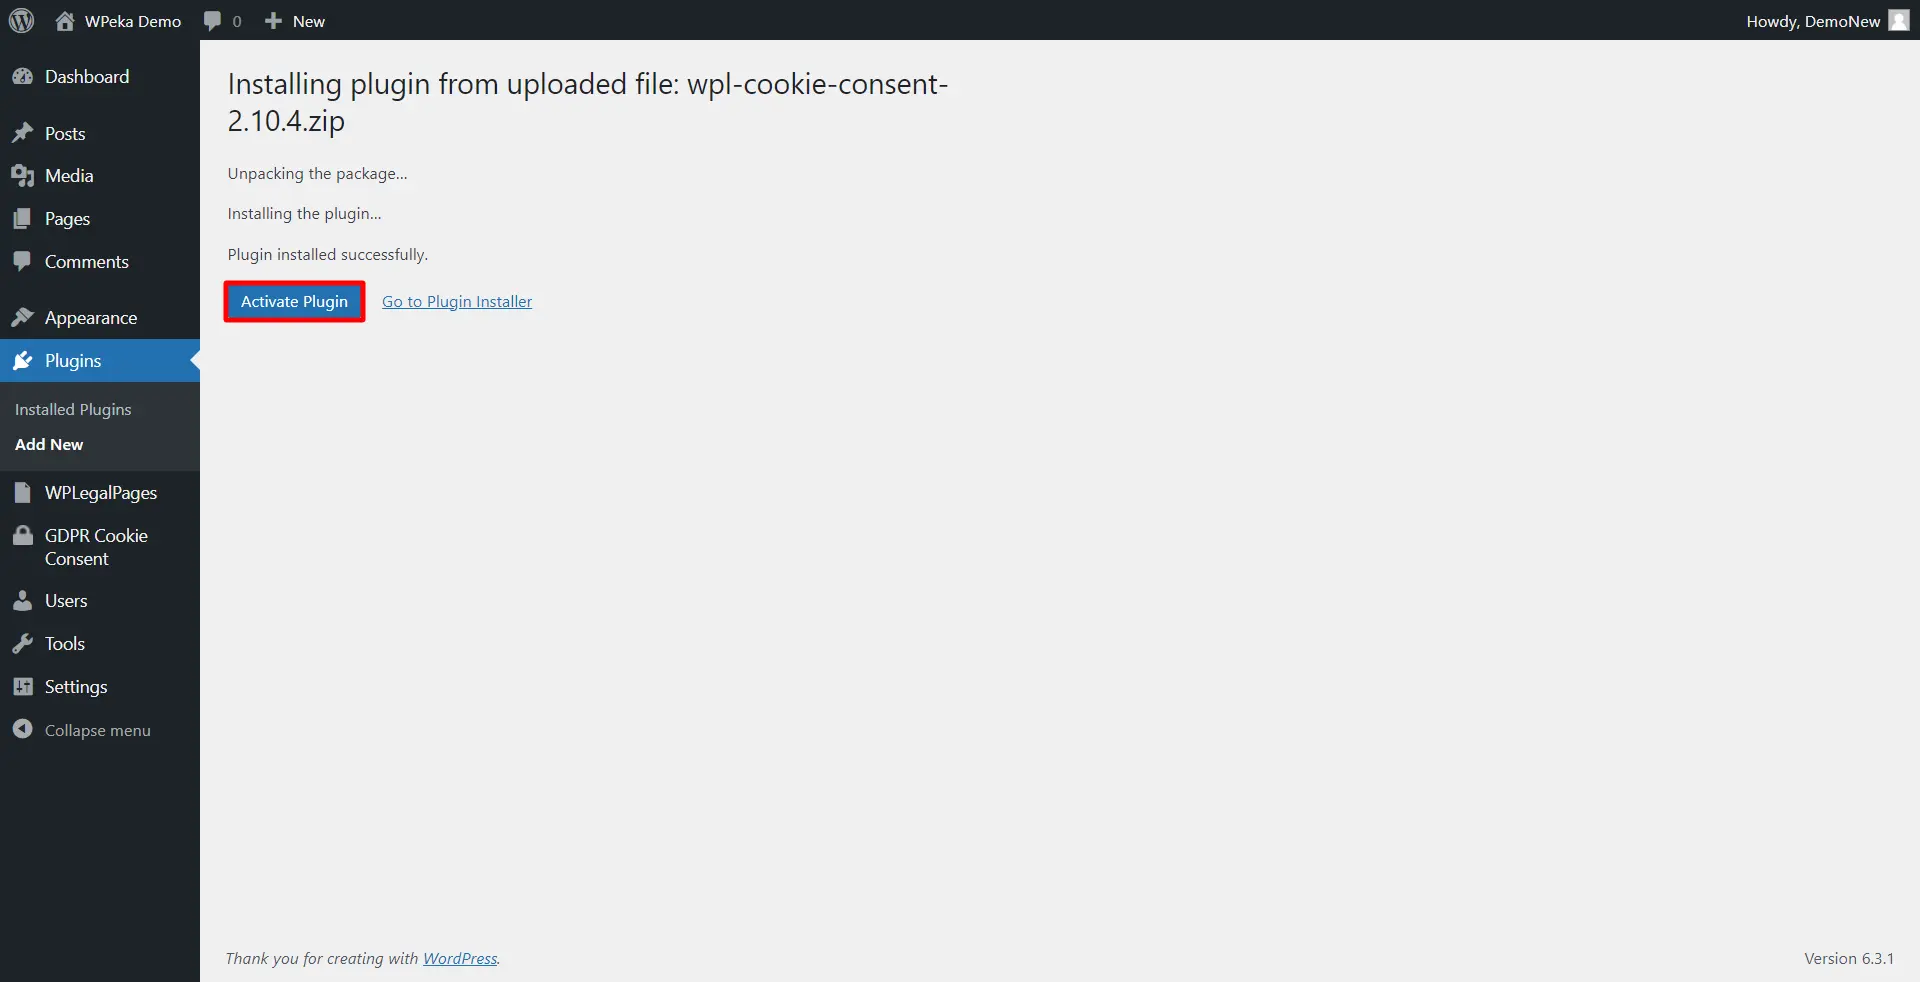
Your WP Cookie Consent Pro is installed.
In your WordPress dashboard, select Click here to activate the Pro plugin.

Enter your purchased API Key and Product ID, and click Save Changes.
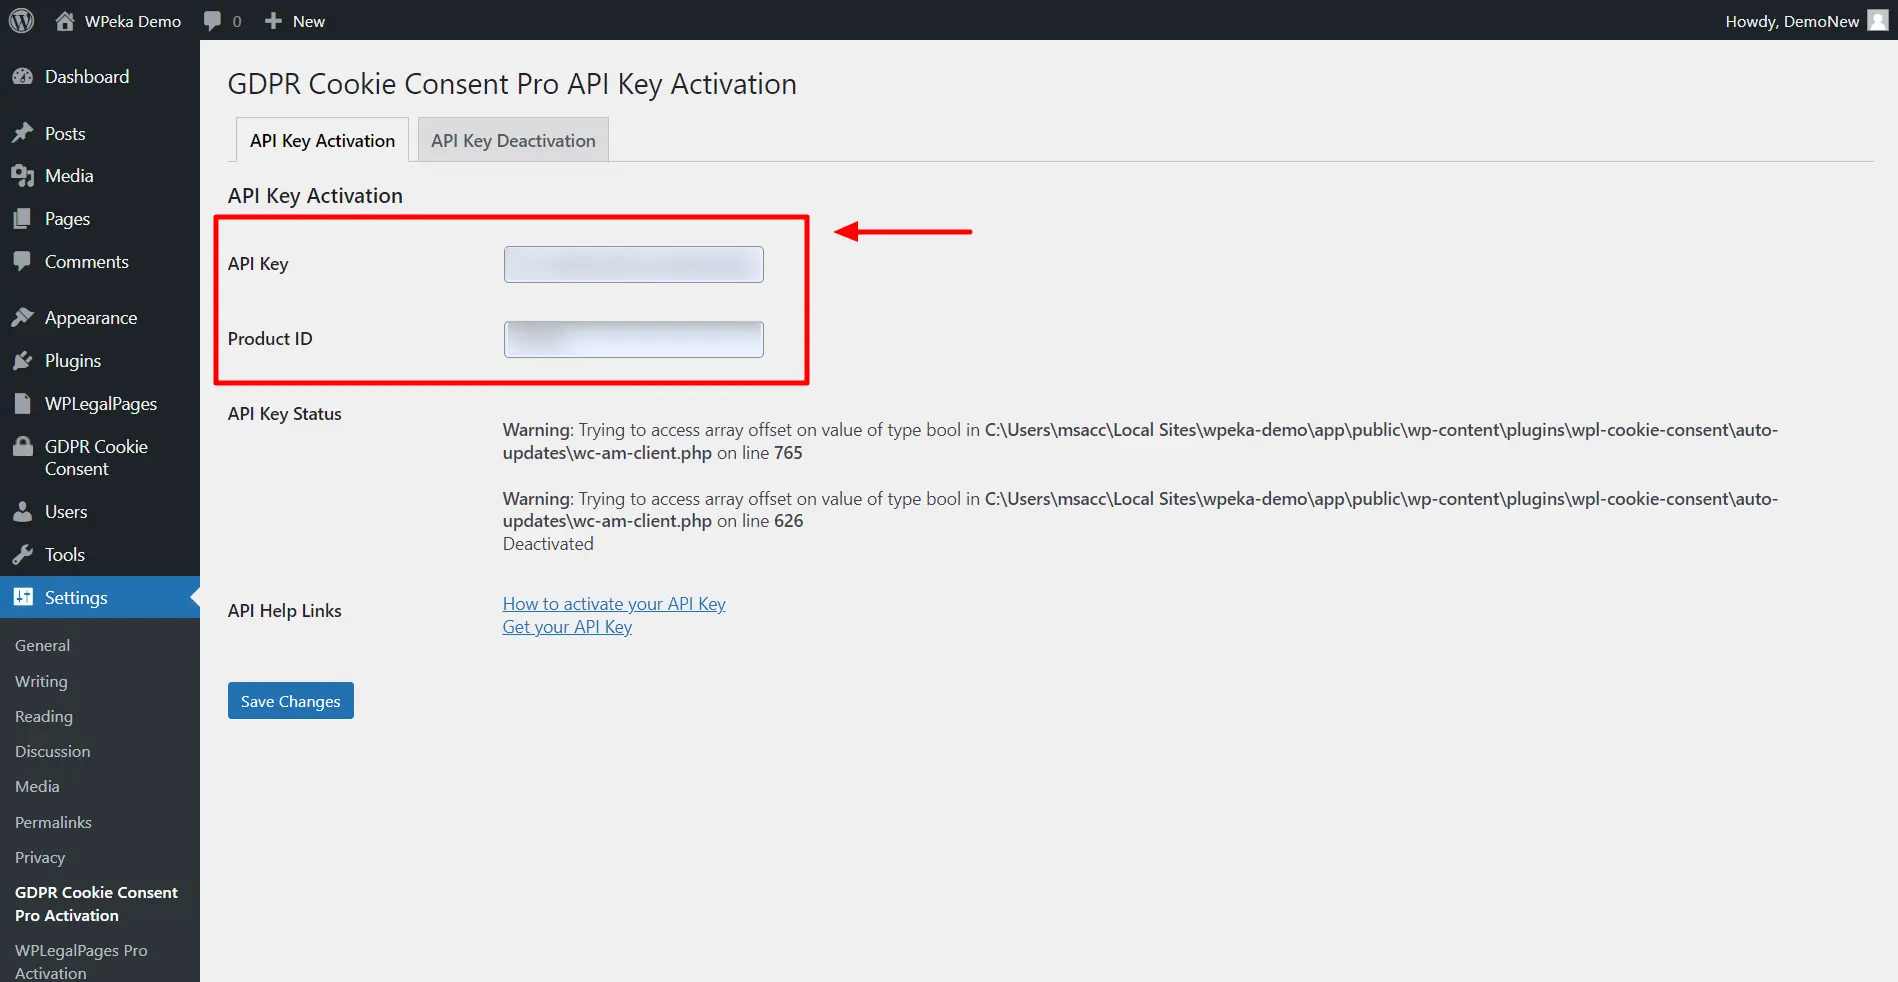
WP Cookie Consent is installed and activated!
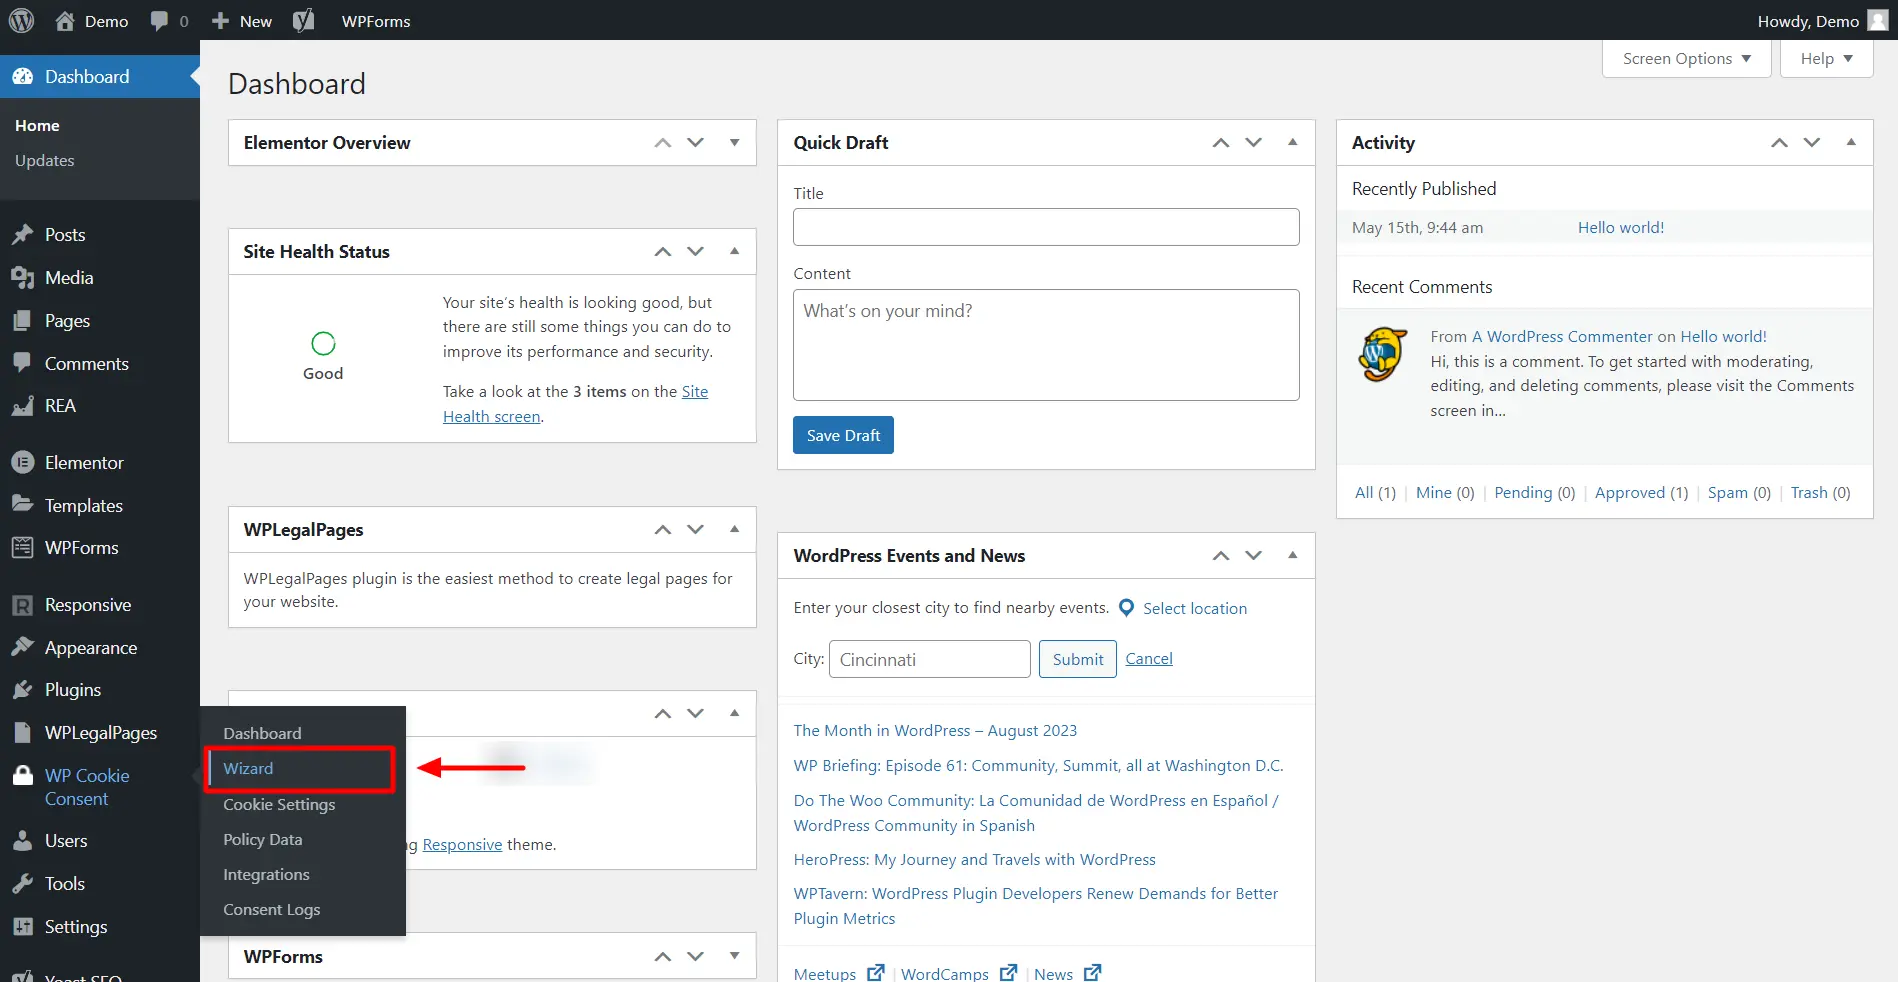
WP Cookie Consent has a wizard feature that automatically crafts compliance messages for you. Select your preferences in the wizard and get a custom-tailored banner ready.
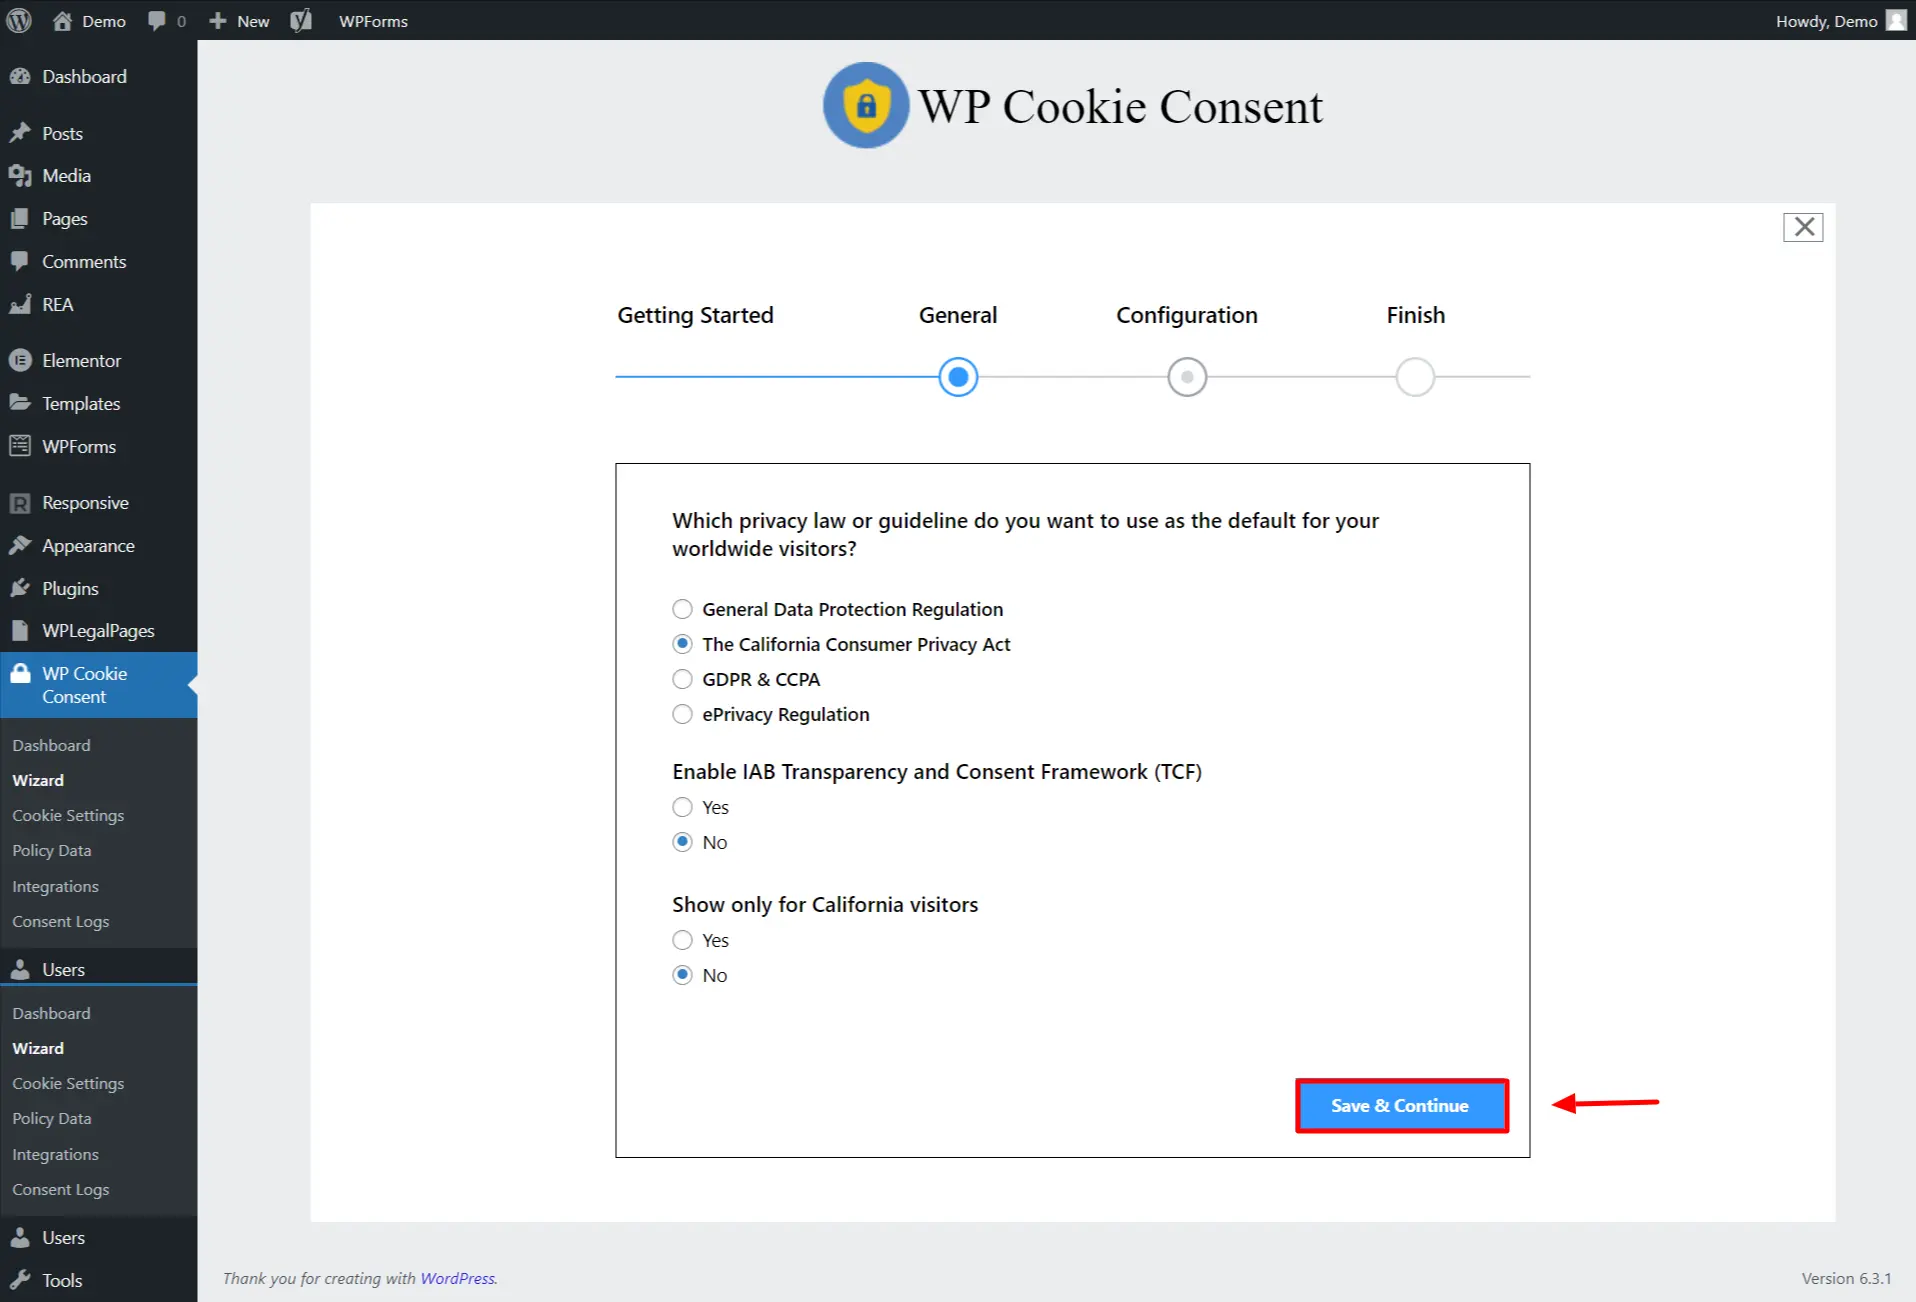
Here’s how you can use the wizard to create a Cookie Consent Banner following CCPA regulations.
In your WordPress Dashboard, navigate to WP Cookie Consent > Wizard.
Under the Privacy law, select the privacy law you prefer. Here we’re choosing The California Consumer Privacy Act.
Click Save & Continue.
Configure your Cookie Banner Settings.
Enabling Consent Logging helps collect records of whether users opt-in or out of the website collecting their personal data.
Click Save & Continue.

Next, click on the Save & Close button.
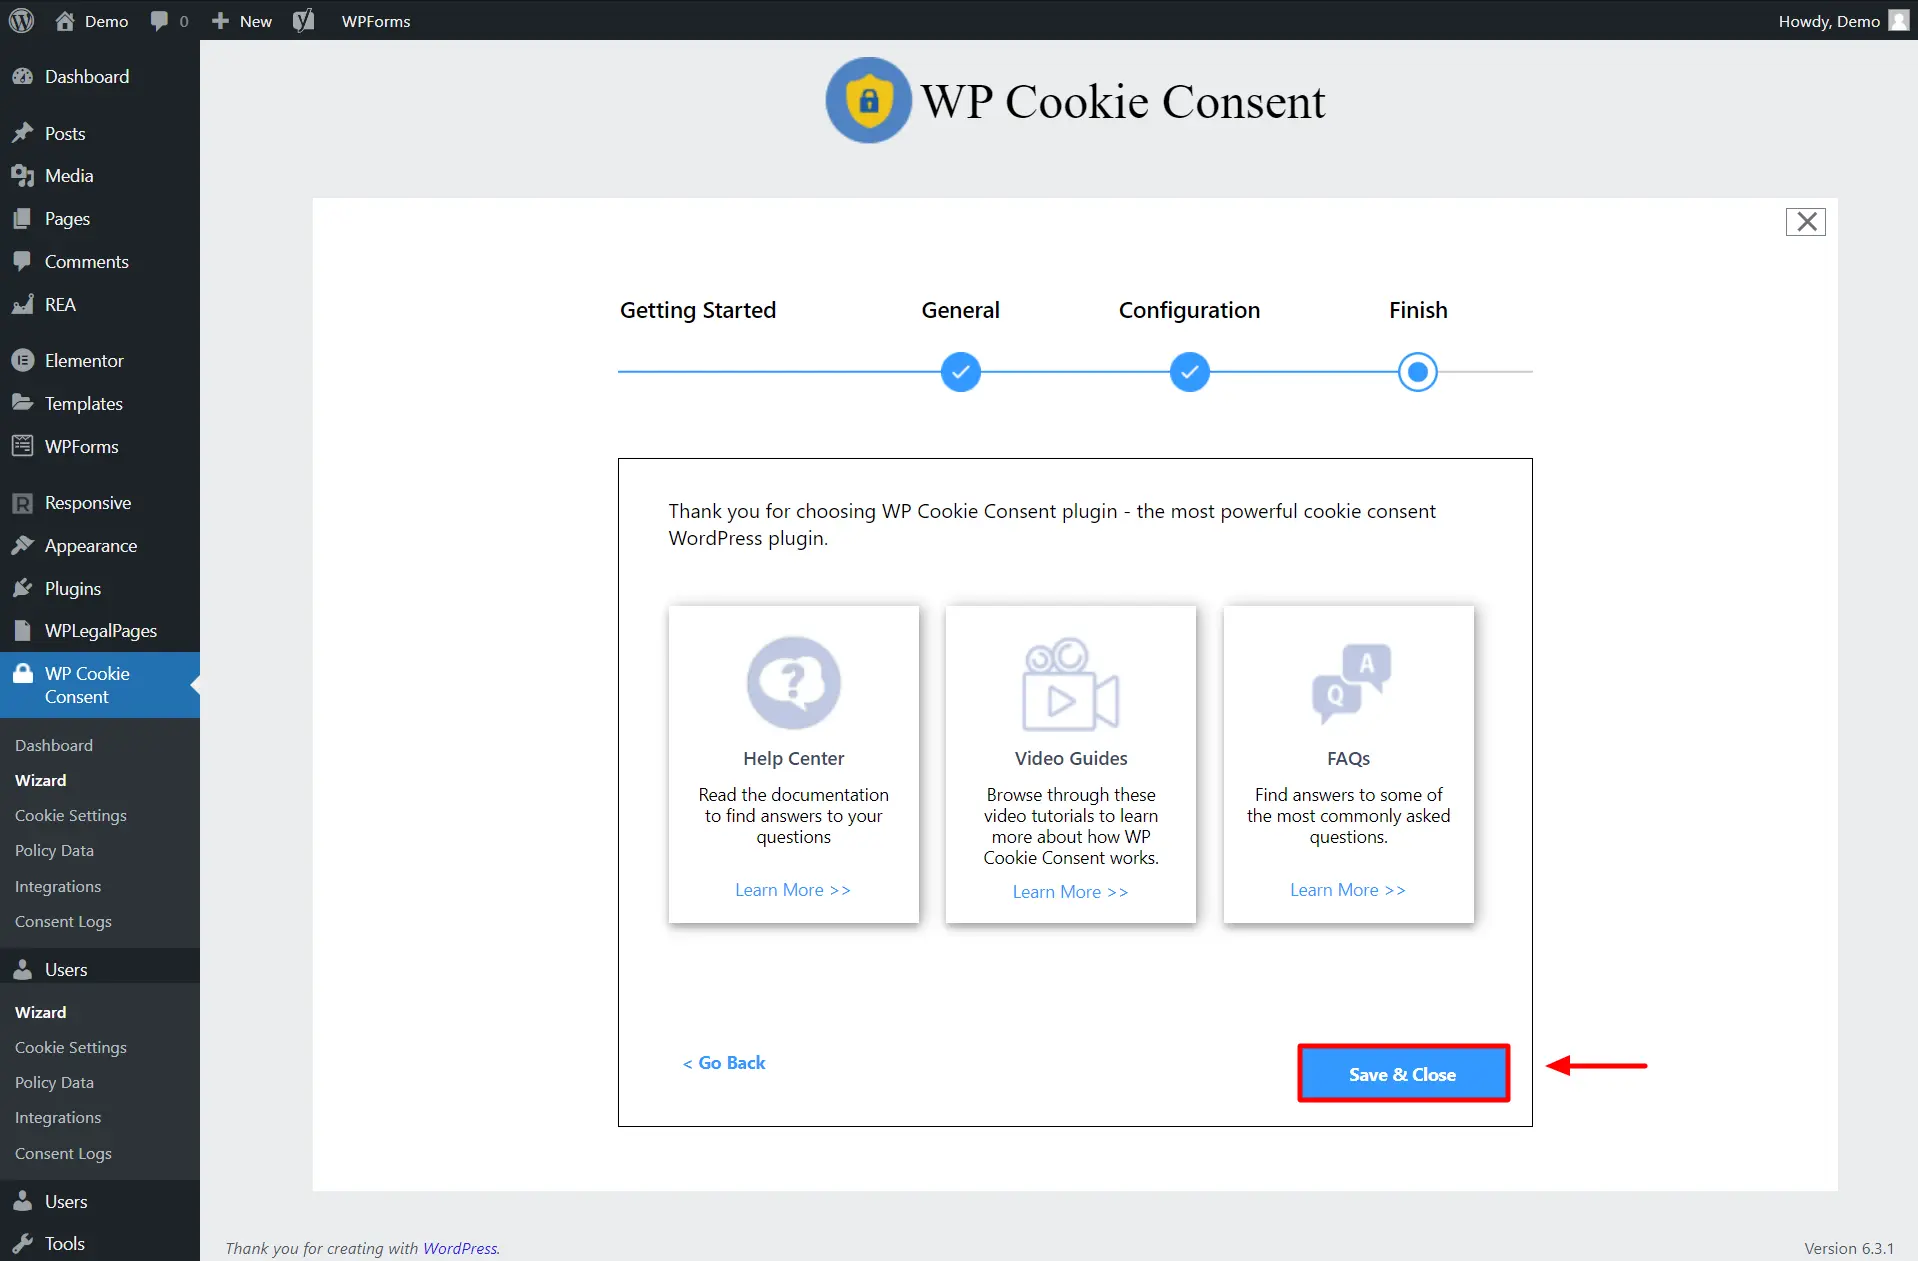
Your Cookie Consent Banner is now live.

Bringing it All Together!
When creating a website, it’s crucial to understand the website essentials namely design, content, and legal compliance are interconnected facets.
Your website’s design should facilitate user engagement and intuitive navigation, your content should offer value and be optimized for search engines, and legal compliance ensures transparency and protection for both you and your users. These elements come together in harmony to create a well-rounded website.
We recommend using Responsive WordPress theme as it’s fast, easy-to-use and SEO optimized. WP Legal Pages and WP Cookie Consent are two trustable WordPress plugins for creating legal pages and cookie consent banners, respectively.
If you’ve liked reading this article, don’t forget to look at our other similar articles:
- What is WooCommerce? Beginner’s Guide
- How to Build a WooCommerce Website with Elementor
- Elementor Review: Is It Still Relevant?
Want to build a WordPress website? Grab the Responsive theme along with WP Legal Pages and WP Cookie Consent plugins to create the best website.