Summary
The article explains how to create a WordPress multilingual site. It defines the steps to set up multiple languages using plugins and settings.
It also highlights best tools, configuration options, and translation tips. Helping readers build a site that serves visitors in different languages.
Wondering how to create a WordPress multilingual site?
Multi-lingual websites refer to those that offer content in multiple languages to reach a diverse audience.
According to Internet World Stats, approximately 20% of Internet users worldwide are English speakers. This implies that the rest, 80% of internet users, prefer accessing the content in their regional languages.
Creating a website with more than one language puts you ahead of your contenders.
If you’re considering creating a multilingual website, using the Elementor page builder is perfect.
Let’s dive into the content and learn how to create a stunning WordPress multilingual site.
Cyberchimps Responsive is the Best WordPress Theme – Get it for free!
Benefits of Creating a Multilingual WordPress Site
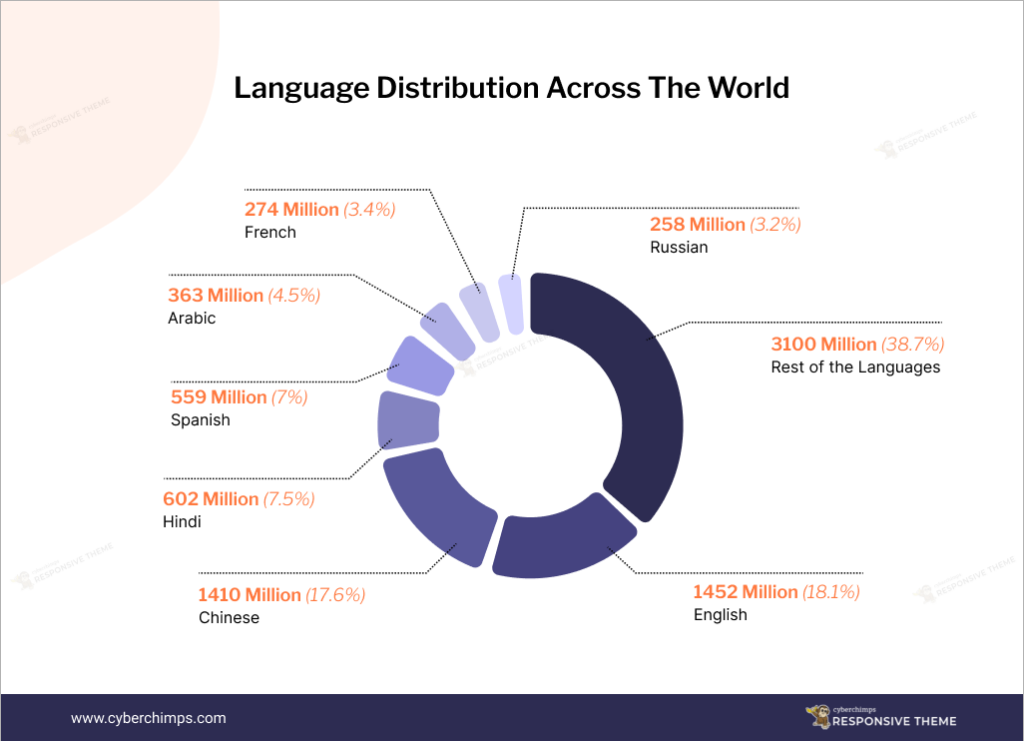
Looking at the infographic, you can see how languages other than English dominate globally. This brings a need to create a multi-lingual website.
There are multiple benefits when creating a multilingual website.
Here are some of the key advantages:
- Expand to Wider Audience: By offering your website in multiple languages, you can reach a broader audience around the world. This enables you to connect with potential customers who may not be fluent in the primary language of your original website.
- Enhances User Experience: Allowing visitors to access content in their preferred language creates an environment that shows that you value diversity, ultimately leading to higher engagement and customer satisfaction.
- Increase in Traffic: Your website becomes more discoverable through search engines in different regions. This can drive organic traffic from international markets and potentially increase conversions.
- Competitive Advantage: In markets where your competitors may not have multilingual websites, offering content in multiple languages can give you an upper hold.
- Creates Trust among Users: Users are more likely to trust and engage with a website that provides information in the language they can read.
- SEO Benefits: By optimizing your content for relevant keywords in each language, you can increase visibility in search engine results and attract organic traffic from various regions.
Now that you know the various benefits, let’s look into the best platform to build your multilingual website in WordPress.
Introduction to Elementor Page Builder

Elementor is a widely used WordPress page builder that enables users to create and customize websites through an easy drag-and-drop interface.
With Elementor, users can visually design their websites quickly by adding and arranging elements such as text, images, videos, buttons, forms, and so on.
A live customizer helps to view real-time changes without switching between windows or preview modes.
With advanced features like responsive design capabilities and seamless integration with other WordPress plugins, Elementor has much to offer.
Elementor continues to build trust by providing continuous improvement, innovation, and collaboration, therefore contributing to the overall growth and development of the platform.
Preparing Your WordPress Site
To get started with your website, there are four major steps involved.
Let’s get started with the first step.
Step 1: Choose a Hosting Provider and Register a Domain Name

Before setting up your website, you must choose a hosting provider and register a domain name. A hosting provider is a company that provides space on a server where your website files are stored, while a domain name is a unique address that directs users to your website.
There are several hosting providers to choose from. Based on the factors such as cost, reliability, and customer support, we recommend using the Kinsta hosting provider.
Why is Kinsta a Reliable Hosting Provider?
Here are several compelling reasons to consider Kinsta:
- Firstly, Kinsta is known for its emphasis on website speed and performance. They employ advanced technology, such as Google Cloud Platform, which provides fast and stable website speeds.
- Another noteworthy aspect of Kinsta is its strong focus on website security. They provide features such as malware scanning, automatic backups, and DDoS protection.
- Kinsta offers a user-friendly interface that is easy to navigate.
- Their expert support team is available 24/7 to help with any issues, ranging from a plugin to server errors and provides an ideal solution.
- Kinsta offers flexible plans to meet diverse needs, from small to high-traffic enterprise sites.
Once you get the Kinsta hosting, you must register a domain name. This is the name that users will type into their web browser to access your website.
Choosing a domain name that is easy to pronounce and related to your business is important.
Step 2: Install WordPress
Once you have chosen a hosting provider and registered a domain name, the next step is to install WordPress.
Kinsta provides a one-click installation process that makes it easy to install WordPress. Simply log into your account and follow the instructions to install WordPress.
Step 3: Install Multilingual Compatible WordPress Theme

WordPress themes are an important part of the website-building process as it allows you to shape your website how you want it to.
Choosing the right theme that’s compatible with your plugins is a never-ending process.
We recommend using the Responsive theme as it’s SEO-friendly and compatible with multiple languages.
Step 4: Choose a Multilingual Plugin
There are hundreds of multilingual plugins to choose from, but selecting the best from the list is tedious. To make things easier, we recommend using either WPML or TranslatePress.
For tutorial purposes, we’ll be using the TranslatePress plugin.
Step 5: Install and Activate the TranslatePress Multilingual Plugin
You can install the TranslatePress plugin from your WordPress plugins section.
Follow these steps to install:
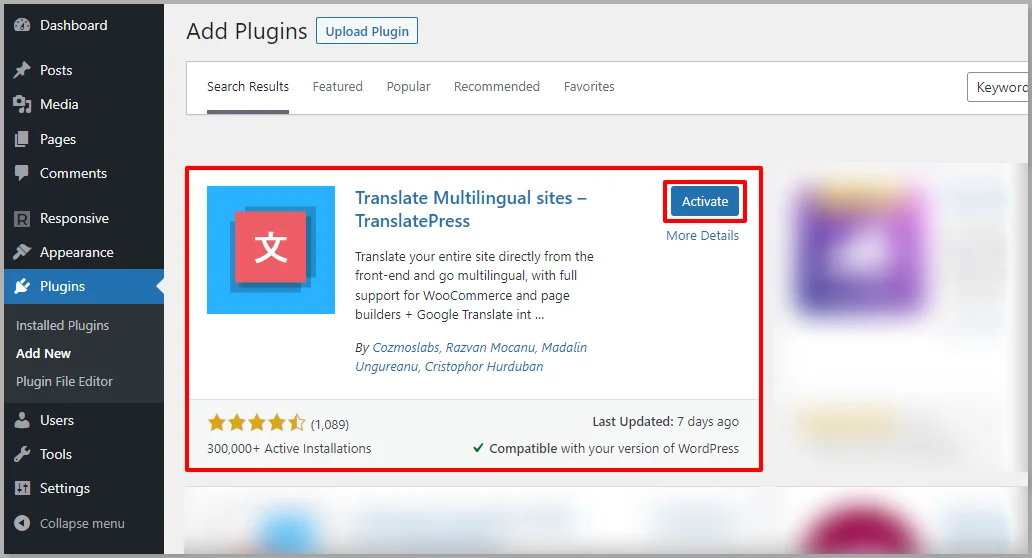
Go to the Plugins menu in the WordPress dashboard and click on the Add New button.

Search for TranslatePress and click on the Install Now button.

The last step is to Activate the plugin.
Configure TranslatePress Plugin
In this section, we’ll cover how to configure the TranslatePress plugin.
Setting Up Language Options
To set up the language options, follow these steps.
From your WordPress dashboard, head over to the Settings option and click on TranslatePress.

In the General settings, choose the default language of your website.
Next, select all the languages you want to include in your multilingual website.

The free version supports only one language, while the premium version of TranslatePress allows unlimited languages.
Create Language Switchers
The translatePress plugin is a great option if you want to implement language switchers on your webpage or website.
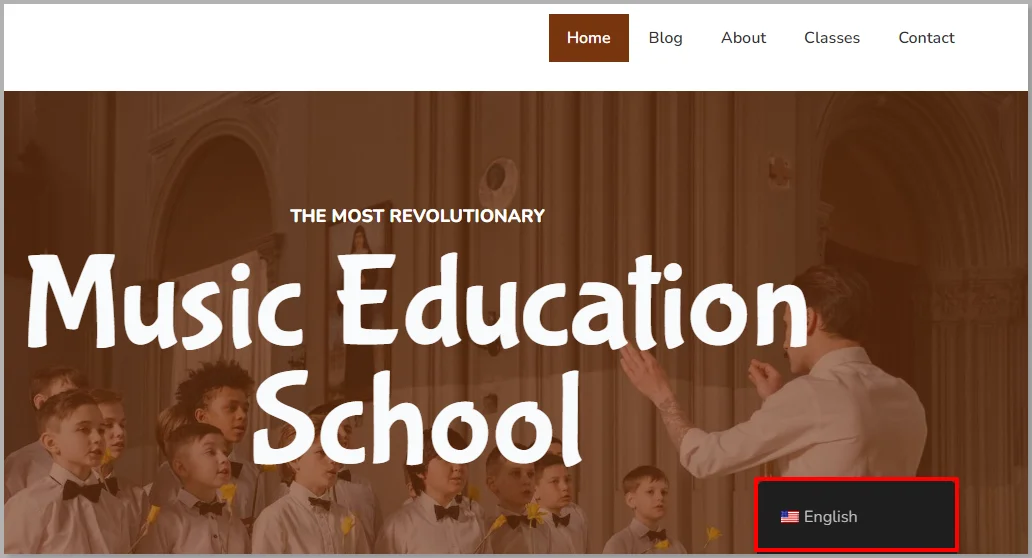
The plugin automatically includes a floating language switcher in the bottom-right corner of your website.

The languages you have opted for in the previous step will be displayed on every site page, regardless of whether you have used Elementor to build those pages.
You can disable the floating language switch by simply unchecking the floating language selection box.
If you want to change the language switcher’s location, you can either use shortcodes in Elementor or define them in menu items.
Adding a Language Switcher with Elementor
With TranslatePress, you can easily add a language switcher anywhere on the page with Elementor.
Follow these steps to add the language switcher:
In Elementor, search for the shortcode widget.

Drag and drop the shortcode widget anywhere you want in the Elementor page or post. Once inserted, type [language-switcher] in the space given.
![Type [language-switcher] in the shortcode space](https://cyberchimps.com/wp-content/uploads/2023/06/Use-shortcode-in-Elemenetor.webp)
Now your users can change the language according to their convenience.
You can use the normal Elementor settings to control spacing, positioning, and styling with the help of Advanced options.
Adding a Language Switcher using Menu Items
To add a language switcher to your multilingual WordPress site, you can use the menu item settings in WordPress.
Head over to your WordPress dashboard. Hover over Appearance and click on the menus option.

Under menus, name the menu as per your choice. Here we’re using Header as the menu name and click on Create Menu button.

In the next step, add all the required pages to the menu. Select the language switcher option and choose the current language option.
Here, we’ve created the languages as sub-items of the Current Language to provide a drop-down menu.

You can either follow the same or use the Opposite Language option, where you can click on the language, which changes to the opposite language.
Save changes, and your website will display this:

Designing Multilingual Pages with Elementor
Once you have added the Elementor language switcher(s) to your website, the next step is to translate your site’s content so visitors can view it when they select a non-default language through the language switcher.
TranslatePress offers two methods for translation:
- Automatic Translation: With the free version of TranslatePress, you can automatically generate translations for your site using Google Translate or DeepL.This allows you to generate translations without manual intervention quickly like a translation plugin.
- Manual Translation: You can manually add or edit translations using the visual editor provided by TranslatePress. This method gives you full control over the translated content and allows you to ensure accuracy and quality.
Also, you can mix both approaches by using automatic translation as a starting point and then refining it manually as per your knowledge.
Automatic translation involves using the Google Cloud Translation API key, which comes as a paid tool.
Here, we’ll be showing you how to translate content manually using the TranslatePress plugin to create your multilingual WordPress site.
How to Create Multilingual Pages
To create multilingual pages, all you need to do is follow these steps:
Head over to your WordPress dashboard and click on the Translate Site button.

Select the page you wish to translate. Here I’m taking an example of the Blog page.
Next, click on the pen icon next to the text you want to translate.
After clicking on the icon, you are provided with a space to type the translated content manually.

Save the changes, and your website will be displayed like this:

This is how you create a WordPress multilingual site manually.
Optimizing Your Multilingual Site
When optimizing a multilingual website for search engines, several important considerations must be remembered.
SEO Considerations for Multilingual Websites
Translating metadata and URLs involves adapting the elements that appear in search engine results pages (SERPs) to the target language.
Here’s a more detailed explanation:
- Metadata Translation
- Title Tags: Title tags are HTML elements that define the title of a webpage. Translate the title tags of your web pages to the target language. The content should be concise and compelling and must contain relevant keywords.
- Meta Descriptions: Meta descriptions briefly summarize a webpage’s content in SERPs. Translate the meta descriptions to describe the page’s content in the target language accurately.
Including relevant keywords in the meta description is one of the most important SEO factors.
- Header Tags
Header tags (H1, H2, etc.) help in structuring the content of your webpage. Translating the header tags to the required language maintains consistency and readability and helps your audience to connect well.
- URL Translation
- Language-Specific URLs: If you choose a subdirectory or subdomain structure for your multilingual website, you can have language-specific URLs.
For example, if your English blog page has a URL like “example.com/en/blog,” the corresponding German page could be “example.com/de/page.” This structure helps users and search engines identify the language and navigate to the desired version of your website. - Redirects: When implementing language-specific URLs, setting up proper redirects is important.
If a user requests a page in a specific language, ensure they are automatically redirected to the corresponding language version.
It’s crucial to note that translating the content to fit the target audience’s language and preferences will increase the effectiveness of your SEO efforts for each language version of your website.
Testing and Monitoring Site Performance
Regularly monitor the performance of your multilingual website in search results. Analyze traffic, rankings, and user behavior to identify areas for improvement and refine your SEO strategy.
Also, remember that SEO for WordPress multilingual site requires ongoing effort and continuous optimization.
Stay up-to-date with search engine algorithm changes, user behavior, and market trends to maintain a competitive edge.
FAQ’s
A multilingual website allows you to reach a broader audience and users of different languages. It can improve user experience, increase international traffic, expand your customer base, and potentially boost conversions and revenue.
The best theme to create a WordPress multilingual website is the Responsive theme. It integrates seamlessly with popular plugins like WPML and Elementor, thereby helping you with a hassle-free process.
To create a WordPress multilingual website, follow these steps:
Install the WordPress platform
Install the Responsive theme
In the next step, install the WPML and Elementor plugins
Start creating a website with Elementor and translate the pages to the desired language using WPML options.
Conclusion
Creating a multilingual WordPress website is crucial as it helps to widen your audience and target country-specific users.
To create a multilingual website, you can use a popular plugin like TranslatePress or WPML, which is easy to use and compatible with Elementor.
Choose the right theme for your WordPress multilingual site to ensure it integrates seamlessly with the multilingual plugin. We recommend using the Responsive theme for its ease of use and compatibility.
Want to read more such content? Here are our other engaging articles:
- Best Elementor Addons to Supercharge Your Website
- Quick Ways To Optimize Your Elementor Page Speed
- How to Use Elementor Theme Builder to Customize Your Website
Want to create a WordPress multilingual website already? Grab the Responsive theme, TranslatePress, and Elementor plugins.