Summary
The article explains how to build a WordPress ecommerce website. It defines the steps from choosing hosting and a domain to installing WordPress and WooCommerce.
It also highlights setting up products, payment gateways, design tips, and store optimization. Helping readers create a fully functional online store.
You could be a retailer, a grocer, an artisan, an artist or you may be selling any type of physical products locally. If you are looking to scale your business, setting up an online store is the way to go. An e-commerce store gives you the opportunity to reach out to a broader audience.
Launching an e-commerce store might feel daunting at first, especially if you’ve got no programming skills or experience, but in reality, starting an e-commerce store has never been easier.
With the help of WordPress, you can set up your e-commerce website within a short span of time. And you do not need to hire a team of professionals to maintain the site as maintaining your store is as simple as setting it up!
In this article, we will look at how to build an e-commerce website with WordPress.
Let’s begin!
Step 1: Buy a Domain Name and Web Hosting
In order to set up a website, you need to buy a domain name and web hosting. First, let’s look at how to buy a domain name.
Buy a Domain Name
A domain name is what your visitors will type in the browser to land on your website. It’s the address of your site. Here are some tips to come up with a domain name for your e-commerce site:
- On a piece of paper, brainstorm a number of domain name ideas. They should ideally include your brand name as well
- Keep the domain name short, simple to type, and easy to remember
- You can use the name of your city if you are looking to target a specific region. E.g., newarklocalgrocery.com
- Avoid numbers and hyphens as they can be confusing
- Go with a domain extension such as .com or country-specific domain extensions (.ca, .in, .us, .uk, etc.)
- Once you have decided on a domain name, check its availability using a service like Instant Domain Search
Buy a Web Hosting Plan
A web host provides space to store your website files/data. Here are a few web hosts that we would like to recommend. Make sure that the web host you choose has the following qualities:
- Reliability
- Speed
- Technical support
- Storage space
- Uptime
- A good bandwidth
For this article, we will use Bluehost for reference to buy the domain name and web hosting plans. Go to Bluehost’s website, and when you land on the homepage, click on the Get Started button.

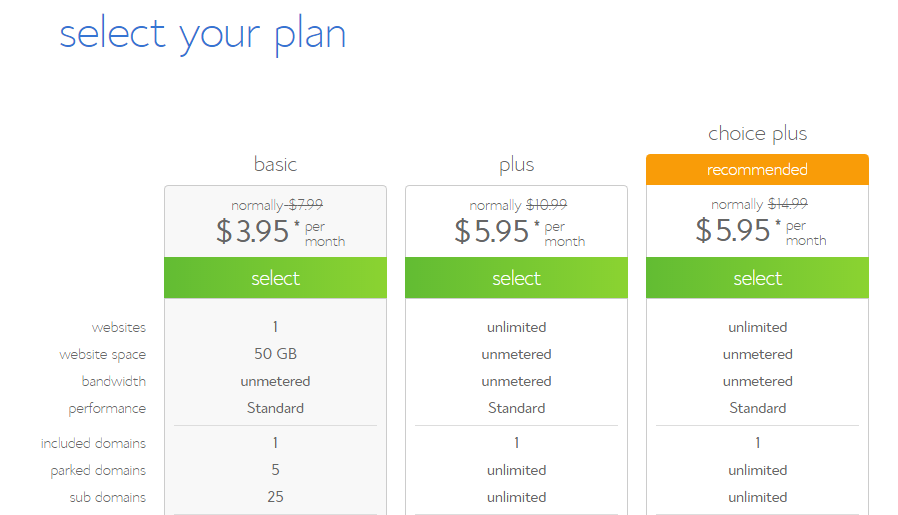
You’d then be taken to their pricing page, where Bluehost has laid out the plan details. We would recommend either the Plus or the Choice Plus plan, depending on your budget.
(While we were working on the article, Bluehost was offering a heavy discount on the Choice Plus plan. We’d suggest going with that if the offer is still around.)
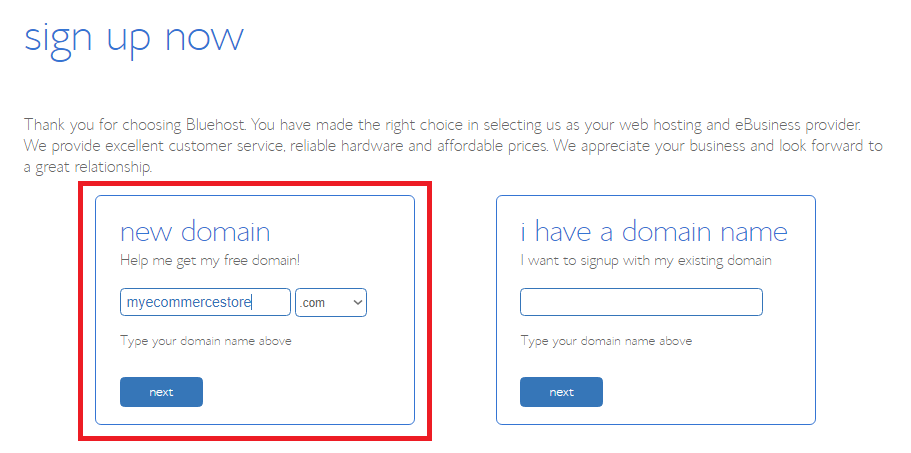
Enter your domain name after selecting the plan.
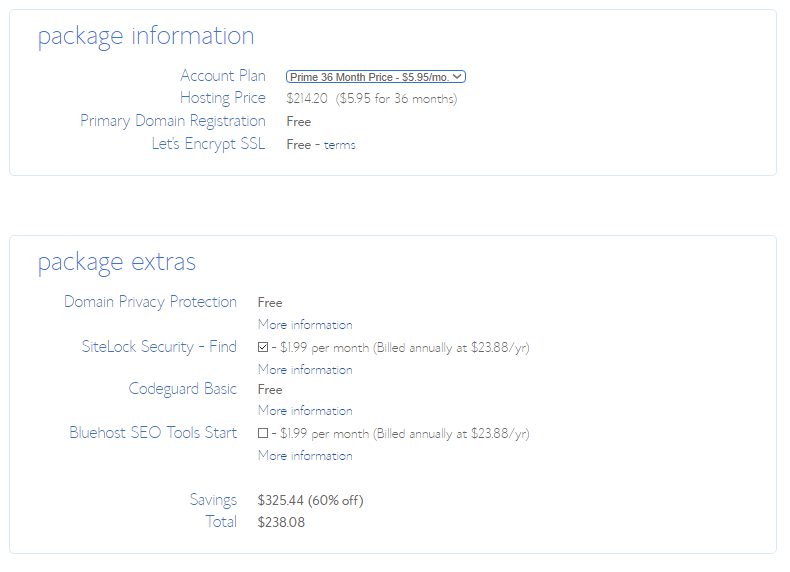
Once you enter the domain name, you’d be taken to the payments page. Fill in all the necessary account and payment information to register your domain name and web hostingwordpress theme with Bluehost.
Once your payment is processed, you will receive a registration confirmation email. You are now all set to install WordPress!
Step 2: Installing WordPress
After purchasing your web hosting and domain, the next step is installing WordPress. Most hosting providers like Bluehost offer one-click WordPress installation, making the process simple and fast.
Inside your hosting dashboard, select WordPress Hosting, click Add Site, choose Install WordPress, enter your site name and domain, and complete the setup. Once installed, log in to access your WordPress dashboard.
Step 3: Installing the WooCommerce Plugin
There are plenty of WordPress e-commerce plugins available in the market. To set up your e-commerce store on WordPress, you will now need to install the WooCommerce plugin. The plugin is developed by Automattic, the parent company of WordPress and is available for free.
Go to Plugins —> Add New in the left pane of your WordPress menu. Type in WooCommerce in the search bar. Install the WooCommerce plugin by Automattic.
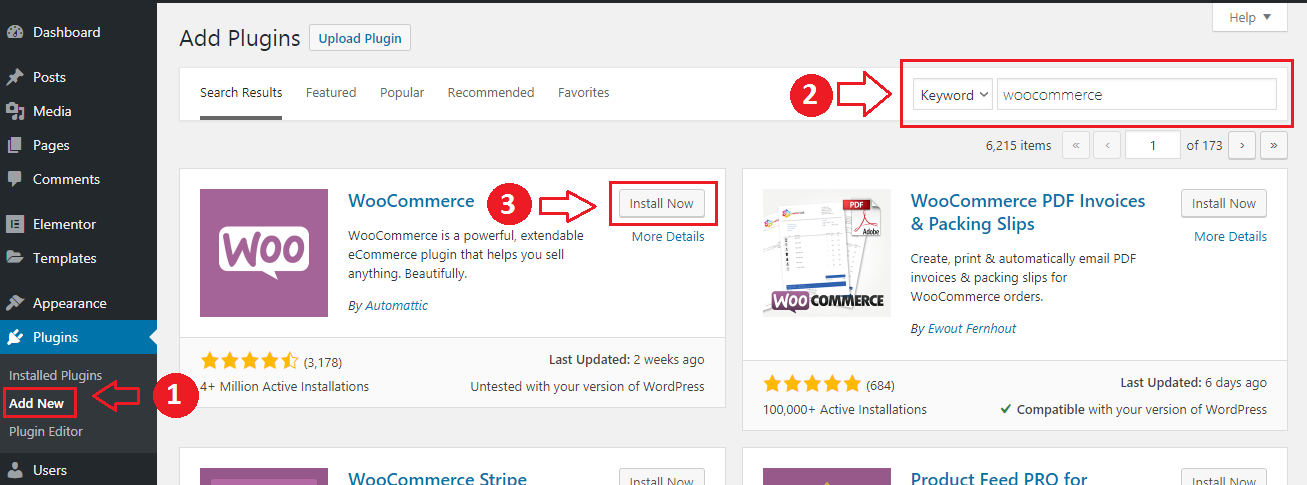
Click on Activate once the plugin is installed. After activating the plugin, you’d be redirected to the WooCommerce setup wizard, where you need to configure store, payment, shipping, etc. details.
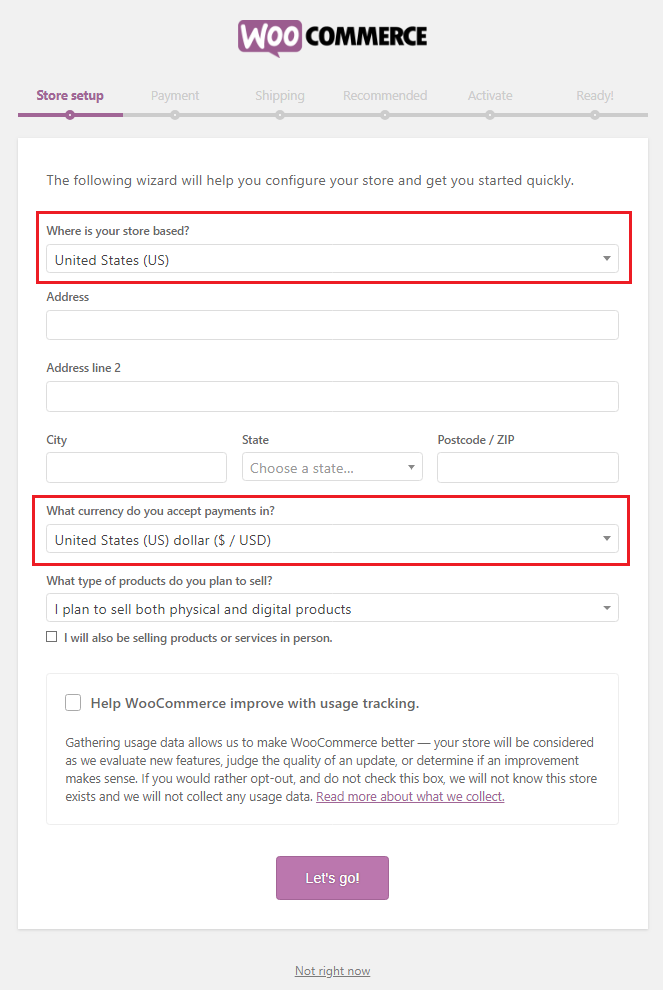
1. Store Setup
On the first page of the wizard, choose the location of your business, fill in the address fields, and choose the currency. Click on Let’s Go after filling in the details.
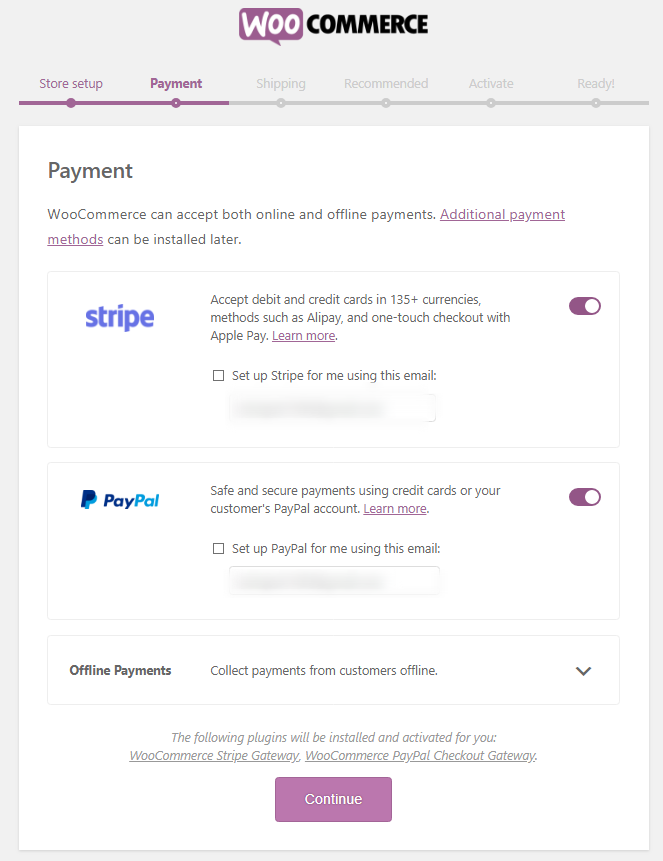
2. Choose a Payment Method(s)
WooCommerce offers multiple payment options. The most commonly used among these are PayPal and Stripe. We would recommend integrating your store with both platforms to make your store more user-friendly. Along with these 2, WooCommerce also allows you to configure payment methods such as direct bank transfer, check payments, and cash on delivery.
3. Add Shipping Details
You can also configure shipping costs during the configuration step. You may have to make some changes later in the settings, but you can fill in basic information to get started.
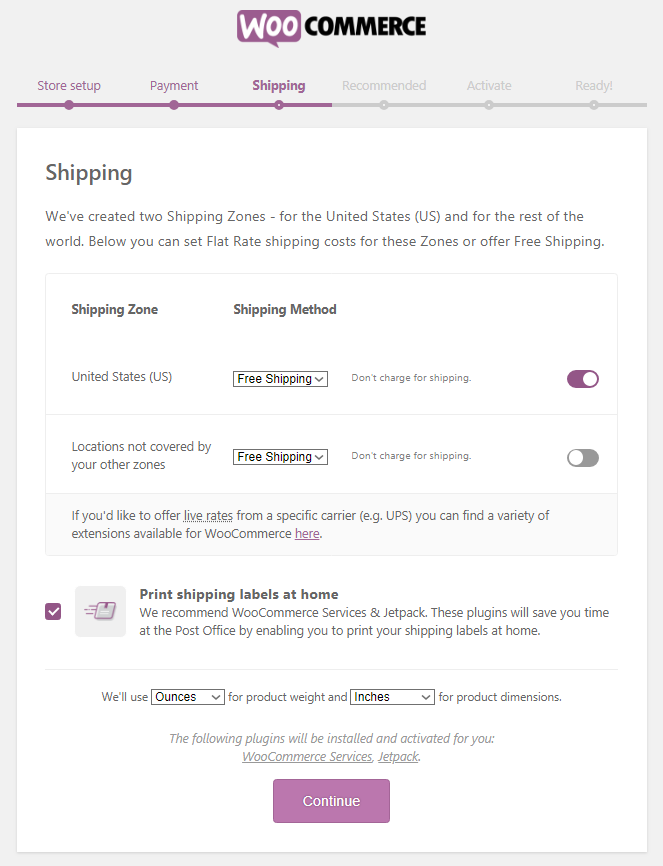
Once you fill in all these fields, you can either review the settings, go to the dashboard, or start adding new products.
Step 4: Installing an E-Commerce Compatible Theme
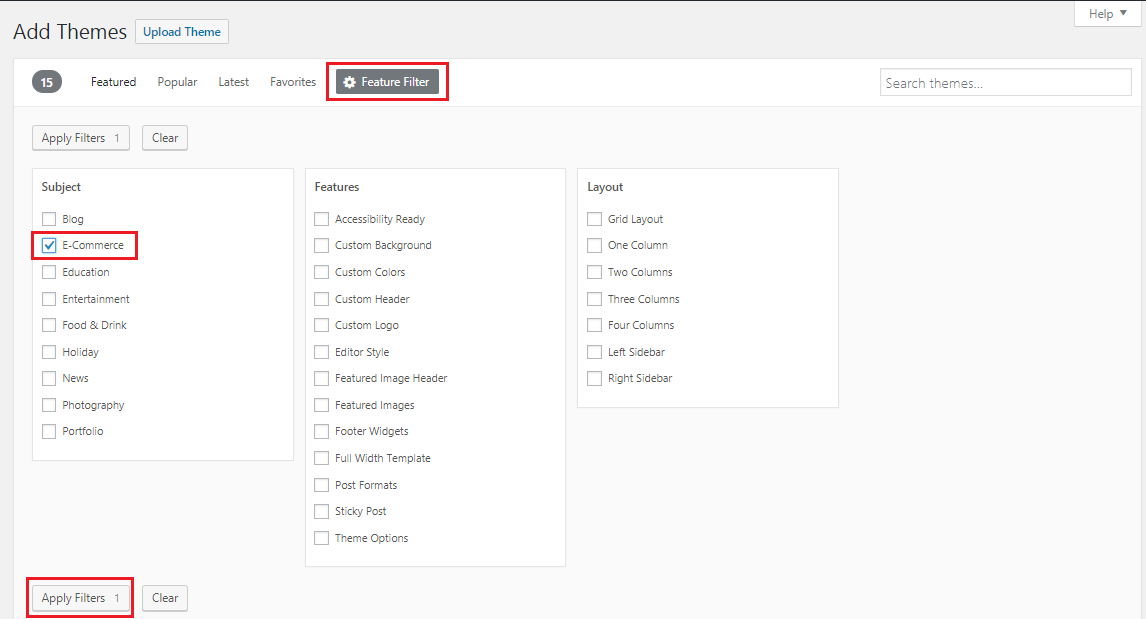
The next step in setting up your e-commerce website is to install a WordPress theme. Go to Appearance —> Themes in the left pane. On the Themes page, click on Add New.
On the Add Themes page, click on Features Filter and in the Subjects column, tick E-Commerce and click on Apply Filters to view e-commerce compatible themes.
But there’s a caveat here. The theme you choose needs to be compatible with WooCommerce as well. There are many premium WooCommerce themes that work well with WooCommerce and are easy to set up. These premium themes will incur some investment in the beginning, but they are well worth the price as you don’t have to sweat the details later.
Once you install the theme, you can customize the store’s look and interface as per your requirements.
Step 5: Adding New Products
To show that your store is functional, you need to add products to your website. Let’s now look at how you can add new products. The process to add a new product is quite intuitive and self-explanatory, but we will run through it once anyway.
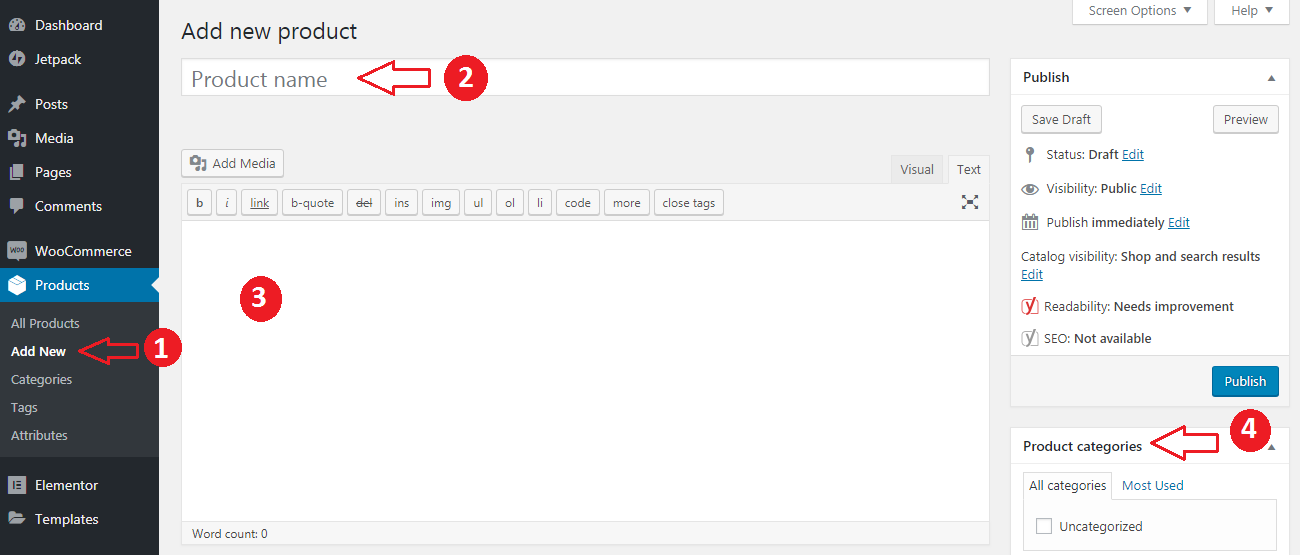
- In the left pane, go to Products —> Add New, and you will see a window like this:
- In the Product name field, type in the name of the product
- In the text area, add the product description. Be as comprehensive and persuasive in your product description copy
- If you sell multiple types of products, choose a category from the Product categories section. You can also add new categories on the go
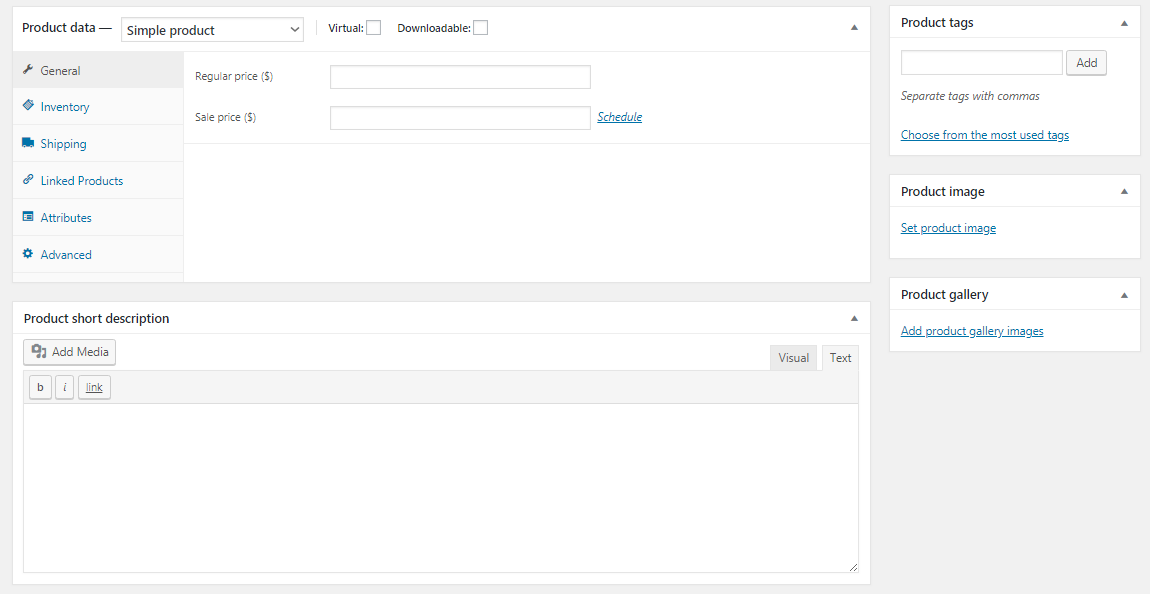
- In the product data section, you can select the product type (We will look at each of them in a later section), its price, inventory details, shipping details (weight and product dimensions), upsell and cross-sell product details, etc.

- Add basic information about the product in the Product short description field.
- Add the showcase image of the product in the Product image section
- You can add multiple images of the product in the Product gallery section
Different Types of Products
When adding new products to your website, you can see 4 product types under the Product data tab. Let’s look at each of them in brief:
- Simple product: Standalone products with a single price and SKU. For example, each book in an online bookstore has a unique price and SKU.
- Virtual product: Intangible products that don’t require shipping, dimensions, or weight. For example, a consulting session is booked online.
- Downloadable product: Products that allow buyers to download files after payment. For example, an MP3/FLAC music album.
- Grouped product: A collection of simple products displayed together. It has no price or SKU and shows all included products on one page. For example, a keyboard and mouse are sold together.
- External/Affiliate product: Products sold on a third-party website. You provide the product link and CTA button, and shoppers are redirected to the external site.
- Variable product: Products with multiple variations, each having its own price and SKU. For example, a T-shirt is available in different sizes and colors.
Step 6: Installing Plugins
Although the combination of WordPress and WooCommerce allows you to build a functional store, you need to add a set of plugins to really take it to the next level.
A plugin is an add-on application that enhances the overall functionality of your website without having you write a single line of code.
Here are 5 plugins you must have on your e-commerce store to make it more intuitive and user-friendly:
1. Yoast SEO
Optimizing your website for search engines is one of the most crucial marketing activities for an e-commerce startup. Yoast SEO makes it simpler for you by offering a way to optimize your on-page SEO activities.
2. Yoast WooCommerce SEO Plugin
This is a premium plugin and should ideally be used in conjunction with the Yoast SEO plugin. While Yoast SEO takes care of the overall website, the Yoast WooCommerce SEO plugin will take care of the product pages, site structure, sitemap, etc.
3. Contact Form 7
Your shoppers need a way to get in touch with you. Online and telephone support are good avenues, but sometimes your customers need to be more elaborate in their approach, and therefore, they prefer contact forms. Contact Form 7 is a plugin that lets you create contact forms with a little effort. The plugin is free to use, but you can make a donation to support it.
4. HumCommerce
One of the biggest plights that e-commerce store owners face is store drop-offs. They are able to drive traffic to the website, but they are not able to convert it. Google Analytics can help you to a certain extent to understand user behavior.
HumCommerce is an effective tool to understand how your visitors navigate through your website. Its features, such as heatmaps, visitor session recordings, user flow, etc., give you an accurate understanding of the website usage. Using this data, you can make the necessary changes to skyrocket the store sales.
5. MailChimp for WordPress
An e-commerce website is as strong as its email list size. I know, it sounds corny, but it is true. A sizeable subscribers list allows you to reach out to a mass audience through just an email and without spending a single penny.
Building your email list should be an ongoing activity, and a simple way to do this is to use the MailChimp for WordPress plugin. With this plugin, you can create opt-in forms that can be seamlessly integrated with WooCommerce.
What are eCommerce Metrics?
Any quantitative, consistently described way of measuring the effectiveness of a website is called a metric.
Ecommerce metrics are standards or sets of measurements that help you to track and analyze the performance of an online store or ecommerce business.
These metrics provide insights into various aspects while operating an online store.
Now let’s discuss the most important eCommerce metrics that help track your business performance.
Top eCommerce Metrics That You Should Track
To understand your organization’s performance, we’ve brought you the following vital eCommerce metrics you need to track frequently.
Here are the top eCommerce metrics you should track:
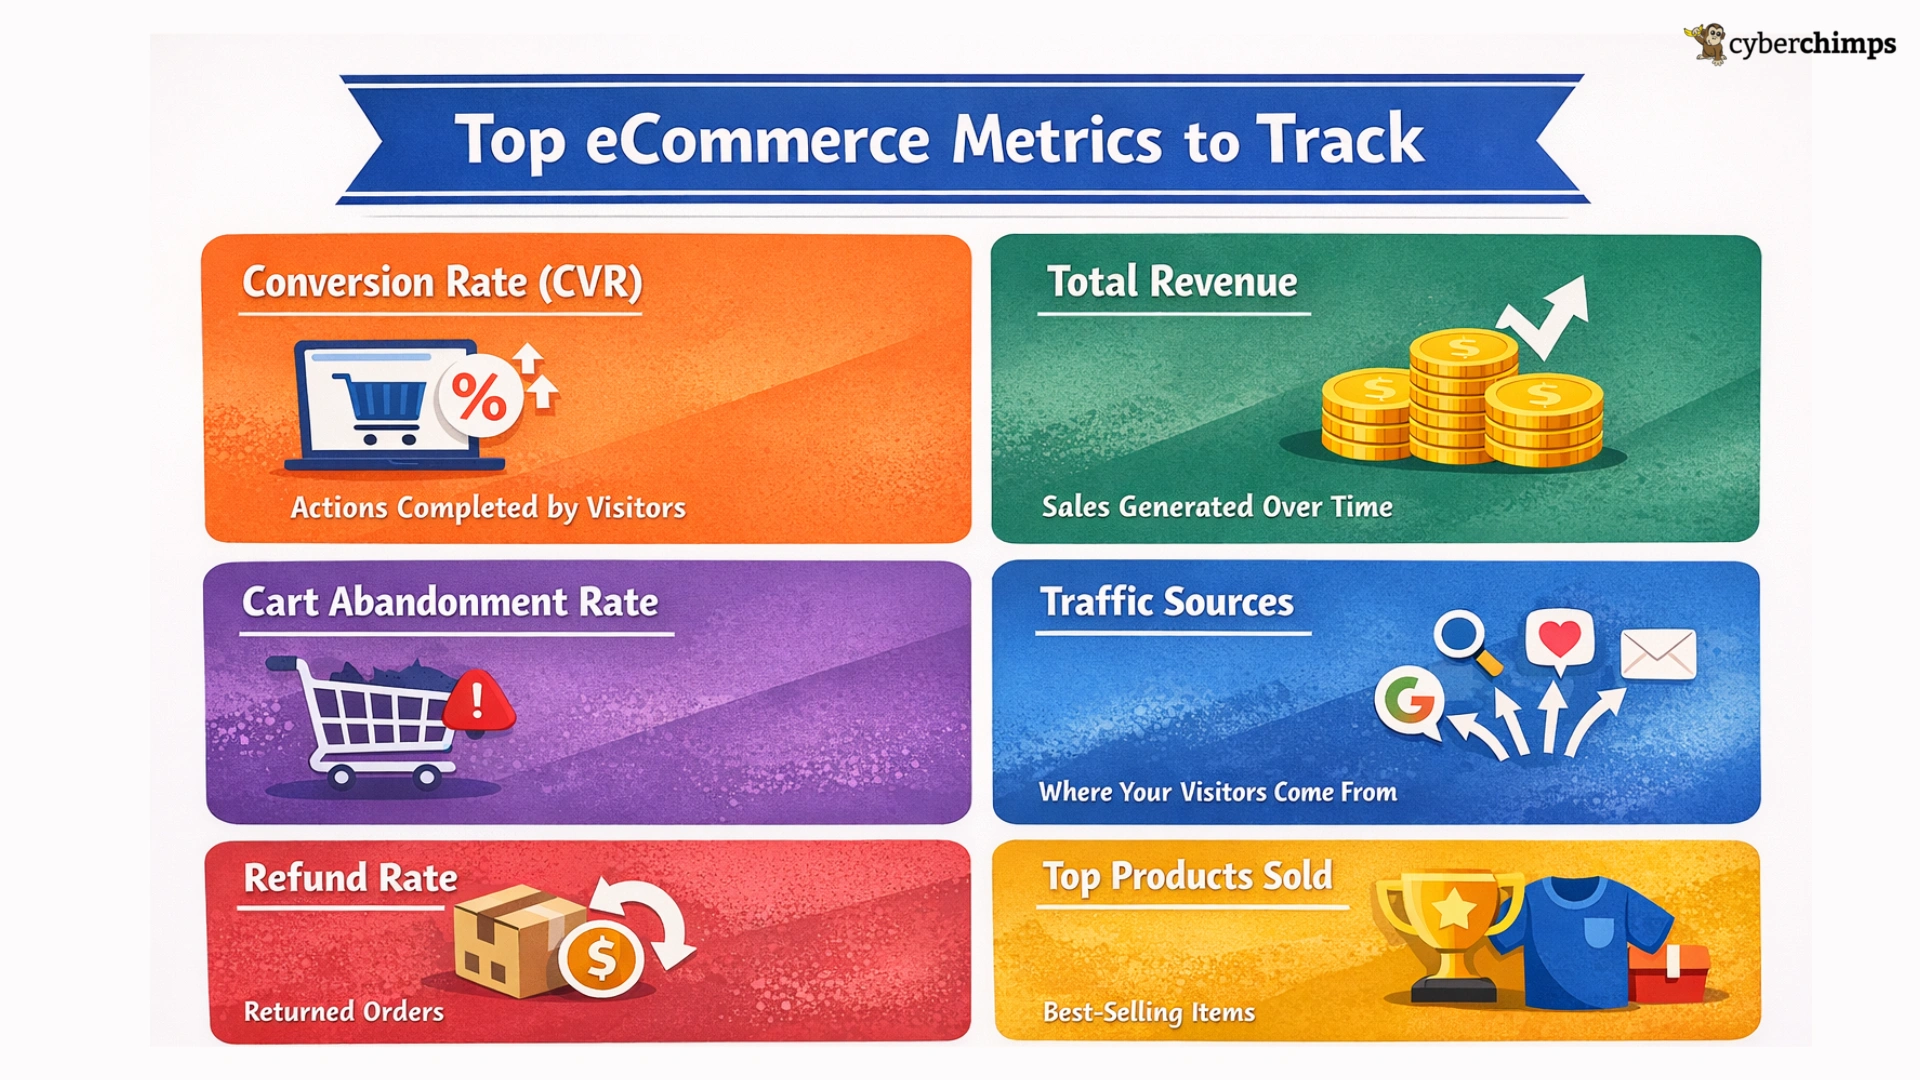
1. Conversion Rate (CVR)
The conversion rate is one of the essential metrics. It measures the percentage of customers coming to your website who complete a desired action, such as purchasing or filling out a form. CVR is the abbreviation for conversion rate.
This metric has a direct effect on the success of your online business. A higher conversion rate means higher revenue. A lower conversion rate indicates the need to improve the overall user experience or marketing strategies.
Several factors influence eCommerce conversion rates:
- Website Design and Usability: An attractive website design and user-friendly website is more likely to keep visitors engaged and encourage them to complete a purchase.
- Page Loading Speed: Slow-loading pages can result in visitors abandoning their shopping carts and moving to other websites, so site speed is also crucial.
- Product Descriptions and Image Quality: Providing accurate, detailed descriptions and high-quality images can help customers make informed purchasing decisions, reducing the likelihood of negative reviews or returns.
In addition, social proof, such as customer reviews, ratings, and testimonials, can boost customer confidence and drive conversions.
2. Total Revenue
Total revenue in ecommerce refers to the amount of money a business generates from selling goods or services over a period. You can calculate total revenue by multiplying the total units sold and the selling price per unit.
A high total revenue means the business generates many sales and is likely growing. In contrast, a low total revenue may indicate that the business needs to change its strategy to increase sales.
Total revenue also helps calculate other vital metrics such as average order value (AOV) and customer lifetime value (CLV).
3. Shopping Cart Abandonment Rate
The shopping cart abandonment rate is the percentage of customers who add items to their cart but do not purchase.
It’s a vital indicator of the effectiveness of an online store’s checkout process that can significantly impact its sales and revenue.
To calculate your shopping cart abandonment rate, divide the number of completed purchases by the number of carts created and multiply by 100.
4. Traffic Sources
Tracking your traffic sources is an integral part of eCommerce business. It can help you understand where your customers are coming from and adjust your marketing strategies accordingly.
Traffic sources include direct, organic, email, social media, and referral traffic.
To track your traffic sources, you can use plugins like Google Analytics that help monitor your website traffic and identify the sources of that traffic.
You can then use this information to adjust your marketing strategies to focus on the sources driving the most traffic.
5. Refund Rate
The refund rate refers to the customers who return a product and claim a refund.
This eCommerce metric is, in fact, the most crucial parameter that helps you to understand if your customers like the products.
When the refund rate is high, it shows that the customers are facing issues with your products. In this case, you must analyze the product thoroughly and develop reasons or solutions for making it a better experience.
To calculate your refund rate, divide the number of refunded or returned orders by the total number of orders and multiply by 100.
6. Top Products Sold
If you’re running an organization by selling multiple products, this eCommerce metric has a significant role to play.
Having an idea of which product is your bestseller can help you set up different strategies for promoting that specific product to get a wider reach.
It provides insights into the most popular products among your customers and can help your business take a crucial step in product development.
FAQ
To build an online store with WordPress, you combine WordPress with the WooCommerce plugin, which turns your site into a fully-functional eCommerce store.
No, with WordPress and WooCommerce, you can build and manage an online store without coding knowledge, using built-in tools and plugins.
Begin by purchasing a domain name and web hosting, then install WordPress. After that, install WooCommerce to set up your store’s basic structure (products, payments, shipping).
Conclusion
Kudos to you if you have made it this far in the article. It is clear that you’re serious about setting up your own online store.
WordPress and WooCommerce have made it easy to set up an e-commerce website for budding entrepreneurs.
It might seem difficult at first, but start implementing the modules outlined in the article one by one, and you will be done setting up your e-commerce store before you even know it!
If you found this article helpful, you should definitely go through the following, too.